Table of contents
- 1. Backup Where
- 1.1. Backup Where Page Overview
- 1.2. About Devices
- 1.3. Staging Area Configuration
- 1.4. Device-Specific Options
- 1.4.1. Backup to Disk Options
- 1.4.2. Backup to Tape Options
- 1.4.3. Backup to Tape Changer Options
- 1.4.4. Backup to Amazon S3 Options
Backup Where
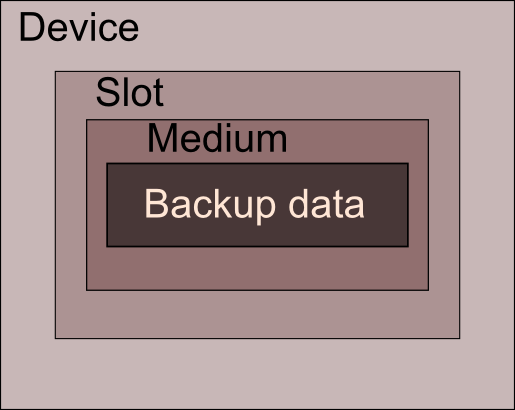
Once the backup source for a backup set has been defined on the Backup What page, a backup device must be selected on the Backup Where page. If no devices have been configured (as will be the case with a new installation), the ZMC will take you directly to the Admin Devices page to define one or more backup devices. The physical object that stores a backup is referred to in Amanda as a medium (plural backup media). Thus, Amanda organizes all backup data in the following heirarchy (note that slots only apply to a tape changer device):
Regardless of the device type, the ZMC also allows you to define an optional write-cache mechanism called a staging area or holding disk, which stores the backup image on the server's hard disk. Because backups can be written in parallel to the holding disk, backups can be completed in much smaller windows than would be possible if writing directly to the device (even if the device is a virtual tape).
Note that while a backup set can include more than one host as a backup source, there can be only one target device per backup set. If you want to send backups from different host systems to different backup media, you must create multiple backup sets to do so. The Duplicate feature of the Admin Backup sets page is useful for this. Also, once a device has been associated (or bound) to a backup set it cannot be changed (this would invalidate the restore catalog). To start sending backups from an existing backup set to a new device, duplicate the existing set and bind the resulting backup set to the new device. Note that Backup When settings will have to be manually set to match the old backup set; these settings are not duplicated.
Backup Where Page Overview
The Backup Where page is divided into two panels:
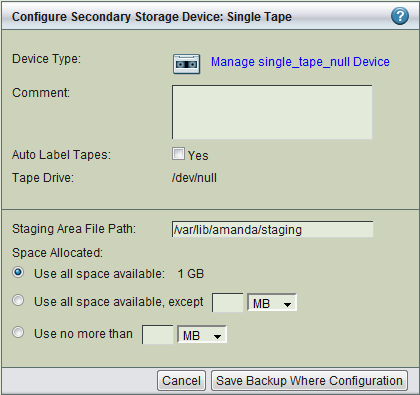
- Configure Secondary Storage (on the top) specifies the target device, showing the options that were set from the Admin Devices page (the link shown next to the device type takes you to device administration page). The screen shot shows the device settings for a single tape; if there is a different media type defined for the backup set, options appropriate to that device (or virtual device) are displayed.
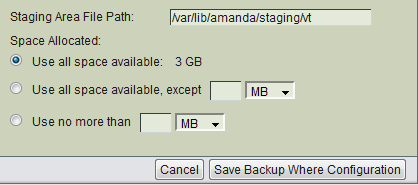
- The bottom panel specifies staging area parameters.
Important Note: After you have defined a staging area for a backup set and run some backups, those backups are dependent on that staging area for restores. If you set a different path for the staging area, backups taken from the old staging area cannot be restored through the Zmanda Management Console.
About Devices
- Device type
- A device type is selected when an Amanda device profile (configured from the Admin Devices page) is bound to the backup set; it cannot be changed from the Backup Where page. Configuration options will depend on the device type. The device-specific options are are described in more in the following sections.
- For backups to disk see Disk section.
- For backups to tape (without a changer) see Tape section. If the Media chosen is Tape, then the page allows tape labeling to be done.
- For backups to a tape changer see the Tape Changer section.
- For backups to Amazon S3 see Amazon S3 section.
Comment
Enter a descriptive comment, such as the physical location of the device or any operational notes.
Staging Area Configuration
In case of device/media failures (such as an unavailable S3 connection or running out of tapes in the changer), backups are stored in the staging area. The backup images stored in the staging area can be used for recovery and will be moved to the secondary media in next backup run if the media problem is resolved.
Important Note:
Do not attempt to back up the staging area. Use Exclude options if necessary to prevent any backup set from including a staging area for itself or any other backup set.
Device-Specific Options
Different options are displayed in the top pane depending on the device type:
Backup to Disk Options
Using hard disk space for a backup provides a number of important benefits:
- The backup window (in other words, the total time to execute backups) can be reduced.
- Files can be conveniently restored directly from the disk image, speeding the restore process.
When the Device Type is disk, the following virtual tape (vtape) options are presented.
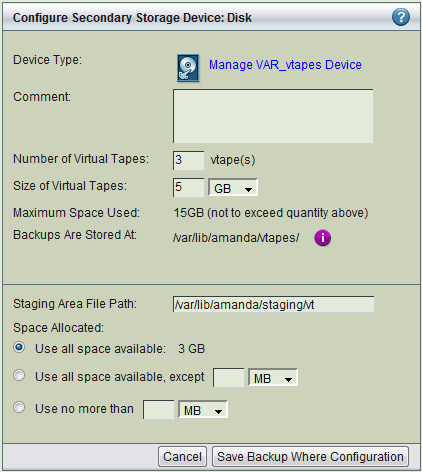
- Number of Virtual Tapes
Determines the number of backup images that should be retained. After writing to the Number of Virtual Tapes, the tapes will get overwritten. The value should be greater than the Backup Cycle value specified in Backup When page.
For example, assuming each full backup is expected to occupy a single virtual tape, and you want to store 5 full backups on the disk, you will need a minimum of 5 virtual tapes. Add two vtapes for a margin of estimation error for a total of 7 vtapes.
- Size of Virtual Tapes
-
Specify the disk space that should be used for a single backup run. It should be more than the full backup size of the largest backup object/DLE in the backup set.
- Backups are stored at:
- The directory where the backup images will be stored, specified when the device was configured in the Admin Devices page.
- Tip: The amount of free space available to hold backup images is an important consideration for fast retrieval of data. To ensure effective restore capabilities, set aside sufficient disk space to hold more than one full Backup Set worth of Data. Just how many full Backup Sets you should keep on disk depends on the data and your sites requirements for quick restores of accidentally deleted data. The more full backup images stored, the longer the retention of accidentally deleted files. Start with enough space to hold three full Backup Set images and adjust this number as experience dictates.
- Tip: Because there is no value in creating a backup of a backup on the same media, Zmanda recommends that the drive that holds the vtapes be excluded from the Backup Set that points to the vtapes.
Backup to Tape Options
You can backup up to either single-tape drive or a tape changer, using industry-standard tools to create the archive that are independent of the proprietary formats of any particular tape drive manufacturer. The only requirement is that the operating system can read and write to the device, and the amandabackup user has the permissions to do so.
When Tape is the media type for the Backup Set, the following options are displayed:
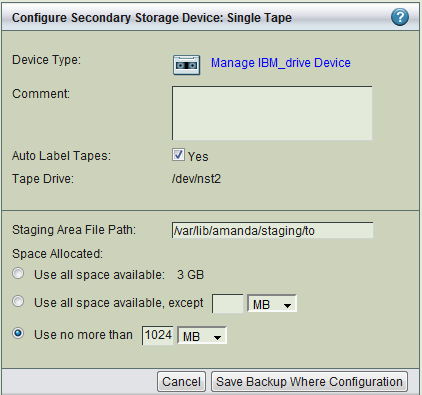
- Auto Label Tapes
- ZMC uses tape labels to manage volumes. Any new tape found in the course of backing up a backup set is given a label. Used tapes cannot be labeled automatically. If it finds that a tape that is already labeled as belonging to another backup set, it will not write to that tape. To overwrite tape labels or label used tapes, please use label tab in Backup Media page.
-
- The 'Auto Label Tapes' radio button allows users to specify whether they want to use the facility of automatic labeling of tapes. The default value is set to No, meaning ZMC expects you to use the Backup Media page to pre-label the tapes you intended to use for backup.
- Enable Bar Code Reader
- Choose Yes if a Bar Code reader should be used for this backup set, Otherwise choose No. This option can be changed at any time and will take effect when the next backup run is executed. This feature should be enabled to display bar codes in the Backup Media page and adding bar codes to the volume labels automatically.
- Starting/Last Slot Number
- For Starting Slot Number, enter the first slot where backup tapes will be labeled. For Last Slot Number enter the last slot where backup tapes will reside in the changer.
Backup to Tape Changer Options
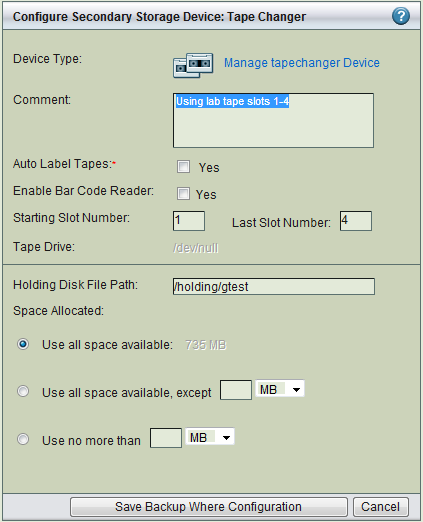
Auto Label Tapes
The 'Auto Label Tapes' radio button allows users to specify whether they want to use the facility of automatic labeling of tapes. The default value is set to No, meaning ZMC expects you to use the Backup Media page to pre-label the tapes you intended to use for backup.
Backup to Amazon S3 Options
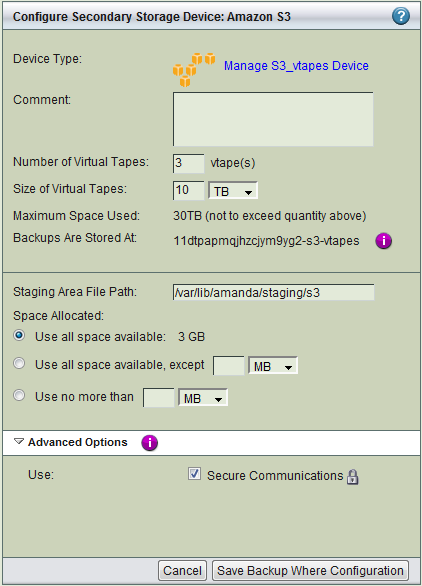
- Number of Virtual Tapes
-
Determines the number of backup images that should be retained. After writing to the Number of Virtual Tapes, the tapes will get overwritten. The value should be greater than the Backup Cycle value specified in Backup When page.
For example, assuming each full backup is expected to occupy a single virtual tape, and you want to store 5 full backups on the disk, you will need a minimum of 5 virtual tapes. Add two vtapes for a margin of estimation error for a total of 7 vtapes.
- Size of Virtual Tapes
- Specify the size of the virtual tapes, which will be dependent on how many are to be use for a backup cycle, and how large each backup will be. It should be more than the full backup size of the largest backup object/DLE in the backup set. The value is specified in megabytes.
- Backups are stored at:
The S3 bucket where the backup images will be stored, which was generated when the device was configured in the Admin Devices page.