Common Internet Filesystem (CIFS) Backup and Restore
Common Internet Filesystem (CIFS) is useful for backing up file system types (such as Netware servers) that that do not support Amanda Enterprise clients, or for when you do not wish to install the Zmanda client software on the system being backed up.
Like other file system backups, CIFS-based backup lets you specify files to exclude, and whether to enable encryption and compression. CIFS-based backup does not support backing up extended file attributes.
CIFS restores are performed as RAW restores. The file system is restored to a tar file in the destination directory specified on the Restore Where page. You can then manually extract files from the tar
Using mount.cifs versus smbclient to Back Up CIFS Shares
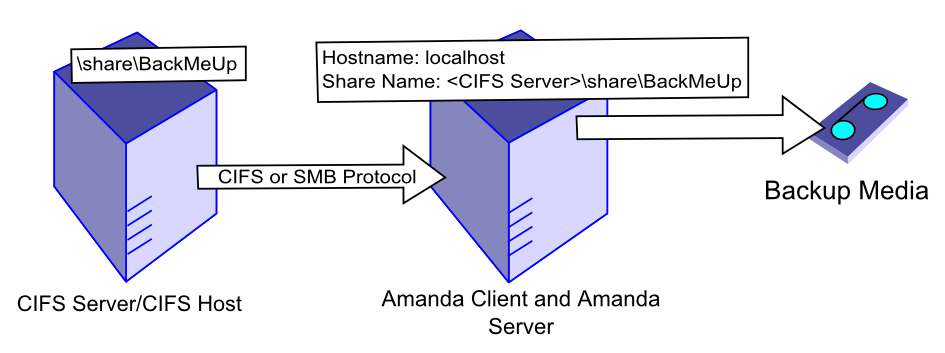
There are two methods that Amanda can use to access a CIFs share for backup (neither of these require a Zmanda client on the machine being backed up):
- Add the share to mount.cifs on the Amanda client (which may be the same as the Amanda server). You can then back up the mounted share as a standard UNIX/Linux file system. This backup method cannot be used for performing incremental backups because amgtar backup of cifs shares do not retain inode numbers across mounts.
- Use smbclient (part of the Samba client package) to access the share using the System Message Block (SMB) protocol. This allows backup of Windows 3.1, Windows NT and older versions of Windows. As it uses the archive bit to identify files for incremental backup, other backup or archive programs that modify the archive bit will affect incremental backups (some files may not get backed up during incremental backups).
Newer versions of Windows support CIFS and can be backed up using the mount.cifs method. The mount.cifs method is the only supported method for backing up Linux and Solaris 10 platforms.
Neither method will back up NTFS extended file attributes or Windows applications. The Zmanda Windows Client (ZWC) is required to back up Windows applications and extended file attributes. To use the ZWC for backup, choose a Backup Type of Windows on the Backup What page.
Advantages and Disadvantages of mount.cifs/smbclient-based backup compared to installing the Zmanda Windows Client
Suppose you need to back up a number of Windows machine(s) over the WAN. The AEE server and Windows machines are connected through a firewall. You could install the AEE client on the AAE server, adding firewall exceptions for the client machines you wish to back up. Restores are then performed to a directory on the AEE client (which is already shared via Samba).
Advantages
- Windows file system can be backed up without having to install Zmanda software on the client.
- Once the firewall ports have been opened for Samba, no further firewall ports need to be opened.
- Simplified restore process.
Disadvantages
- Restore to original along with Windows ACL and Attributes is not possible.
Requirements for CIFS Server Backup and Restore
These instructions assume you have already installed and licensed the Amanda Enterprise server.
- Create a backup set that you intend to use for backing up the CIFS share as described here.
- Amanda assumes that the smbclient executable binary file is located on the Amanda client in /usr/bin. If smbclient is not in /usr/bin, create a symbolic link to the file in that directory. Alternatively, you can edit
/etc/zmanda/zmc_aee/zmc_user_dumptypes
on the Amanda server (make a safe backup copy before doing so). Find the application tool definition for app_amsamba_user and add the following property:
property "SMBCLIENT-PATH" "Path_to_smbclient_Binary"
Path_to_smbclient_Binary
The path to the smbclient binary executable file.
Example entry:
property "SMBCLIENT-PATH" "/usr/csw/bin"
Configuring CIFS Backups from the ZMC Backup What Page
On the Backup What page you are prompted to select what type of object you want to back up. Choose CIFS/, and the following options are displayed:
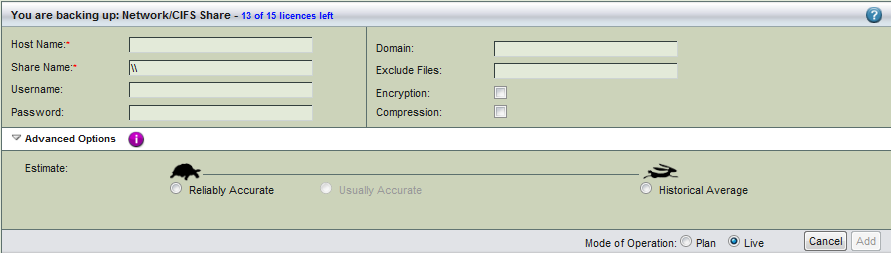
- Host Name
-
The host name of Amanda client. For performance reasons, Zmanda recommends using the Amanda server itself (specified as localhost) as the Amanda client. Using the fully qualified domain name (FQDN) is recommended. smbclient (part of the Samba client package) must be installed on the Amanda client. If a remote client is used (in other words, a client other than localhost) you must create the /etc/amanda/backup_set_name/cifs_network_shares file on the Amanda client. You can copy this file from the version that the ZMC creates on the server: /etc/amanda/backup_set_name/cifs_network_shares.client_name
The file must be owned and readable by the Amanda backup user, and it must contain an entry for CIFS share being backed up in form \\Host_IP\backup_set_name root%password. For example:
\\192.168.15.127\aee_backup root%boot12
- Share Name
-
The CIFS share represented in \\CIFSserver\share\sub-directory format (in other words, the Univeral Naming Convention - UNC format). The CIFSserver can be specified by host name or IP address. This is the share backed up by Amanda as a backup object.
.png)
Recommended CIFS Backup Configuration - Username
-
User name used to access the SMB share.
- Password
- Password required for the user; please note the password is displayed in plain text as it is typed.
- Domain
-
CIFS server domain name. To find it, open a command window on the Windows client and enter the following command:
smbclient -L IP_of_Amanda_client -U smb_usernamefrom the Windows client. You will be prompted for the SMB password.
- Exclude Files
- Lists files to be excluded from the backup. Regular expressions are allowed to specify multiple files and paths.
- Encryption & Compression Options
- Lists Encryption and Compression choices. Encryption and Compression of data is described here.
- Advanced Options - Estimate
- If estimates are taking too long and the databases being backed up do not change in size that much from backup to backup, use the the Historical Average calculated from previous backups. In most cases, the default of Reliably Accurate is appropriate.
After you have set the options, click the Add button to add the CIFS share to the backup set. Click Apply Plan to Server to commit the changes; you can then configure the backup set just as you would any other by setting the options on Backup Where, Backup How, and Backup When, etc.