Oracle Backup
When Amanda is configured and licensed for Oracle backup, Amanda uses Oracle's RMAN and native OS tools to back up Oracle data files, control files, and archive logs.
Preparing the Oracle Server for Backup and Restore
These instructions assume you have already installed and licensed the Amanda server and the Oracle server being backed up as described here. There are a number of additional steps:
- Make sure that the version of RMAN running matches the version of the Oracle server being backed up.
- On the client you must manually add entries to /etc/amanda/amanda-client.conf that define the Oracle SIDs being backed up, as well as the "SID List" that will be used to select the databases in the ZMC Backup What page. The syntax for entries is as follows:
- property "SID_list_name-BACKUP-DIRECTORY" "Backup_path_on_client"
- property "SID_list_name-ORACLE-SIDS" "SID_1" "[SID_2" ...]
- property "SID-ORACLE-HOME" "Oracle_Home_Directory_for_SID"
- property "SID-ORACLE-PATH" "Oracle_Path_for_SID"
- property "SID-ORACLE-CONNECT-STRING" "Connect_string_for_SID"
- The following describes the variable portions of the entries:
- SID_list_name
- When you select Linux-Oracle as the Backup Type from the Backup What page, you are prompted to enter an SID List Name rather than a Disk. The amanda-client.conf entries described here allow you to define which SIDs belong to that list and how they will be backed up.
- Backup_path_on_client
- Specify where to store the backup image on the client. Backup images are removed after transfer to the Amanda server. This directory requires sufficient space to hold a full backup of all SIDs selected for backup. The default location is /var/lib/amanda.
- The Oracle user (the OS user through which Oracle is run) must be the owner of the client backup directory (the backup_path_on_client defined above).
The Oracle user's group should have read/write permissions on this backup directory, and the amandabackup user on the client OS should belong to the same group. For example, If Oracle is run by user oracle and the default group of the oracle user is oinstall, then the amandabackup user should be a member of the oinstall group. To ensure this, follow these steps (substituting your local oracle GID for oinstall if necessary):
- Login to the Oracle server as root and type the following command:
# id oracle uid=501(oracle) gid=501(oinstall) groups=501(oinstall),502(dba)
Determine the gid, and modify group membership for the amandabackup user:
# usermod -G oinstall amandabackup
Confirm that the change was made correctly:
# id amandabackup uid=502(amandabackup) gid=6(disk) groups=6(disk),501(oinstall)
- SID
- The Oracle System Identifier is used to specify which databases to back up.
- Oracle_Home_Directory_for_SID
- Specify the home directory for the database to back up.
- Oracle_Path_for_SID
- The path to Oracle binaries for the SID being backed up.
- Connect_string_for_SID
- The connection string to access the SID being backed up, in the standard Oracle connect string format. For example (some of the parameters shown are optional; others are omitted):
- user_name/password_of_target_database@target_database_host_name:port_#/service_name
- The following example defines an SID list named Oracle, which includes SIDs orcl and zmanda. The local temporary directory to store backup images for the SIDs is /tmp/zmanda. Note that SID orclsol will not be selected for backup because it is not defined in the SID list:
For further details on Oracle parameters, see man amoracle and man amrman; these man pages are installed on the server along with Amanda Enterprise Edition.
Lastly, make sure that all Oracle databases selected for backup are mounted and open. For restore, the databases should be mounted but closed.
Configuring Oracle Backups from the ZMC Backup What Page
After you have prepared the client by editing the amanda-client.conf file as described above, you can use the ZMC to schedule Oracle backups. On the Backup What page you are prompted to select what type of object you want to back up. Choose Linux Oracle or Solaris Oracle, and the following options are displayed:
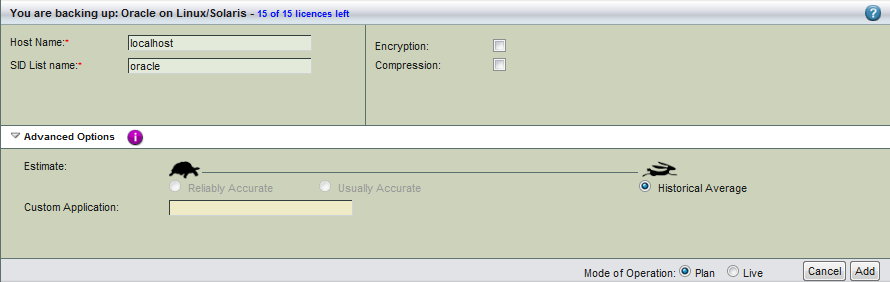
- Host Name
- The name of the machine running the Oracle database server you intend to back up.
- SID List Name
- The SID List Name for the group of SIDs being backed up. This is defined in the amanda-client.conf file as described in the section above.
- Encryption and Compression
- Select these options as desired. They are described in more detail here.
- Advanced Options
- For details on the Estimate option, see the Backup Where Advanced Options help. The Custom Application field allows you to select rman (rather than the default oracle) as the program used to back up the Oracle database. Using rman as the backup application leverages the RMAN media management interface to send Oracle data directly to backup media, thus giving better control of the backup process, and eliminating the need for disk space to store the backup on the Oracle server. Note that backups produced using rman will require additional restoration steps as described here.
Click Add. Depending on the Mode of Operation (Planned or Live) the changes are added to the list and/or actually made live on the server; you can then configure the backup set just as you would any other by setting the options on Backup Where, Backup How, and Backup When, etc.
Performing Oracle Restores using the Zmanda Management Console and RMAN
Restoration involves two main steps:
- Use the Zmanda Management Console to restore the files to a directory you create on the client machine for that purpose.
- Use the Oracle RMAN utility to apply the restored backup to the Oracle server.
Using the ZMC to restore to a directory on the client
- Log on to the client machine where the Oracle databases are being restored. Create a directory on a filesystem that has sufficient space to store the restored files.
- In the newly-created directory, use the ZMC Restore pages to restore the Oracle backup, specifying the directory you created in the previous step as the Destination Directory on the Restore Where page.
Restore procedure if rman was used for backup
If rman was specified as the Custom Application on the Backup What page, you will need to make RMAN aware of the Amanda media before a restore can be completed. After restoring from the ZMC as described above, follow these steps:
- Change to the destination directory where ZMC has extracted the Oracle amrman backup. Using the amarchiver utility, list the archived files. For example:
amarchiver --list --file localhost.orcl.20090302074716.1
- After verifying the list, extract the files with a command such as:
amarchiver --extract --file localhost.orcl.20090302074716.1
- Login to the Oracle server as a user who owns the oracle instance.
- Connect to database via RMAN.
- From the RMAN prompt, configure SBT_TAPE to use Zmanda's AMMML utility. For example:
CONFIGURE CHANNEL DEVICE TYPE 'SBT_TAPE' PARMS
'SBT_LIBRARY=/usr/lib/amanda/application/ammml.so,ENV=(BACKUP_DIR=/home/oracle)';
- CATALOG all extracted backup pieces:
CATALOG DEVICE TYPE 'SBT_TAPE' BACKUPPIECE '/u02/oracle_bkp_test/restore/5kk8v9pt_1_1';
or a RUN {} block can be written for the same. For example:
RUN
{
CATALOG DEVICE TYPE 'SBT_TAPE' BACKUPPIECE
'/home/oracle_restore/4skbv4ic_1_1.17';
CATALOG DEVICE TYPE 'SBT_TAPE' BACKUPPIECE
'/home/oracle_restore/4tkbv4k2_1_1.17';
CATALOG DEVICE TYPE 'SBT_TAPE' BACKUPPIECE
'/home/oracle_restore/4ukbv4ln_1_1.17';
CATALOG DEVICE TYPE 'SBT_TAPE' BACKUPPIECE
'/home/oracle_restore/4vkbv4nc_1_1.17';
CATALOG DEVICE TYPE 'SBT_TAPE' BACKUPPIECE
'/home/oracle_restore/50kbv4p2_1_1.17';
CATALOG DEVICE TYPE 'SBT_TAPE' BACKUPPIECE
'/home/oracle_restore/51kbv4qn_1_1.17';
CATALOG DEVICE TYPE 'SBT_TAPE' BACKUPPIECE
'/home/oracle_restore/52kbv4sc_1_1.17';
CATALOG DEVICE TYPE 'SBT_TAPE' BACKUPPIECE
'/home/oracle_restore/53kbv4u2_1_1.17';
CATALOG DEVICE TYPE 'SBT_TAPE' BACKUPPIECE
'/home/oracle_restore/54kbv4vo_1_1.17';
CATALOG DEVICE TYPE 'SBT_TAPE' BACKUPPIECE
'/home/oracle_restore/55kbv57j_1_1.17';
CATALOG DEVICE TYPE 'SBT_TAPE' BACKUPPIECE
'/home/oracle_restore/56kbv581_1_1.17';
}
- RMAN is now configured to complete the Oracle recovery as described below.
Using RMAN to complete the restore
Before running RMAN, you may want to read "Using RMAN for Restores" from the Oracle documentation.
Start RMAN for all the databases being restored. These databases should be mounted but closed. Execute RMAN RESTORE commands to restore from the directory created above. Execute the RMAN RECOVER command after the RESTORE is successful. When you are done, you can delete the directory you created for the amrecover restore.