PostgreSQL Server Backup
When the Amanda Enterprise Edition is configured and licensed for PostgreSQL backup, the ZMC allows you to select a PostgreSQL server to back up. When a PostgreSQL server is backed up, all databases are included in the backup, which can be either full (using a copy of the data directory) or incremental (which depends on PosgreSQL write-ahead logs, referred to as WALs).
Note that backing up PostgreSQL tablespaces is not supported.
Requirements for PostgreSQL Server Backup and Restore
These instructions assume you have already installed and licensed the Amanda Enterprise server and the PostgreSQL server being backed up. There are a number of additional requirements:
- Make sure that your versions of Postgres conform to the tested platforms listed on the Zmanda Network Supported Platforms page.
- The amanda-client.conf file on the server must be manually edited to include the following lines:
property "PG-DATADIR" "Path_to_PSQL_Data_Dir"
property "PG-ARCHIVEDIR" "Path_to_PSQL_Archive_Dir"
property "PG-HOST" "hostname_or_directory_of_socket_file"
property "PG-TMP" "Path_to_temp_dir"
property "PSQL-PATH" "Path_to_PSQL_Binary"
property "PG-USER" "PostgreSQL_username"
property "PG-PASSFILE" "Path_to_PSQL_Password_File"
property "PG-PASSWORD" "PSQL_Password"
Path_to_PSQL_Data_Dir
The path to the PostgreSQL data directory.
Path_to_PSQL_Archive_Dir
The path to the PostgreSQL archive directory. Specify the path where the archive command copies files and stores them between full backup runs. This directory must be writeable by the user that runs PostgreSQL processes.
Specify the location that has been configured in PostgreSQL for continuous Write-ahead Log (WAL) archiving (i.e. the archive_command in the PostgreSQL config file). Note that write-ahead logging must be enabled. WAL is not enabled by default in either PostgreSQL or PostgreSQL Plus.
hostname_or_directory_of_socket_file
Specify the hostname (localhost if that is appropriate) or the directory where a socket file is located. Entries beginning with / are interpreted as a socket file directory (just the directory, for example, /tmp, not /tmp/.s.PGSQL.5432). If a directory is used, the PostgreSQL server and Amanda backup server must reside on the same machine.
Path_to_temp_dir
Temporary directory. Must have enough capacity to temporarily store the backup data for a full backup of the PostgreSQL server. Defaults to /tmp.
Path_to_PSQL_Binary
The path to the PostgreSQL psql binary executable file.
PostgreSQL_username
The PostgreSQL database user to connect as, which must have superuser privileges.
Path_to_PSQL_Password_File
Passfile to use for Postgre 8.1 or greater. See http://www.postgresql.org/docs/8.1/static/libpq-pgpass.html
PSQL_Password
The PostgreSQL password (deprecated in PostgreSQL 8.1).
For further details on application properties, see amanda-client.conf(5). For specific details on PostgreSQL agent properties, see ampgsql(8).
Configuring PostgreSQL Server Backups from the ZMC Backup What Page
Create a dedicated backup set for each PostreSQL server you intend to back up. On the Backup What page you are prompted to select what type of object you want to back up. Choose PostgreSQL, and the following options are displayed:
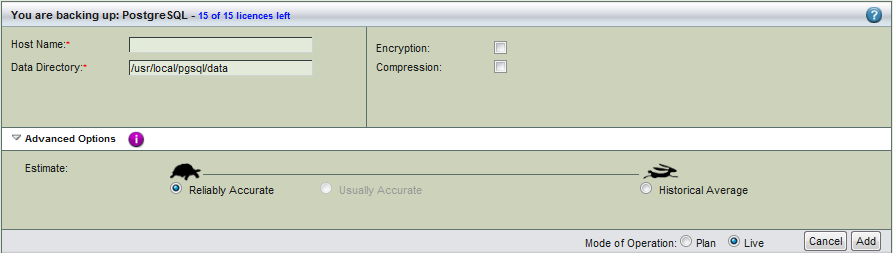
- Host Name
- The name of the machine running the PostgreSQL server you intend to back up.
- Data Directory
- The path to the PostgreSQL data directory.
- Encryption and Compression
- Set these options as desired. They are described in more detail here.
- Advanced Options - Estimate
- If estimates are taking too long and the databases being backed up do not change in size that much from backup to backup, use the the Historical Average calculated from previous backups. In most cases, the default of Reliably Accurate is appropriate.
After you have set the options, click the Add button to add the PostgreSQL server to the backup set. Click Apply Plan to Server to commit the changes; you can then configure the backup set just as you would any other by setting the options on Backup Where, Backup How, and Backup When, etc.
Configuring PostgreSQL Server Restores from the ZMC Restore What Page
Make sure that PostgreSQL is installed in the same location as when the backup was run. The databases and logs file locations should also match the original configuration.
Either select the desired PostgreSQL backup from one of the Reports, or go directly to the Restore Where page and select a PostgreSQL backup for restore. The Explore button lets you select from the most recent backups.
When you have selected the backup object that includes the PostgreSQL server for restore, the Restore What page displays the following options:
.png)
Select the databases you wish to restore. Choose All for a full restore up to the last backup. Click Next Step when you are done, and the Restore Where options are displayed:
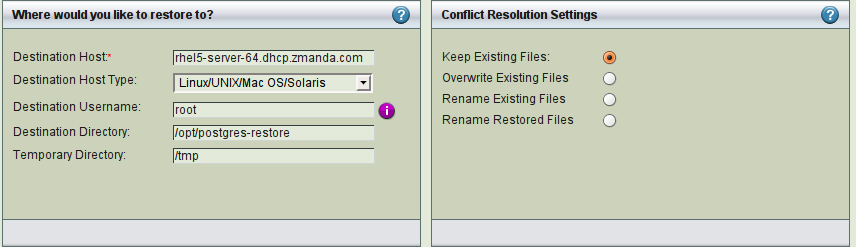
Set the restore options as desired. Note that the Destination Directory and Temporary Directory much each have enough space to hold the selected backup data. If you choose the same directory for both, make sure that the selected directory has enough space to hold two copies of the backup image. Do not specify specify the PostgreSQL data/cluster directory as a destination, especially if PostgreSQL is running.
After reviewing the entries, click Restore to start the restore process.
When the ZMC restore process is complete, the restored files will reside on the specified host and destination directory. Completing the restore is accomplished outside the ZMC using the host operating system and PostgreSQL as described below.
Completing the PostgreSQL Database Point-in-time Recovery
- If the PostGreSQL server is running, stop it using the following command:
# /etc/init.d/pgplus_83 stop
- As a safeguard, copy the entire cluster data directory and any tablespaces from the stopped production server to a temporary location. This will require enough disk space on the system to hold two copies of the existing database. If sufficient disk space is unavailable, you should at the very least make a copy of everything in the pg_xlog subdirectory of the cluster data directory. pg_xlog may contain logs that were not archived before the system was stopped. For example:
# cp -rp /opt/PostgresPlus/8.3/data/ /opt/postgres-restore/
-- or --
# cp -rp /opt/PostgresPlus/8.3/data/pg_xlog/ /opt/postgres-restore/
- Remove all files and subdirectories under the cluster data directory, and under the root directories of any relevant tablespaces.
# rm -rf /opt/PostgresPlus/8.3/data/*
- Using the restored database dump, restore the database files by unpacking the earliest (i.e. the base or level 0) backup image:
# cd /opt/postgres-restore/
# ls
data zmc_restore_20090327141718 zmc_restore_20090329142314
# tar xfv zmc_restore_20090327141718
archive_dir.tar
data_dir.tar
The earliest backup image (zmc_restore_20090327141718 in this case) may be removed if space is needed.
--Unpack the data_dir.tar file to the database data directory
# cd /opt/PostgresPlus/8.3/data/
# tar xf /opt/postgres-restore/data_dir.tar
-- Ensure that all files and directories are restored with the correct ownership (i.e., owned by the database system user, not by root) and permissions. If you are using tablespaces, verify that the symbolic links in pg_tblspc/ were correctly restored.
-- unpack "archive_dir.tar" file and all remaining incremental PostgreSQL backup images to a temporary archive directory owned by the database system user
# mkdir /opt/postgres-restore/archive/
# chown postgres:postgres /opt/postgres-restore/archive/
# cd /opt/postgres-restore/archive/
# tar xf /opt/postgres-restore/archive_dir.tar
# tar xf /opt/postgres-restore/zmc_restore_20090329142314
# ls
00000002000000000000004A 00000002000000000000004B
-- The data_dir.tar, archive_dir.tar and all Postgres backup images may all be deleted now if desired.
- Purge any logs in pg_xlog/; these are from the backup dump and unlikely to be current. If you create a copy of pg_xlog/ in step 2, create it now, taking care to ensure that it is a symbolic link if the original was configured as such. If manually creating the pg_xlog/ directory, you must also recreate the subdirectory pg_xlog/archive_status/ as well.
# rm /opt/PostgresPlus/8.3/data/pg_xlog/*
# rm /opt/PostgresPlus/8.3/data/pg_xlog/archive_status/*
- If you copied the unarchived WAL segment files as described in step 2, copy them now to pg_xlog/. You should copy them rather move them in case there is a problem that requires you to start over.
# rm -rf /opt/PostgresPlus/8.3/data/pg_xlog
# cp -rp /opt/postgres-restore/data/pg_xlog/ /opt/PostgresPlus/8.3/data/
- Create the file recovery.conf in the cluster data directory (see the PostgreSQL documentation's Recovery Settings). It is also prudent to modify pg_hba.conf to prevent users from connecting successful recovery has been verified.
- Edit /opt/PostgresPlus/8.3/data/recovery.conf to include (at minimum) the following entry, which must specify the path to your temporary archive directory:
restore_command = 'cp /opt/postgres-restore/archive/%f "%p"'
- Change the ownership and permissions on this file so that it is owned by the database system user, and that it is only readable and writable by this user
# chown postgres:postgres /opt/PostgresPlus/8.3/data/recovery.conf
# chmod 0600 /opt/PostgresPlus/8.3/data/recovery.conf
- Start the server, which will automatically begin recovering from the archived WAL files. If the recovery stops on an error, restart the server to continue the recovery after you have corrected the error condition. Upon successful completion of the recovery, the server renames recovery.conf to recovery.done and then starts normal database operations.
# /etc/init.d/pgplus_83 start
- Inspect the the database to verify that it is in the expected point in time. If it is not recovered to the correct point, return to step 1. After the recovery is verified, allow end-user access by restoring pg_hba.conf to to its production state. Further details on PostgreSQL Point-in-time recovery are available in the PostgreSQL documentation; see Recovering using a Continuous Archive Backup.
Troubleshooting
[Need troubleshooting steps]
Troubleshooting Restores