VMware ESX Server Backup
Amanda Enterprise 3.0 allows you to backup VMware ESX images to various media supported by Amanda. The backups are performed in an application consistent manner. These backups can be used for restoration of guest VMs running on the ESX server and can be restored to alternate ESX server.
Guest VM files will have to restored from the restored VMs. Zmanda recommends using Amanda client to backup files from guest VM if file level backup of VMs is needed.
Amanda Enterprise VMware ESX application supports licensed versions of VMware ESX 3.5 and 4 (Vsphere 4).
Requirements for VMware Server Backup and Restore
- All Amanda Enterprise 3.0 and Zmanda Management Console patches (including dependencies) must be installed on the Amanda server.
- Make sure Amanda Enterprise server and Zmanda Management Console is functional before installing and configuring VMware ESX application.
- Amanda VMware ESX application agent performs the backup from the Amanda server. No additional Amanda clients are required in the process.
- Amanda server must be running Linux distribution listed on the Zmanda Network Supported Platforms page.
- Following packages must be installed on the Amanda server for Amanda VMware ESX application:
VMware vSphere VCLI (VMware-vSphere-CLI)
VMware vSphere VDDK (VMware-vix-disklib)
VMWare-ovftool (required for recovery)
perl-Crypt-SSLeay
perl-URI
fuse
fuse-libs
curl
All packages mentioned above are required by VMware commands. They can be installed using yum or yast or apt-get tools available in the Linux distribution. The actual names of the packages might be different in different distributions. VMware VCLI and VMware VDDK packages are available in the Vmware web site. VMware VDDK package is also available in Zmanda Network.
Following example commands shows how to install some of these packages on RHEL 5 distribution.
# yum install fuse-libs fuse perl-Crypt-SSLeay perl-URI curl
# <extract from VMware-vix-disklib tar archive>
# <extract from VMware-vSphere-CLI tar archive>
# ./vmware-vix-disklib-distrib/vmware-install.pl
# ./vmware-vsphere-cli-distrib/vmware-install.pl
# <install the Amanda VMware application>
On Ubuntu 8.04, fuse and fuse-libs packages are installed as part of default installation. The package names on Ubuntu are fuse-utils and libfuse2. In Ubuntu distribution, perl-Crypt-SSLeay package is called libcrypt-ssleay-perl and perl-URI is called liburi-perl. The following command line will help in installation of dependencies on Ubuntu distribution
# apt-get install fuse-utils libfuse2 libcrypt-ssleay-perl liburi-perl curl
- Amanda VMware ESX application requires temporary space to store the backup images on the Amanda server (See Installation section below). The space required should be equal to the size of the guest VM images being backed up. This space requirement is temporary and required only during backup. The amandabackup user should be able to read and write to this directory on the Amanda server.
- For good backup performance, there should be no snapshots of the Guest VM being backed up.
Installation
Amanda ESX VMware application must be installed on the Amanda server. Download the ESX VMware application from the Zmanda Network and extract the tar ball. Run the install.sh script.
If the VMware commands (vmware-cmd, vmkfs, vmware-diskmanager, snapshotmanager.pl) are not installed in default locations (/usr/lib/vmware-cli for VCLI and /usr/bin for vmware-diskmanager), you will have to modify /etc/zmanda/zmc_aee/zmc_user_dumptypes to fix the application properties (VCLI-PATH, VCLI-BIN-PATH and VDDK-BIN_PATH).
It is also important to change TEMP-WORKING-DIR location in the /etc/zmanda/zmc_aee/zmc_user_dumptypes file for zmc_vmware_userapp. This location should have sufficient disk space to hold one full backup of ESX VMware images.
Configuring VMware Server Backups
Configuring VMware guest VM backups requires steps in both Zmanda Management Console and some manual steps.
- Zmanda recommends creation of separate backup set for backing up guest VM images.
- Create a backup set for the guest VMs in the Zmanda Management Console.
- Configure Backup devices in the Admin Devices page and bind them to the backup set in the Backup Where page.
- Configure minimal staging area in the Backup Where page. Using staging area for the VMware ESX backups does not add any value.
- Change the Data Timeout value in the Backup How page for the backup set. The value should be increased to at least 7200 seconds. Increasing the value does not impact the backup window (time to complete the backup).
.png)
- Modify the /etc/amanda/<backup set name>/disklist.conf to add backup entries for each guest VM that has to be backed up. See below for the line that must be added. The ip address of the ESX server and guest VM will have to be changed for your configuration (it has to be done in couple of places). You can use ESX host name instead of ip address of the ESX server. The Guest VM name must be the name of the VM folder on the data storage (may not be the name that appears on Vsphere client). You can have multiple entries in the file.
localhost "\\\\<ip address of the ESX server>\\<guest VM name>" "\\\\<ip address of the ESX server>\\<guest VM name>" {
      comment "Base dumptype for VMWare ESXi virtual machine"
      zmc_global_base
      zmc_bsdtcp_auth
      estimate    server
      compress    server best
      encrypt none
      property        "zmc_version"   "3"
      property        "zmc_type"      "vmware"
      property        "zmc_amanda_app"        "vmware"
      zmc_vmware_app
}
Please make sure you do not edit using Backup What page on the Zmanda Management Console for this backup set.
- Create the ESX authentication file in /etc/amanda/<backup set name>/esxipass . This file should have the ip address for the ESX server, user name and password for the root user. This should be readable only by amandabackup user. If you do not want to use root user, you can create a role with appropriate privileges for backup and assign it to a user and use the user name. See Creating ESX Backup User section for more details.
An example esxipass file is shown below:
//esx4.company.com root%root_password
esx4.company.com is the IP address or the name of the ESX server whose guest VMs are being backed up by the backup set. root is the user on the ESX server used for the backup operations and password for the user is root_password. The password must not be encrypted.
- Before scheduling backups, it is important to verify the VMware ESX application configuration. Run the amcheck command to verify the configuration.
$ amcheck -c <backup set name>
Please resolve any configuration errors found.
Scheduling backups of VMware Server
You can schedule backups using Zmanda Management Console Backup When page or run immediate backups for the backup set from the Backup Activate page.
The status of the backup are shown in the Monitor page. Backup reports will be available under the Report tab in the Zmanda Management Console.
Amanda ESX Server application supports only full backups (level 0 backups).
Performing VMware Server Restores using ZMC
Zmanda Management Console restores the files to the Amanda server. The VMware files will have to be extracted and manually transferred to the ESX server to complete the recovery.
The Restore What page configuration is similar to all other applications. In the Restore Where page, Select Destination Host as localhost and Destination Directory as the location to restore in the Amanda server. The directory must have sufficient disk space to store restored images. Conflict Resolution options are not supported for this application.
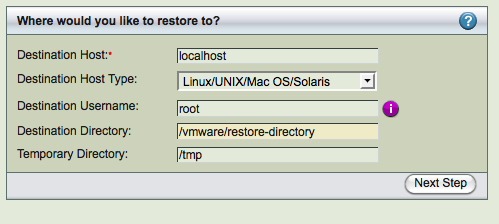
After reviewing the entries, click Restore to start the restore process.
When the ZMC restore process is complete, the restored files will reside on the specified host and destination directory. Use the following steps to complete the VM recovery on the ESX server.
- In the destination directory, there will be single file named zmc_restore_<number> restored.
- Run the following command to extract the files in the archive. The tar must be GNU tar.
# dd if=zmc_restore_<number> bs=512 skip=1 | tar xv
- These VMX and VMDK files will have to converted to OVF format. ESX server supports import of OVF files. To convert the files into OVF, use ovftool. The ovftool is available from VMware. Run the tool and provide vmx file as parameter as shown below. The ovf file will be generated.
# /opt/vmware/ovftool/ovftool <vmx file name> <ovf file name>
Copy the contents of the directory to the ESX server and import it using Vsphere console.
Alternatively, you can convert and copy it to ESX host in a single step.
# /opt/vmware/ovftool/ovftool -ds=<datastore> <Name of vmx file that has to be copied> vi://<user name>@<ESX host>/
Another alternative is to use VMware VCenter Converter to convert and transport restored VM image to the target ESX server.
Performing VMware Server Restores/Recovery using command line
This section describes how to use Amanda recovery command amrecover to perform ESX guest VM recovery. This procedure can be used to restore guest VM to the original ESX server (not to a different ESX server). These steps can be used instead of the procedure described in the previous section.
- Run amrecover command on the Amanda server as root user. You will need to provide the backup set name as a parameter. The values for options -t and -s will not change.
# amrecover -C <backup set name> -t localhost -s localhost
- Set the host to localhost and the disk to DLE name that was used in the backup set configuration. The DLE name will have //<ip address of the ESX server/<name of the guest VM>. The setdisk parameter must match the name (include escape characters) that was specified in the disklist.conf configuration file.
amrecover> sethost localhost
200 Dump host set to localhost.
amrecover> setdisk //192.168.1.2/rhel4-32
200 Disk set to //192.168.1.2/rhel4-32
- You list the files in the backup using ls command. Add all the files to be restored and run extract command to restore the files.
amrecover> ls 2010-03-03-17-22-35 rhel4-32.vmx
2010-03-03-17-22-35 rhel4-32.vmdk
2010-03-03-17-22-35 .
amrecover> add *
Added file /rhel4-32.vmx
Added file /rhel4-32.vmdk
amrecover> extract
- The VMDKs will be restored to the original ESX server and the datastore. The name of the restored VM will be <original vm name>_restored_<timestamp of restoration>.
Creating ESX Backup User
Using VMware Vsphere client, create a backup user role.
- Select View > Administration > Roles
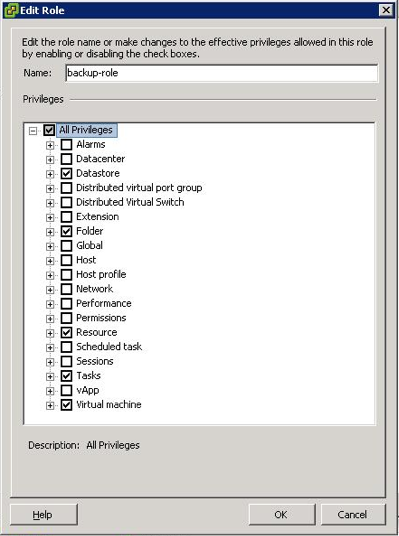
- Select Add Role. Select an unique name for the role. For example: backup-role
- Select the list of privileges for this role as shown below and click OK to save the role configuration.
.png)
After creating the role, assign the role to specific user that can be used for VMware backups.
- Using VMware Vsphere Client, Log in to the ESX server.
- Select the host in the inventory and click on the Permissions tab.
- Select the user name and use the right-click menu to select Properties.
- Assign the backup role to this user.