Table of contents
- 1.
Amanda Enterprise Edition Linux Client is a certified Amanda network backup software, tested and supported by Zmanda. This document has been prepared in conjunction with the Amanda Enterprise Edition Linux client 3.6 release.
Amanda Enterprise Edition Linux client packages are available for the following distributions from the Zmanda network:
Red Hat Enterprise CentOS Fedora Oracle Enterprise Linux Debian Ubuntu SLES Open Suse
Please see supported platforms matrix for exact versions of above distributions that are supported by 3.6 release.
This document confers about the Amanda Enterprise Edition Linux client installation, configuration and verification procedures.
- 1.1. Installation
- 2.
Amanda Enterprise Edition Linux client packages are available from the Zmanda network download page.
There are two packages - Amanda Enterprise Backup Client package and Amanda Enterprise Extensions Client package. Both packages are necessary.
- 2.1.1. Pre-installation checklist
- 3.
Following packages should be installed on the client GNU tar (version 1.15.1 or greater, except Red Hat/CentOS/Oracle Enterprise Linux), which supports version 1.14 or greater) xinetd ssh server perl (version 5.8.0 or greater) - required only on the client Schily tar (star 1.5a74 or greater) if extended attributes for file systems are being backed up. For selective restoration of files, star 1.5a85 or greater is required. Libraries (32bit libraries for 32bit Amanda client packages and 64bit libraries for 64bit packages) that are required are: libcurl3 readline glib2 termcap
These packages are installed by default on most Linux distributions. If you need to add them, you can use yum, apt-get, or yast. Packages can be obtained from the distribution media or from a distribution repository (run either as root):
#yum install package_name
or
#apt-get install package_name
or
#yast -i package_name
In the case of yast on SLES, you can also use the YaST Online Update (YOU) to install the new package and to keep the SLES distribution updated (which is recommended).
- 3.1.1. Client installation
- 4.
Amanda client installation must be performed as super user (in other words, the root user).
Download the Amanda Enterprise Edition 3.6 Linux client package from the Zmanda network download page. There are two packages - amanda-enterprise-backup-client and amanda-enterprise-extensions-client. Both packages are required. Install the packages (amanda-enterprise-backup-client followed by amanda-enterprise-extensions-client) o Use rpm or dpkg command if you are installing client binaries for Ubuntu1204, Ubuntu1210, Ubuntu1304, Ubuntu1404, Ubuntu1604, CentOS5, CentOS6, Fedora20, Fedora21, Debian6, Debian7, SUSELinux11, SUSELinux12, Solaris10, Solaris11 rpm -ivh <package name> --or-- dpkg -i <package name> o Use yum or apt-get command if you are installing client binaries for CentOS7, CentOS8, Fedora28, Fedora29, Fedora30, Fedora31, Ubuntu1604, Ubuntu1804, Ubuntu1810, Ubuntu1904, Debian 8.11, Debian9.9, Debian10.0 yum install –y ./<package name> --or-- apt-get install –y ./<package name> Amanda client configuration files are created during Amanda client package installation. The list of files that are modified during installation can be seen in the above installation command output.
The logs for Amanda client package installation can be found in /var/log/amanda/install.log. If there are installation errors, messages are logged to the /var/log/amanda/install.err file.
During the install, the amandabackup user is created, if it does not exist. Please assign a password for the amandabackup user.
- 4.1.1. Post-installation checklist
- 5. Note: These tasks must be performed as super user (the root user). Check installation log files The Amanda installation log can be found in /var/log/amanda/install.log and errors (if any) in /var/log/amanda/install.err. Make sure there are no errors in the log files. Perform the post installation steps common to all Amanda clients. These steps are required for backup and recovery operations.
- 6.
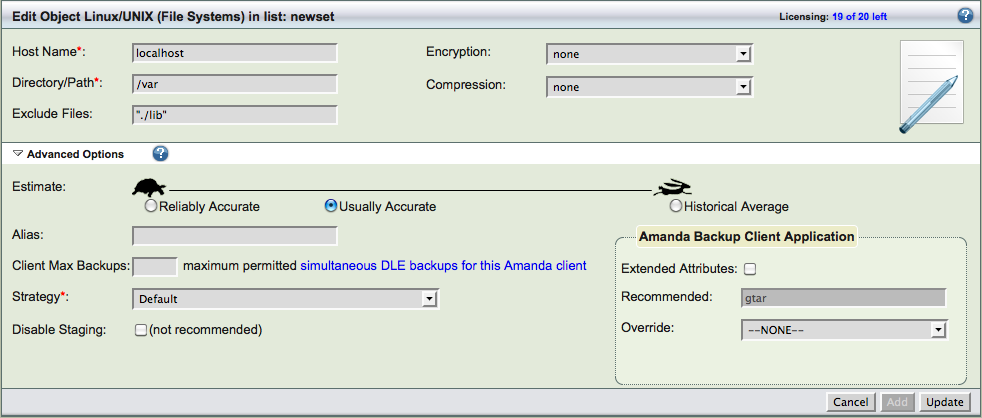
You can add the Linux file systems/folders to the backup set using Zmanda Management Console. Use the Backup What page in the Zmanda management console, to add folders from the Linux client (Select File systems from the drop-down menu). You will need to specify the Client Name, Host Name and the Directory to back up.
Amanda does not cross file system boundaries and thus each file system/partition should be entered as its own entry (separate DLE object).
You can exclude files, specify encryption and compression to be used for the directory. Special files such as device files, named pipes, sockets, etc. can cause errors from the native backup and restore tools and they should be excluded from the backup.
Linux file systems can be backed up using different Amanda methods (Amanda Backup Client Application). The default method is using gtar (GNU tar). Another method that is available is Schily tar (star).
Schily tar allows the backup of extended POSIX attributes (such as SE Linux MAC labels). This application can be selected by checking Extended Attributes under Amanda Backup Client Application. In order to select this application requires starcommand to be installed on the Amanda client.
You can specify different estimate algorithms and number of client backups that can happen in parallel (Client Max Backups). You can specify if you want only full or incremental or skip the backups of a Linux directory using Strategy field.
- 6.1.1. Restoring Linux files
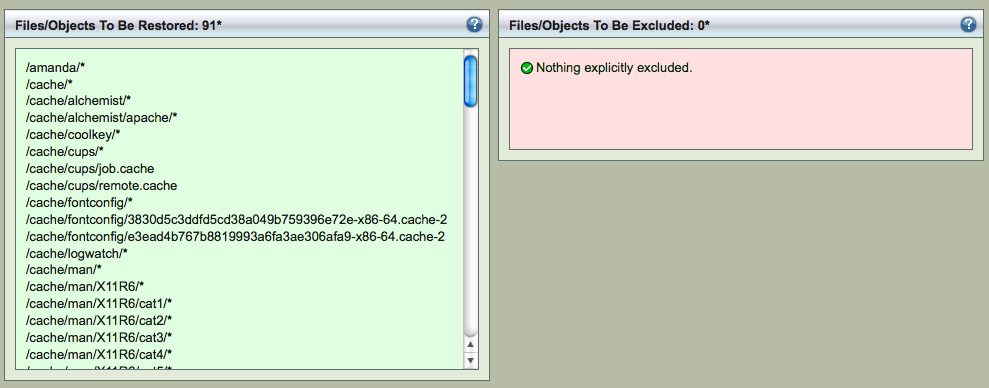
- 7. Linux file systems can be restored using Zmanda Management Console Restore pages or using amrecover command. The restoration process begins at ZMC Restore What page. You can select the Backup Date entering the value or you can click the date stamp from ZMC Report Summary page. You can select the backup image's Host Name and Directory to be restored. If the Amanda indexes are available on the server, ZMC can provide the possible values (click the Edit button). You can either Explore & Select specific files to be restored as shown above or perform Express Restore to restore all files from the image. You can select specific directories and files to be restored. If the number of files is too large, the Explore & Select might take too long to complete. You are recommended to use Express Restore. Next step is specifying the conflict resolution policies and selecting where to restore to - Restore What page. There are four possible Conflict Resolution Settings as shown above. If the Destination Directory is empty, you select Overwrite Existing files/directories as conflict resolution. You should specify the Destination Host Name, where backups will be restored to the Destination Directory. The Destination Directory and Temporary Directory must be writable by amandabackup user and must have sufficient space to hold the whole backup image. Please note that the default value of /tmp for the Temporary Directory is not recommended for production. If the Destination Host is not running Amanda client, ssh will be used for restoration. The ssh user and password will be required. The Destination User Name is used as the ssh user. After verifying the entered information, use the navigation to go to ZMC Restore Restore page. Start the Restore process by clicking Restore button. It shows the list of tapes or virtual tapes (in case of Disk and Amazon S3 backup) that will be used for restoration. It is important to have these tapes available in the tape changer. The list of files to be restored and count will also be displayed as shown below. Any files that are excluded are also displayed (Express Restore). The restore process will involve transferring the data to the Destination Host and extracting the specific files.
Amanda Enterprise Edition Linux Client is a certified Amanda network backup software, tested and supported by Zmanda. This document has been prepared in conjunction with the Amanda Enterprise Edition Linux client 3.6 release.
Amanda Enterprise Edition Linux client packages are available for the following distributions from the Zmanda network:
- Red Hat Enterprise
- CentOS
- Fedora
- Oracle Enterprise Linux
- Debian
- Ubuntu
- SLES
- Open Suse
Please see supported platforms matrix for exact versions of above distributions that are supported by 3.6 release.
This document confers about the Amanda Enterprise Edition Linux client installation, configuration and verification procedures.
Installation
Amanda Enterprise Edition Linux client packages are available from the Zmanda network download page.
There are two packages - Amanda Enterprise Backup Client package and Amanda Enterprise Extensions Client package. Both packages are necessary.
Pre-installation checklist
- Following packages should be installed on the client
- GNU tar (version 1.15.1 or greater, except Red Hat/CentOS/Oracle Enterprise Linux), which supports version 1.14 or greater)
- xinetd
- ssh server
- perl (version 5.8.0 or greater) - required only on the client
- Schily tar (star 1.5a74 or greater) if extended attributes for file systems are being backed up. For selective restoration of files, star 1.5a85 or greater is required.
-
Libraries (32bit libraries for 32bit Amanda client packages and 64bit libraries for 64bit packages) that are required are:
- libcurl3
- readline
- glib2
- termcap
- GNU tar (version 1.15.1 or greater, except Red Hat/CentOS/Oracle Enterprise Linux), which supports version 1.14 or greater)
- xinetd
- ssh server
- perl (version 5.8.0 or greater) - required only on the client
- Schily tar (star 1.5a74 or greater) if extended attributes for file systems are being backed up. For selective restoration of files, star 1.5a85 or greater is required.
Libraries (32bit libraries for 32bit Amanda client packages and 64bit libraries for 64bit packages) that are required are:
- libcurl3
- readline
- glib2
- termcap
These packages are installed by default on most Linux distributions. If you need to add them, you can use yum, apt-get, or yast. Packages can be obtained from the distribution media or from a distribution repository (run either as root):
#yum install package_name
or
#apt-get install package_name
or
#yast -i package_name
In the case of yast on SLES, you can also use the YaST Online Update (YOU) to install the new package and to keep the SLES distribution updated (which is recommended).
Client installation
- Amanda client installation must be performed as super user (in other words, the root user).
- Download the Amanda Enterprise Edition 3.6 Linux client package from the Zmanda network download page. There are two packages - amanda-enterprise-backup-client and amanda-enterprise-extensions-client. Both packages are required.
-
Install the packages (amanda-enterprise-backup-client followed by amanda-enterprise-extensions-client)
o Use rpm or dpkg command if you are installing client binaries for Ubuntu1204, Ubuntu1210, Ubuntu1304, Ubuntu1404, Ubuntu1604, CentOS5, CentOS6, Fedora20, Fedora21, Debian6, Debian7, SUSELinux11, SUSELinux12, Solaris10, Solaris11
rpm -ivh <package name>
--or--
dpkg -i <package name>
o Use yum or apt-get command if you are installing client binaries for CentOS7, CentOS8, Fedora28, Fedora29, Fedora30, Fedora31, Ubuntu1604, Ubuntu1804, Ubuntu1810, Ubuntu1904, Debian 8.11, Debian9.9, Debian10.0
yum install –y ./<package name>
--or--
apt-get install –y ./<package name>
- Amanda client configuration files are created during Amanda client package installation. The list of files that are modified during installation can be seen in the above installation command output.
- The logs for Amanda client package installation can be found in /var/log/amanda/install.log. If there are installation errors, messages are logged to the /var/log/amanda/install.err file.
- During the install, the amandabackup user is created, if it does not exist. Please assign a password for the amandabackup user.
Install the packages (amanda-enterprise-backup-client followed by amanda-enterprise-extensions-client)
o Use rpm or dpkg command if you are installing client binaries for Ubuntu1204, Ubuntu1210, Ubuntu1304, Ubuntu1404, Ubuntu1604, CentOS5, CentOS6, Fedora20, Fedora21, Debian6, Debian7, SUSELinux11, SUSELinux12, Solaris10, Solaris11
rpm -ivh <package name>
--or--
dpkg -i <package name>
o Use yum or apt-get command if you are installing client binaries for CentOS7, CentOS8, Fedora28, Fedora29, Fedora30, Fedora31, Ubuntu1604, Ubuntu1804, Ubuntu1810, Ubuntu1904, Debian 8.11, Debian9.9, Debian10.0
yum install –y ./<package name>
--or--
apt-get install –y ./<package name>
Post-installation checklist
Note: These tasks must be performed as super user (the root user).
- Check installation log files
The Amanda installation log can be found in /var/log/amanda/install.log and errors (if any) in /var/log/amanda/install.err.
Make sure there are no errors in the log files.
- Perform the post installation steps common to all Amanda clients. These steps are required for backup and recovery operations.
Adding Client file systems in ZMC
You can add the Linux file systems/folders to the backup set using Zmanda Management Console. Use the Backup What page in the Zmanda management console, to add folders from the Linux client (Select File systems from the drop-down menu). You will need to specify the Client Name, Host Name and the Directory to back up.
Amanda does not cross file system boundaries and thus each file system/partition should be entered as its own entry (separate DLE object).
You can exclude files, specify encryption and compression to be used for the directory. Special files such as device files, named pipes, sockets, etc. can cause errors from the native backup and restore tools and they should be excluded from the backup.
Linux file systems can be backed up using different Amanda methods (Amanda Backup Client Application). The default method is using gtar (GNU tar). Another method that is available is Schily tar (star).
Schily tar allows the backup of extended POSIX attributes (such as SE Linux MAC labels). This application can be selected by checking Extended Attributes under Amanda Backup Client Application. In order to select this application requires starcommand to be installed on the Amanda client.
You can specify different estimate algorithms and number of client backups that can happen in parallel (Client Max Backups). You can specify if you want only full or incremental or skip the backups of a Linux directory using Strategy field.
Restoring Linux files
Linux file systems can be restored using Zmanda Management Console Restore pages or using amrecover command.
The restoration process begins at ZMC Restore What page. You can select the Backup Date entering the value or you can click the date stamp from ZMC Report Summary page.

You can select the backup image's Host Name and Directory to be restored. If the Amanda indexes are available on the server, ZMC can provide the possible values (click the Edit button). You can either Explore & Select specific files to be restored as shown above or perform Express Restore to restore all files from the image.
You can select specific directories and files to be restored. If the number of files is too large, the Explore & Select might take too long to complete. You are recommended to use Express Restore.
Next step is specifying the conflict resolution policies and selecting where to restore to - Restore What page.
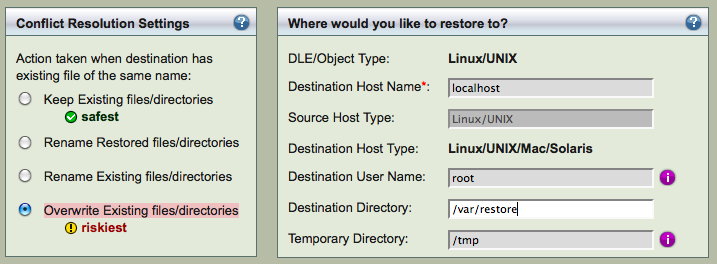
There are four possible Conflict Resolution Settings as shown above. If the Destination Directory is empty, you select Overwrite Existing files/directories as conflict resolution. You should specify the Destination Host Name, where backups will be restored to the Destination Directory. The Destination Directory and Temporary Directory must be writable by amandabackup user and must have sufficient space to hold the whole backup image. Please note that the default value of /tmp for the Temporary Directory is not recommended for production.
If the Destination Host is not running Amanda client, ssh will be used for restoration. The ssh user and password will be required. The Destination User Name is used as the ssh user.
After verifying the entered information, use the navigation to go to ZMC Restore Restore page.
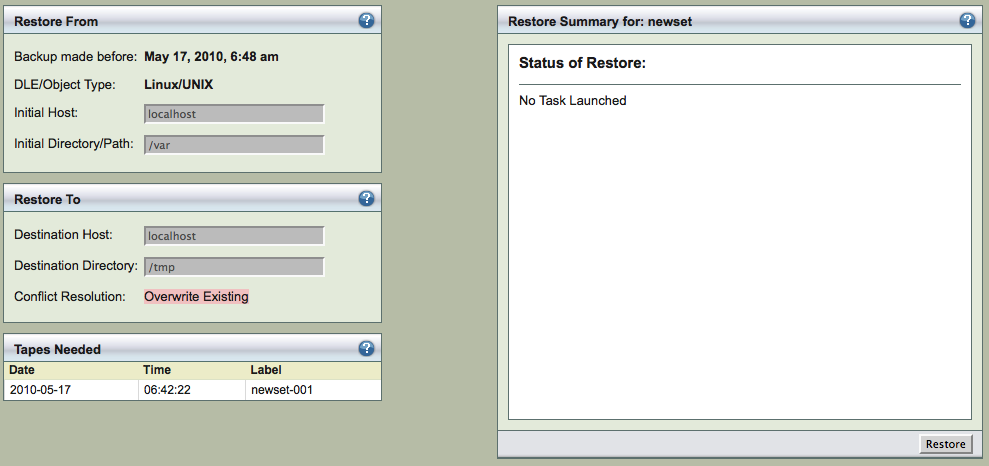
Start the Restore process by clicking Restore button. It shows the list of tapes or virtual tapes (in case of Disk and Amazon S3 backup) that will be used for restoration. It is important to have these tapes available in the tape changer. The list of files to be restored and count will also be displayed as shown below. Any files that are excluded are also displayed (Express Restore).
The restore process will involve transferring the data to the Destination Host and extracting the specific files.