Zmanda Documentation > BackupWhere
Table of contents
- 1. Introduction
- 2. Backup Where Page Overview
- 3. Backup Where Page Main Functionalities
- 4. Disk or Tape Option
- 5. Backup on Disk
- 5.1. Media Type 1
- 5.2. Tape Type 2
- 5.2.1. Name
- 5.3. Size 3
- 5.4. Drive - Valid Choices 4
- 5.5. Number of Slots 5
- 5.6. Save
- 6. Tape Backup- Introduction
- 7. Choice of Tape Device and Media
- 8. Tape GUI
- 8.1. Backup Device Settings panel
- 8.1.1. Media Type 1
- 8.1.2. Tape Type 2
- 8.1.3. Tape Size 3
- 8.1.4. Tape Drive 4
- 8.1.5. Tape Changer 5
- 8.1.6. Tape Changer Device 6
- 8.1.7. Starting Slot Number 7
- 8.1.8. Bar Code Reader 8
- 8.1.9. Cleaner Slot 9
- 8.1. Backup Device Settings panel
- 9. Save Button
- 10. Introduction to Holding Disks
BACKUP WHERE
Introduction
- On the Backup What page, users have already defined What the Backup Image will contain.
- ZMC looks at the answer to the next question 'Backup Where?' as an answer that defines the media where the Backup Image is to reside.
- The traditional media for backup was tape.
- An alternate emerging media is Hard Disk.
- ZMC allows users to choose between Tape and Hard Disk as the media where the Backup Image will reside for a particular Backup Set.
- It assumes that users will ultimately archive (i.e. transfer for long term storage purposes) the Backup Image to a tape.
- Therefore, while creating a backup Image on Hard Disk, ZMC implements a virtual tape i.e. vtape system in the background.
- The vtape system aids in the archiving of the Backup Image.
- The Holding Disk is an optional but highly recommended intermediate step that cuts down the Backup Window time irrespective of where the Backup Image will reside.
- For each Backup Set , users can individually choose the Backup Media.
- For different Hosts in the same Backup Set, users cannot choose different media.
- Create two or more Backup Sets to have different Backup Media for their constituent Hosts.
- Users can backup a particular file or a particular directory on a specific host, with media of the user's choice different from that of the rest of the host, by creating a separate Backup Set for that particular file or directory while excluding the rest of the files/directories on that Host.
Backup Where Page Overview
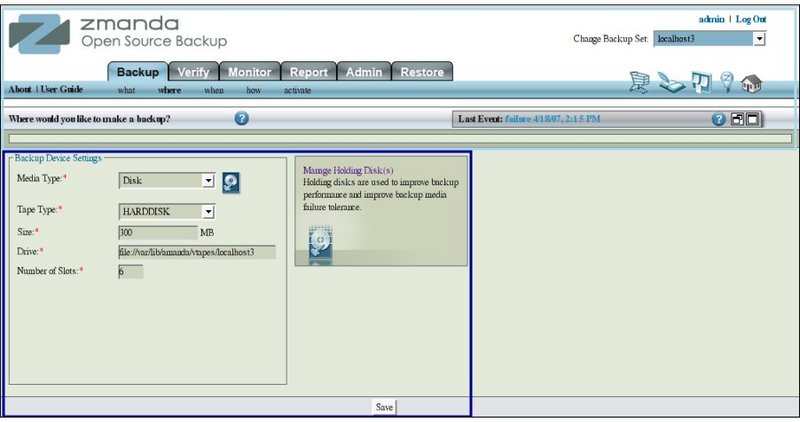
- Like all other functional pages of ZMC, the Backup Where page has its main functionality in the center, while other common-to-most-pages functionalities are grouped at the top of the page.
- Explanation of common functionalities enclosed in a light blue rectangle at top in Fig 1 can be found on the Common Functionality page.
- In the image above, the main functionality area is enclosed in a Navy Blue rectangle.
Backup Where Page Main Functionalities
- The main functionality of the Backup Where page is to allow the users to specify the media on which the Backup Image will reside.
- If the Media chosen is Tape, then the page allows tape labelling to be done.
- Additionally, under either the Disk option or the Tape option, the page leads the users to the page for managing the Holding Disk.
Disk or Tape Option
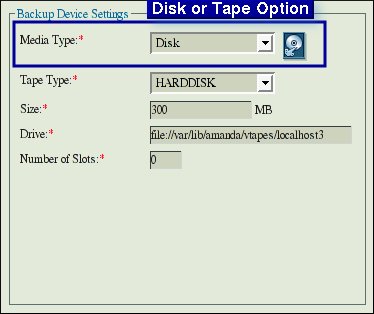
- Users can chose either of the two media from the drop down button.
- The default option is Disk.
- Choosing a Tape option changes the GUI as can be seen later on under the discussion of the Tape Option.
- After a discussion of the Disk, Tape and Holding Disk options, Tips on implications of these options are given.
Backup on Disk
- Using a Hard Disk option benefits users in two important ways:
- Backup Window time can be reduced.
- Most restores can be made directly from the images on the disk.
- The restore action is much faster from the disk than from a tape.
- The time and effort involved in mounting the correct tape is entirely avoided.
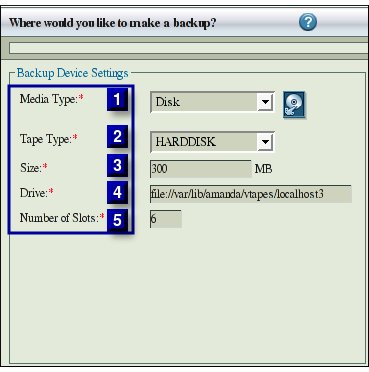
- ZMC requires you to specify five items when you want to Backup on a Disk.
- The reason why ZMC asks many questions that appear to be related to tape as a media (and may seem irrelevant to backup on a disk) is that it implements the vtape system
Media Type 1
- When the media chosen is Disk, ZMC implements a Virtual tape or vtape system during the backup.
- A vtape is an image on the hard disk that corresponds to one single physical tape that will be used for archiving the data.
- The vtape image can be written to that tape without any further processing.
- Chose Disk option in the drop down box.
Tape Type 2
- Tape Type corresponds to a unique combination of a Tape name and the size of the tape.
Name
- The choice 'New...' allows the user to name a new Tape Type.
- Usually, the name will reflect a Brand/Type of a tape.
- Many Standard Tapes (and their default sizes) are predefined in the drop down box.
Size 3
- Specify the size, in MB, of each vtape that will hold an image that will be written to an actual tape at the time of archival.
- The size will be the same as the size of an actual tape.
- It is usually defined on the assumption of 1:2 data compression ratio.
- If the data does not compress that much, alter the size to reduce it.
Drive - Valid Choices 4
- This is the directory on the Hard Disk where the Backup Images will reside.
- Its name must begin with 'file://' string.
- By default, ZMC proposes a directory 'file://ect/var/liv/vtapes' with the name of the Backup Set as post fixed to it.
- An Error Message is generated at the 'Save' stage if an invalid name has been specified.
- The drive/directory must exist as ZMC does not create it.
- The drive/directory must have have its permission set so that it is writable by amandabackup user.
- Before using the default drive generated by ZMC, users have to manually create it and ensure that it has enough space to hold the Backup Set.
- The amount of free space to hold the backup images is an important consideration in fast retrieval of data .
TIP:
For effective restore capabilities, users  need to set aside disk space sufficient to hold more than one full  Backup Set   worth of Data.
Just how many Full Backup Sets the user  should keep on the Disk depends on the data and the end-user's habits of figuring out when they have
accidentally deleted a file and want to restore it urgently.
If users  have to guess, start with space enough to hold three full  Backup Sets   and later on adjust it.
- Logically, there appears to be no advantage of creating a backup of a backup on the same media. Therefore, it is recommended that the Drive be excluded from the Backup Set.
- Users could have multiple files on the same Hard Disk (but on different directories) for different Backup Sets.
Number of Slots 5
- Number of Slots: This corresponds to the number of tapes of size specified above that will be used to hold the Backup Images.
- By default, a figure of 25 slots is displayed.
Example:
Suppose each full backup is expected to occupy 4 tapes.
The user  wants to store 3 full backups on the disk.
So, the user needs 12 slots at a minimum.
Specify 16 slots so that there is ample space before the slots get over written by a fresh backup set.
- Click the Save Button to save the choices for the Backup Set .
- ZMC will try to create the slots on the Disk. If the Drive name is valid and the path exists, slots will be created.
Save
- After the data has been entered, the Save Button in the lower center of the page should be clicked to save the data before the Manage Holding Disk Button is clicked. If the data is not saved, it will be lost when the users come back from the Holding Disk page.
Tape Backup- Introduction
- Tape has been the traditional media for backups.
- Because of its inexpensive nature and virtually unlimited length, it is the media of choice for Archiving data.
- There are good software supporting the management of an Archived library.
- Sequential nature of tape delays restore from it.
Choice of Tape Device and Media
- ZMC allows backup on a single tape or a Tape Changer.
- ZMC does not impose any restrictions from its side on user's choice of a Tape device or the tape media used with it.
- ZMC uses industry standard tools for backup.
- It is independent on any mechanisms/standards of any particular tape drive manufacturer.
- Its only requirement is that the OS should be able to read/write to the device.
- The Backup User should have the necessary permissions to do so.
Tape GUI
- When users choose Tape option in the drop down box, the GUI changes and becomes like that below.

- Below the in the right pane is the Manage Media(s) link which takes users to the Manage Media page and will be dealt with a little later.
Backup Device Settings panel
- The left hand pane contains nine items that deal with Tape Media.
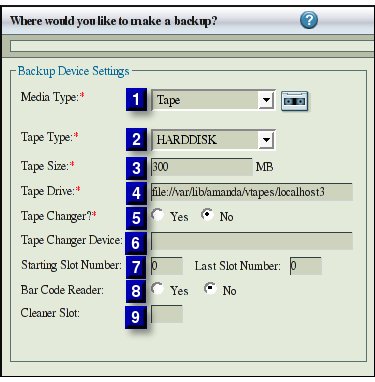
Media Type 1
- The drop box allows users to switch between Tape and Disk options.
Tape Type 2
- The combination of Tape name and its size (length in MB) together make a Tape Type.
- The drop down box shows all the existing Tape Names that users have previously defined.
- It also has a choice 'New...' clicking on which changes the GUI slightly as follows.
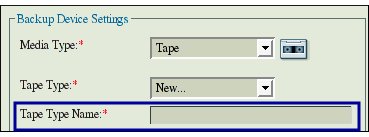
- An additional input line for entering the name opens below the Tape Type box.
- Enter a meaningful name here so that the Name itself tells the user the Tape Type.
- Enter its length in MB in the next box to complete the definition of a new Tape Type.
- Entering the name of an existing Tape Type and then altering its length, allows users to edit an existing Tape Type.
- Users have to click the Save Button in the lower middle of the page for the New /Edited definition to take effect.
- Any changes made to a dumptype (Tape name/Tape Size combination) affects all Backup Set Configurations that use that Tape Type.
Tape Size 3
- Tape size can be measured in either the length of the media or its storage capacity.
- Most manufacturers will give the length of the tape and simultaneously indicate its tolerance.
- For example, Tape Length of HP-DAT 72 is specified in meters as 170 +0.8/-2.
- Though reliable, this specification is not useful for Backup purposes.
- HP-DAT 72 capacity is also specified as
- Compressed Capacity (Assumes 2:1 compression) 72 GB
- Tape Size is used for planning purposes only.
TIP:
ZMC does not check that the media actually has the specified length.
If it runs out of tape, it reports an error.
If there is excess tape, it does not write beyond the specified length.
TIP:
Till users have experience of actual compression of the data, specify a lower Tape Size
than computed on the assumption of 2:1 compression.
Warning:
When users  change the Tape Size from the default value shown, that change gets reflected across all the Backup Set Configurations.
In different Backup sets, users  cannot have different tape sizes with the same name.
The last value that users  enter will prevail over all previous values.
Tip:
Just add a suffix to the Tape name to work around this problem.
Tape Drive 4
- Use this to specify the tape device to use.
Tape Changer 5
- Checking the box will specify that there is an attached Tape Changer.
- The prompts from the Tape Changer will then be displayed during the Backup process.
Tape Changer Device 6
- Enter a valid device name here.
- When the Backup Where configuration is saved, the Tape Changer name and its location are not validated.
Starting Slot Number 7
- This value represents the first slot where users will place the actual tapes to be labeled.
- Tape label will label the tape in the slot specified and also label tapes in the subsequent slots till the number of tapes to be labeled is reached.
   Example:
   At the instance when users want to label the tapes for a particular Backup Set,
   suppose slots 1 and 2 are busy with some other backup.
   The user  places five fresh non-labeled tapes in slots 3 to 7 respectively.
   Enter number 3 in Start Slot Number.
   Enter 5 in Number of Tapes in the Tape Labeling portion.
Bar Code Reader 8
- Chose 'Yes' option if a bar Code reader is accessible from the backup server.
- Otherwise chose 'No' option.
- The option can be changed at any time and will take effect from the next backup run.
Cleaner Slot 9
- Enter the Cleaner slot number if the Tape Changer device has such a slot.
- The entered value will take effect from the next backup run.
Save Button
After Tape device settings have been entered, press the 'Save' button for them to be incorporated in the Backup Set configuration.
Warning:
Clicking the Manage Media page link before saving a Tape based configuration will lead to a functionally blank page.
Once a Tape based configuration has been saved, Manage Media page will be fully functional.
Introduction to Holding Disks
- Holding Disks are an elegant solution to many problems of Tape backups.
- A Holding Disk is a Hard disk which temporarily stores backup data before writing it to a tape device.
- It allows parallel writes from multiple hosts in the same Backup Set during a backup window.
- Later on, it allows dumps to the tape at the full speed at which the tape drive can write.
- Even when the user has chosen 'Disk' as the Backup Media option, under most circumstances, it makes sense to specify a Holding Disk as well.
- Managing Holding Disks is discussed here