Zmanda Documentation > BackupWhere 1
Table of contents
- 1. Tape Backup
- 1.1. Tape Backup- Introduction
- 1.1.1. Choice of Tape Device and Media
- 1.1.2. Tape GUI
- 1.2. Tape Labeling
- 1.1. Tape Backup- Introduction
Tape Backup
Tape Backup- Introduction
- Tape has been the traditional media for backups.
- Because of its inexpensive nature and virtually unlimited length, it is the media of choice for Archiving data.
- There are good software supporting the management of an Archived library.
- Sequential nature of tape delays restore from it.
Choice of Tape Device and Media
- ZMC does not impose any restrictions from its side on user's choice of a Tape device or the tape media used with it.
- Its only requirement is that the OS should be able to read/write to the device.
- The Backup User should have the necessary permissions to do so.
Tape GUI
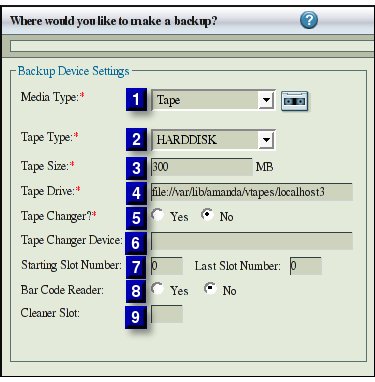
- When the user will choose Tape option in the drop down box, the screen changes and becomes like that below.

- The left hand rectangle contains five items that deal with Tape Media.
- Below the rectangle is the link 'Manage Holding Disk(s)' which takes a user to a different page that deals with Holding Disk for both Tape and Disk options.
- The right hand rectangle deals with Tape Labeling and will be dealt with a little later.
- 1.'Media Type' drop box allows a user to switch between Tape and Disk options.
- 2.'Tape Type: The combination of Tape Type name and its length in MB together make a Tape Type.
- Tape Size is used for planning purposes only.
TIP:
ZMC does not check that the media actually has the specified length.
If it runs out of tape, it reports an error.
If there is excess tape, it does not write beyond the specified length.
- The drop down box shows all the existing Tape Types that a user has defined previously.
- It also has a choice 'New...' clicking on which changes the GUI slightly as follows.
- An additional input line for entering the name opens below the Tape Type box.
- Enter a meaningful name here so that the Name itself tells the user the Tape Type.
- Enter its length in MB in the next box to complete the definition of a new Tape Type.
- Entering the name of an existing Tape Type and then altering its length, allows a user to edit an existing Tape Type.
- The user has to click the save Button in the lower middle of the page for the New /Edited definition to take effect.
- The Tape Type drop box also displays some standard Tape Types.
- Their corresponding lengths have been pre-entered for user's convenience.
- Alter them if need be.
- Any changes made to a dumptype (Tape name/Tape Size combination) affects all Backup Set Configurations that use that dumptype.
- 3.Tape Size in MB: Tape size can be measured in either the length of the media or its storage capacity.
- Most manufacturers will give the length of the tape and simultaneously indicate its tolerance.
- For example Tape Length of HP-DAT 72 is specified in meters as 170 +0.8/-2.
- Though reliable, this specification is not useful for Backup purposes.
- HP-DAT 72 capacity is also specified as
- Compressed Capacity (Assumes 2:1 compression) 72 GB
TIP:
Till the user has experience of actual compression of the data, specify a lower Tape Size
than computed on the assumption of 2:1 compression.
Warning:
When a user  changes the Tape Size from the default value shown,that change gets reflected across all the Backup Set Configurations.
In different Backup sets, a user  cannot have different tape sizes with the same name.
The last value that a user  enters will prevail over all previous values.
Tip:
Just add a suffix to Tape name to work around this problem.
- 4.Tape Drive: Use this to specify the tape device to use.
- 5 Tape Changer: Checking the box will specify that there is an attached Tape Changer.
- The prompts from the Tape Changer will then be displayed during the Backup process.
- Tape Changer Name: Enter a valid device name here.
- When the Backup Where configuration is saved, the Tape Changer name and its location are not validated.
- Starting Slot Number: This value represents the first slot where a user has placed the actual tapes to be labeled.
- Tape label will label the tape in the slot specified and also label tapes in the subsequent slots till the number of tapes to be labeled is reached.
   Example:
   At the instance when a user wants to label the tapes for a particular Backup Set,
   suppose slots 1 and 2 are busy with some other backup.
   The user  places five fresh non-labeled tapes in slots 3 to 7 respectively.
   Enter number 3 in Start Slot Number.
   Enter 5 in Number of Tapes in Tape Labeling portion.
Tape Labeling
- Tape Labels
- Tape Label is a magnetically written string at the beginning of a each fresh tape during the Tape Labeling process.
- All ZMC tapes must be pre-labeled before they are used for backup.
- This ensures that the proper tape is loaded and no tape is overwritten before the planned cycle is complete.
- Whenever ZMC finds a tape without any label, it labels it and appends the new tape to an internal list so that it will be used before reusing any other tapes.
- When a user labels multiple tapes, they will be used in the order they have been labeled.
- When ZMC finds a tape that belongs to some other Backup Set, it does not use it and gives an error message.
- ZMC will not overwrite an existing tape containing backed up data till it has first written a number of fresh tapes equivalent to the number of tapes in the planned Backup How section.
- Tape Label is a magnetically written string at the beginning of a each fresh tape during the Tape Labeling process.
- Number of Tapes
- Enter the physical number of tapes that are to be labeled during the Tape Labeling process.
- Make sure that there are that many fresh tapes.
Enter the number of tapes that are expected to be used from One Full Backup Set to start of the next Backup Set i.e. a dumpcycle.
- Enter a number on the higher side till the user gets the experience of doing the backups.
- This is because tape capacity is a big guesstimate. Also see the tip below.
- Enter a number on the higher side till the user gets the experience of doing the backups.
TIP:
 Specify about 50% higher number of slots then the tapes expected to be consumed in one full backup.
 Doing so gives the user  the possibility of having more than one full back up on the tapes before they begin to be overwritten.
- Label Tapes Button
- After the user has entered a value in the Number of Tapes box (and Start Slot Number) he can click the button to start the Labelling process.
- The user can check the status of the labeling process in the window below.
- If the user has set 'Over Write Tape(s)' option to Yes, it will apply a fresh label to a tape as if it is a new tape.
- NB: If a tape is damaged and cannot be reused for re-writing, at present the GUI in ZMC does not support marking it as 'no-reuse'. The user will have to use 'amadmin' command to do this.