Zmanda Documentation > ManageMedia
Table of contents
Warning:
Clicking the Manage Media page link before saving a Tape based configuration will lead to a
functionally blank page.
Once a Tape based configuration has been saved, Manage Media page will be fully functional.
Manage Media Introduction
- A Tape Label is method to identify a tape.
- All Amanda tapes must be labeled before they are used for backup.
- This ensures that the proper tape is loaded and no tape is overwritten before the planned cycle is complete.
- Whenever ZMC finds a tape without a label, it labels it and appends the new tape to an internal list so that it will be used before reusing any other tapes.
- When users label multiple tapes, they will be used in the order they have been labeled.
- When ZMC finds a tape that belongs to some other Backup Set, it does not use it and gives an error message.
- ZMC will not overwrite an existing tape containing backed up data till it has first written a number of fresh tapes equivalent to the number of tapes in the planned Backup How section.
Manage Media Overview
Clicking the 'Manage Media link on the Backup Where page, brings up the Manage Media page where the following data has to be entered.
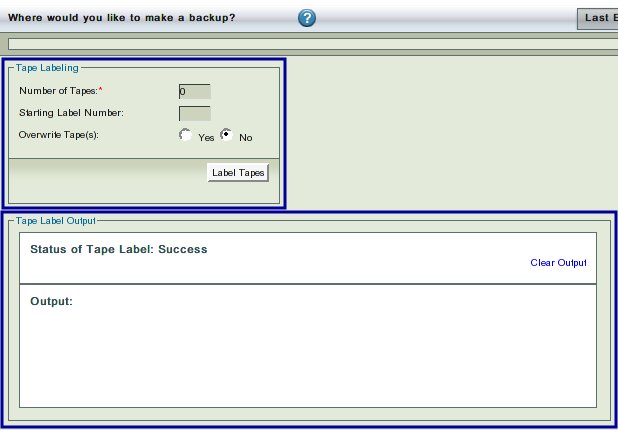
Manage Media Procedure
- The Manage Media page consists of two panels stacked vertically, one over the other.
- The top panel is Tape Labeling panel while the lower panel, Tape Label Output displays the results of tape labeling process.
Tape Labeling panel
- Users are to enter in the Tape Labeling panel the Number of Tapes (compulsory), Starting Label Number and chose whether tapes are to be overwritten or not .
- The panel also contains the Tape Label Button that initiates the labeling process.
Number of Tapes
- Enter the physical number of tapes that are to be labeled during the Tape Labeling process.
- This should be the number of tapes that are expected to be used from One Full Backup Set to the start of the next Backup Set i.e. a dumpcycle
- Make sure that there are that many fresh tapes. .
- Enter a number on the higher side till there is experience of doing the backups.
- This is because tape capacity is a big guesstimate. Also see the tip below.
TIP:
 Specify about a 50% higher number of slots then the tapes expected to be consumed in
 one full backup.
 Doing so gives the user the possibility of having more than one full back up on the tapes
 before they begin to be overwritten.
- ZMC will not validate, at this stage, the name users have entered.
- However, ZMC will enforce that the number is a positive integer before starting the Labeling process, when the Label Button is clicked.
- If it is not a positive integer, it will give an error message and not proceed with the labeling task.
Starting Label Number
- By default, the starting Label Number should be 1.
- If some tapes have already been labeled for the Backup Set and additional tapes are to be added to it, then that should be the starting number.
- If a Tape Changer has been selected on the Backup Where page and a starting slot number has been specified there, then that value is silently picked up for use here.
Overwrite Tapes Choice
- By default, ZMC will not overwrite a tape that has been already written to while labeling tapes.
- This ensures that backups are made on tapes that are fresh when the process starts.
- If the default value is changed to Yes to overwrite , then ZMC will create labels on pre-written tapes.
- When the Over Write Tape(s) option is set to Yes, ZMC will apply a fresh label to a tape as if it is a new tape.
- NB: If a tape is damaged and cannot be reused for re-writing, at present, the GUI in ZMC does not support marking it as 'no-reuse'. The user will have to use the 'amadmin' command to do this.
Label Tapes Button
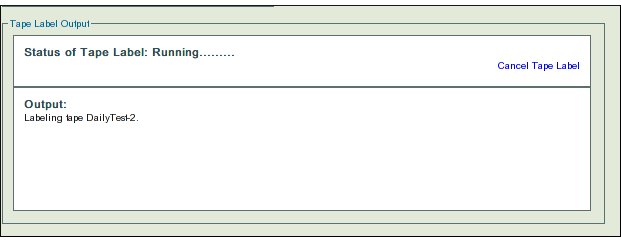
- To start the Labelling process, click the Label Tape button
- The status of the labeling process is then shown in the window below.
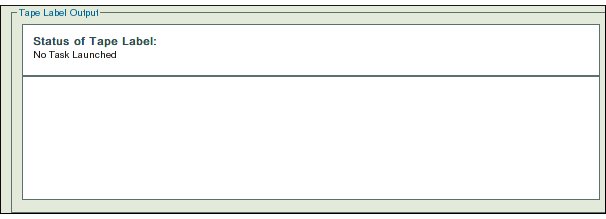
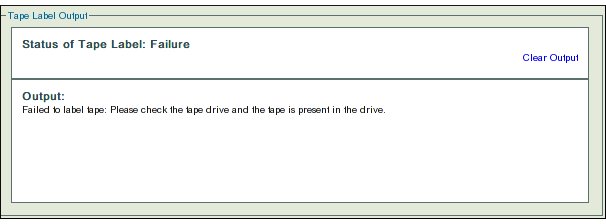
Tape Label Output panel
- When the Tape Label button has not been clicked, the panel has no hyper link in its upper right hand corner.
- While the process is running, users can cancel it by pressing the hyper link in the upper right hand corner of the panel.
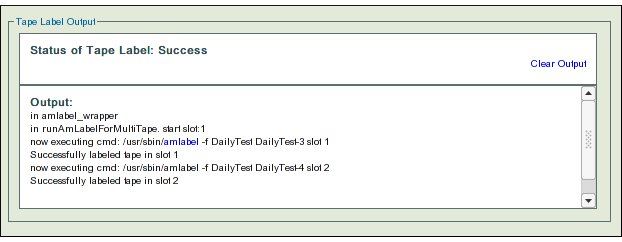
- When the Tape labeling process is completed successfully, then the image shows a success message.
- When the Tape Labeling process fails, then the panel displays a failure message.
Failure Messages
- ZMC responds with an elaborate error messages when it encounters situations like
- There is no tape present in the tape drive or drive is not ready, or is busy with some other task.
- A tape is missing in a particular slot that has been included in the range of slots for tape labeling.
- You can insert a tape at that stage and continue.
- Over-write option has not been selected, and a tape that had been a part of ZMC Backup Set is found in a slot.
- Over-write option has not been selected, and a tape that is part of the current ZMC backup set is present in a slot.
- Over-write option has not been selected, and a used tape is found in a slot.
- NB: When over-write option is selected, all found tapes are labeled without any further check.
Move to ...
- You need to use the Back arrow in the browser window to go back to the Backup Where page.