Table of contents
Configuring Devices for Backup
The Admin Devices page lets you select and configure target devices for backup. Once configured, a device is then bound to the current backup set.
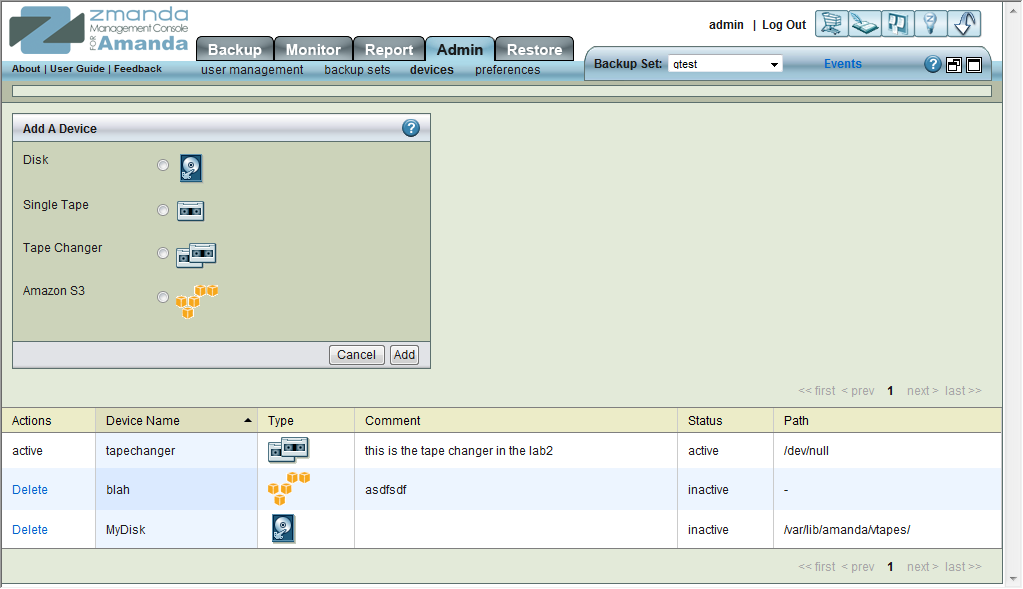
When you select a device type (Disk, Single Tape, Tape Change, Amazon S3) and click Add, the options for that device are displayed in the top pane. Devices already configured are listed in the bottom pane along with buttons that allow you to Edit, Delete, and Bind the device. When there are more items that can be listed one page, page navigation links at the bottom of the table allow you to move between pages.
All devices must have a Name; a descriptive Comment is optional. Device-specific options are described in the subsections that follow.
Disk Options
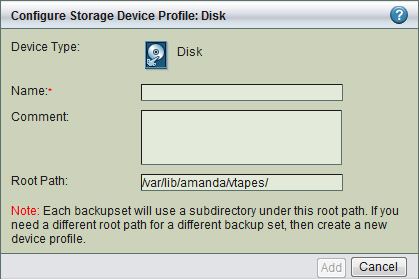
Root Path The directory to store backup images, specified as an absolute path.
- By default, ZMC fills in the field with /var/lib/amanda/vtapes/. The amandabackup user must have permission to write to this directory, which should also be large enough to hold images for all intended backups. When you bind a disk device profile to a backup set on the Backup Where page, it will display this value as the storage location, creating a subdirectory of the root path that matches the backup set name to store images.
Tip: The amount of free space available to hold backup images is an important consideration for fast retrieval of data.
- To ensure effective restore capabilities, set aside sufficient disk space to hold more than one full Backup Set worth of Data. Just how many full Backup Sets you should keep on disk depends on the data and your sites requirements for quick restores of accidentally deleted data. The more full backup images stored, the longer the retention of accidentally deleted files. Start with enough space to hold three full Backup Set images and adjust this number as experience dictates.
When using vtapes, you must first decide whether to oversubscribe before you can determine how much disk space to allocate. If oversubscribing, you should still determine by how much you plan to oversubscribe and set up processes on the host system to alert you when oversubscription threatens to prevent backups from occuring.
If you set the number of vtapes in rotation to match the number of vtape slots on the Backup Where page (i.e. normal, recommended configuration), then to avoid oversubscription issues you must allocate disk space equal to the number of vtapes times the size of each vtape. Changes to either of these two parameters require adjusting the amount of disk space allocated for use by ZMC's backup set outside of Amanda, since currently the Amanda does not reserve space before usage.
Tip: Because there is no value in creating a backup of a backup on the same media, Zmanda recommends that the drive that holds the vtapes be excluded from the backup set that points to the vtapes.
Single Tape Options
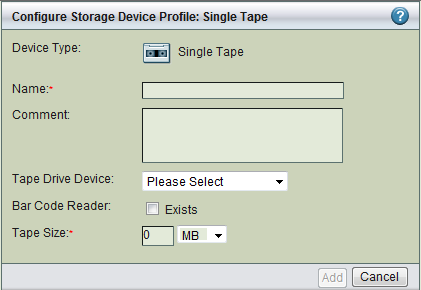
Tape Drive Device
- Choose one of the following:
-
- Other: This option displays the default path of a tape drive /dev/tape0. The default path can be manually changed. Under the choice Other, the software does not check that an actual tape drive exists at the path specified; it only checks the syntax of the path specified when the configuration is saved.
-
- Please Select: ZMC automatically senses the presence of tape drives and changers that are attached to the ZMC server. The choice Please select is populated with the Tape Devices attached to the ZMC server. Select the desired device from the list.
Tape Size
- Tape size can be specified by either the length of the tape or by storage capacity. Most manufacturers specify the length of the tape and simultaneously indicate its tolerance. For example, Tape Length of HP-DAT 72 is specified in meters as 170 +0.8/-2. Though reliable, this specification is not useful for backup purposes. HP-DAT 72 capacity is also specified as having a Compressed Capacity (Assumes 2:1 compression) of 72 GB.
- Important Note: The ZMC does not check that the media actually has the specified length. If it runs out of tape, it reports an error. If there is more capacity available than specified by Tape Size, it does not write beyond the specified length.
- Tip: Until you have experience with actual compression of the data during backup, specify a lower Tape Size than computed on the assumption of 2:1 compression.
- Warning: When users change the Tape Size from the default value shown, that change is global, affecting all backup sets that use the named tape device for backup. To enter a different Tape Size that will not affect other backup sets, add another named tape device (perhaps by adding a suffix to the existing name).
- Bar Code Reader
- Check Exists if the device has a bar code reader that is accessible from the backup server, otherwise choose leave the box unchecked. This option can be changed at any time and will take effect when the next backup run is executed.
Tape Changer Options
.png)
- Tape Changer Device
-
- Please select: Click this option to display a list of tape changers sensed by the operating system and the ZMC. Choose one.
-
- Other Click this option to enter a path to a Tape Changer device that may be currently inaccessible or not detected by the ZMC. When the Backup Where configuration is saved, the Tape Changer name and its location are not validated.
- Drive Slot
- This field is only displayed if the changer has multiple tape drives. Select the drive (by slot number) you would like to dedicate to this device profile and all the backup sets that use it. The slot number must refer to the same device referenced by the Tape Drive Device path entered below it. If they do not match, the ZMC returns the error:
Unable to make Amanda device bindings: 'device_name' tape device does not
exist, is not writable by amandabackup user, or there are permissions problems
with the parent directory.
The MTX Output link to the right of the entry can help you determine the slot number assigned to the tape drive. Not all changer devices number their drives as Amanda assumes (i.e., starting from 0). Clicking the link opens another browser window that lists the status of slots in the changer. The list will include one or more Data Transfer Elements which correspond to drive numbers. In the example output below, 0 and 1 are the available drive numbers associated with the changers.
$ mtx -f /dev/sg1 status
  Storage Changer /dev/sg1:2 Drives, 24 Slots ( 4 Import/Export )
Data Transfer Element 0:Empty
Data Transfer Element 1:Empty
      Storage Element 1:Full :VolumeTag=007B000B
      Storage Element 2:Full :VolumeTag=007B000T
      Storage Element 3:Full :VolumeTag=007B000D
      Storage Element 4:Full :VolumeTag=007B000E
      Storage Element 5:Full :VolumeTag=007B000F
      Storage Element 6:Full :VolumeTag=007B000G
       .
       .
       .
By manually mounting and unmounting tapes and using mtx(1) (outside of the ZMC) and then examining the MTX Output you can verify that that Slot Number and Tape Drive Device are the same. It will simplify the process if you start with empty drives.
- Tape Drive Device
-
The Unix device file name for the tape drive specified by Drive Slot.
- Bar Code Reader
- Check this box if a barcode reader is attached to the changer so that the ZMC can use it to identify tapes.
- Cleaner Slot
- The slot where the cleaning tape is located. Amanda can automatically use the cleaning tape (if specified to do so in the changer.conf file) or cleaning can be done manually using the amtape (8) command. Additional information about configuring the cleaning operation is discussed in the changers (7) man page, especially the section discussing chg-zd-mtx.
- Tape Size
- Specify the size of the tape in MB (megabytes), GB (gigabytes) or TB (terabytes). This should be the uncompressed size of tapes used by the changer. It is important not to use the number quoted by marketing material. You can use the amtapetype command to allow Amanda to estimate the size of tape. The execution of amtapetype will probably take hours because it must perform I/O operations on the entire tape length.
- Note on Block Size: Although you cannot change the block size of the device using the ZMC, you can manually edit the amanda.conf file to specify a different block size if necessary. See the description of device_property in the link for details.
Amazon S3 Options
Setting up an Amazon S3 storage device requires that you sign up for an Amazon S3 account and obtain the Access Key ID and Secret Key as described in Setting up an Amazon S3 Account for Use with Amanda. If the S3 account is already set up, you can obtain the Key ID and Secret Key by logging in here (Amazon username and password required), from where you can cut and paste the Key ID/Secret Key.
.png)
- Access Key
- The Access Key ID you obtained when signing up for S3 storage.
- Secret Key
- The Secret Key you obtained when signing up for S3 storage.
- User Token
- This is included for compatibility with the Amanda Enterprise 2.6.4 payment model, which required an "Amazon S3 Certificate." If you have such an account, this field will be automatically filled with User Token for the account, which will be required if you need to access the data without using Amanda.
Amanda Enterprise 2.6.4 customers please note: Amanda will always support the old payment model, but if you wish to change to the new payment model, please contact the Zmanda Support team. Account migration does not happen automatically, and the best migration method will depend on how Amanda/S3 was used at your particular site.
- Store Data in EU Only
- If checked, ensures that data is stored only in one of Amazon's European Data Centers. European customers should check this option to reduce latency and backup Windows. European pricing for storage and data transfer varies from U.S. pricing. For details on the storage and data transfer charges associated with different locations, see the Amazon S3 web site at http://aws.amazon.com/s3/.