Amanda Enterprise supports backup and recovery of NDMP appliances using NDMPv4 (version 4) protocol. It does not support earlier versions of NDMP protocol. Amanda Enterprise supports Remote NDMP, Direct NDMP as well as 3-way NDMP configurations.
In Remote NDMP configurations, NDMP appliance such as Netapp Filers, Sun Unified Storage and BlueArc storage are backed up to tape changers and disk attached to the Amanda server. The backup and recovery data goes through the server. In Direct NDMP and 3-way NDMP configurations, Appliances can be backed up to a tape changer that is attached to a SAN or using iSCSI and is accessible from the appliance. The backup and recovery data is not transferred through the server. The Amanda backup server acts as a backup control program.
NDMP backup and recovery in Amanda Enterprise is implemented as an Amanda application. As a result, management of NDMP backup and recovery is identical to other applications. The Amanda disk list entries (DLEs) for NDMP can be present in a backup set that has other application DLEs. This configuration is not recommended.
The NDMP backups from an appliance can be restored to an appliance from the same vendor.
Requirements for NDMP Backup and Restore
- Amanda server must be running Linux or Solaris distribution listed on the Zmanda Network Supported Platforms page.
- Amanda Enterprise 3.1 (including dependencies) must be installed on the Amanda server.
- The Amanda server includes the NDMP application. The NDMP backup can be performed only from the Amanda server not from Amanda client.
- NDMP services must be enabled on the appliance. For example: the following figure shows how to check if NDMP services are enabled on BlueArc Storage.
Installation
- No additional packages are required for NDMP application. Amanda server includes all necessary software.
- Zmanda's NDMP application module is a licensed application. All product licences from Zmanda are in a single license file. If you have bought licenses recently, you will have to download the license file from Zmanda Network. The license file should be installed as /etc/zmanda/zmanda_license on the Amanda server. It should be owned by amandabackup user and disk group with file permissions 755.
Configuring NDMP volumes/directories for Backup
Configuring NDMP backups requires configurations steps using Zmanda Management Console and some manual steps.
- Zmanda recommends creation of separate backup set for NDMP backup.
- Create a backup set for the NDMP appliance in the Zmanda Management Console.
- Add the new NDMP entries to the backup set using the Backup What page. Begin by selecting NDMP from the File System drop down menu. The following figure shows an example backup configuration of /vol/zmanda_fs1 from Netapp Filer with IP address 192.168.29.151:
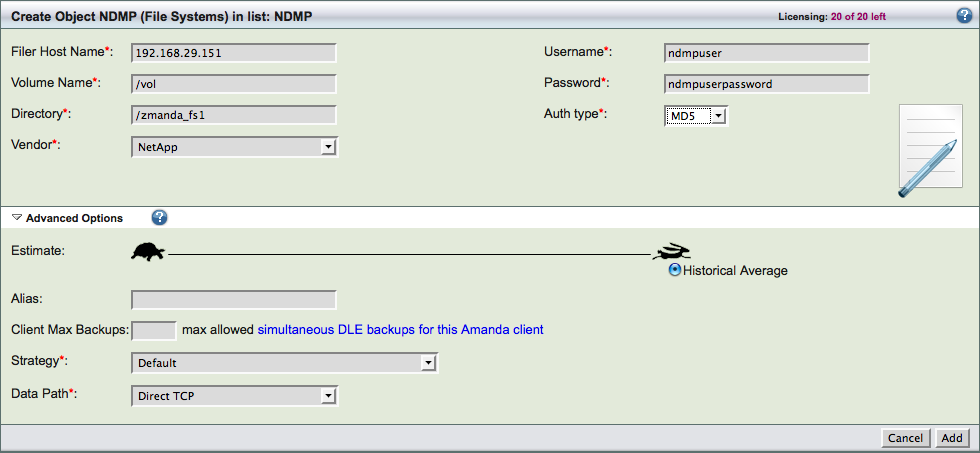
The NDMP backups are always initiated from the Amanda server. The Vendor can be Netapp, BlueArc and Sun Unified Storage. The Directory must be in //<name or ip address of the filer or appliance>/<volume name>/[<directory name>] format. In the above example, 192.168.29.155 is the IP address of the filer that contains the volume that has to be backed up. The Username and Password are the user credentials for performing backup and recovery from the filer whose IP address or the name is specified as Appliance IP addr.
Compression and Encryption cannot be used for NDMP DLEs. The Data Path must be set to DirectTCP for LAN free backups.
- Modify the NDMP appliance filer authentication file in /etc/amanda/<backup set name>/ndmp-passfile . This file should have the ip address or the name of the filer/appliance, DLE name, user name and password of the backup user. The last field should be TEXT if ndmpd.authtype is plaintext and should be md5 if the ndmpd.authtype is challenge. The ndmpd options can be checked in Netapp filer using options ndmp command on the filer. In case of 3 way NDMP configuratiom, the filer/appliance being backed up should have authentication entries in the ndmp-passfile file.
This authentication file should be readable only by amandabackup user. An example ndmp-passfile file is shown below:
172.17.47.2 /vol/vol1/data "root" "root_password" TEXT
172.17.47.2 is the IP address of the Netapp filer. /vol/vol1/data is the DLE. root is the user on the Netapp filer used for the backup operations and password for the user is root_password. The password must not be encrypted.
- If you are configuring Backup devices that are connected to the Amanda server for this backup set, use the Admin Devices and Backup Where pages to configure the devices. This should be done in Remote NDMP configurations. For configuring tape changers accessible using NDMP, please see next section.
- Before scheduling backups, it is important to verify the backup set configuration. Run the amcheck command to verify the configuration.
$ amcheck <backup set name>
Please resolve any configuration errors found.
Configuring NDMP tape changer
This procedure has to be performed for Direct NDMP and 3-way NDMP configurations.
Configuration of NDMP tape changer has to be done manually. You can create a backup to disk configuration using Zmanda Management Console Backup Where and Admin Devices page and use it as a template.
- When you create a Backup to disk configuration, Staging area cannot be used. The backup to disk configuration will create a configuration file disk-2-<name of the device>.conf in the backup set directory /etc/amanda/<backup set name>
- Modify the disk device configuration file.
- Remove the holding disk definition define holdingdisk zmc_default_holding, changerdev definition and tapedev definition tapedev "file:<directory name>"
- Add the NDMP changer definition. For example: This example shows tape changer mc0 accessed from filer with IP address 172.17.47.2 with four tape drives (nrst1h, nrst0h, nrst2h and nrst3h). This configuration uses only tape changer slots 19 and 20.
define changer ndmp-changer {
        tpchanger       "chg-ndmp:172.17.47.2@mc0"
        changerfile "/etc/amanda/<backup-set-name>/disk-2-ndmp_changer.changer.conf"
        property "use-slots" "19-20" # skip slots 17-18, cleaning tapes
        property "tape-device" "0=ndmp:172.17.47.2@nrst1h" "1=ndmp:172.17.47.2@nrst0h" "2=ndmp:1
72.17.47.2@nrst2h" "3=ndmp:172.17.47.2@nrst3h"
        property "ndmp-username" "root"
        property "ndmp-password" "netapp1"
        property "ndmp-auth" "text"
        property "driveorder" "lru"
}
tpchanger should be "chg-ndmp:<ip address of the netapp filer@changer-name" The changer name can be found using Netapp filer storage show mc command. In case of BlueArc storage, you can find changer name and drive name in the user interface as shown in the figure below.
use-slots property specifies the list of slots in the tape changer that can be used by the backup set.
tape-device property specifies the list of tape drives available in the changer. In the above example, three tape drives are configured for the backup set. Each tape drive configuration has the format "<drive number>=ndmp:<filer IP address>@device name". The device name can be obtained using Netapp filer command sysconfig -t. Use no rewind device file name.
ndmp-username, ndmp-password, ndmp-auth are the filer authentication information which runs the NDMP tape agent for the tape changer. In 3-way NDMP configuration, filer/appliance which manages the tape changer should have authentication information specified in this section.
- Change the tpchanger entry in the same file outside the changer definition (define changer ndmp-changer {...})
tpchanger "ndmp-changer"
- Before scheduling backups, it is important to verify the backup set configuration. Run the amcheck command to verify the configuration.
$ amcheck -c <backup set name>
Please resolve any configuration errors found. Configuration checks are automatically performed in Zmanda Management Console Backup What page.
Please do not try to change these configurations using Backup Where and Admin Devices
page. Your configuration will get overwritten.
Scheduling backups of NDMP appliance
You can schedule backups using Zmanda Management Console Backup When page or run immediate backups for the backup set from the Backup Activate page.
The status of the backup are shown in the Monitor page. Backup reports will be available under the Report tab in the Zmanda Management Console.
Performing NDMP Restores using ZMC
Performing NDMP Restores using command line
This section describes how to use Amanda recovery command amrecover to perform NDMP volume/directory restoration.
- Run amrecover command on the Amanda server as root user. You will need to provide the backup set name as a parameter. The values for options -t and -s will not change.
# amrecover -C <backup set name>
- Set the host to 127.0.0.1 and the disk to DLE name that was used in the backup set configuration (use amrecover listdisk command to figure out the correct host and DLE name). The DLE name will have //<ip address or the name of filer>/<volume name>/[<directory name>]. NDMP authentication file must be configured in the /etc/amanda/ndmp-passfile configuration file for the filer netapp1.company.com
amrecover> sethost localhost
200 Dump host set to localhost.
amrecover> setdisk //netapp1.company.com/vol/vol3
200 Disk set to //netapp1.company.com/vol/vol3
- You can list the files in the backup using ls command. Add all the files or specific files to be restored and run extract command to restore the files.
amrecover> ls 2010-03-03-17-22-35 MyData
2010-03-03-17-22-35 MyMusic
...
amrecover> add *
Added file /MyData
Added file /MyMusic
amrecover> extract
- The amrecover command asks you to load the necessary tapes to the tape changer. Confirm that the tapes are loaded. The files will be restored to the original location. Please note that existing files in the original location will be deleted.
- To restore to an alternate location on the filer or another filer (filer authentication information must be in /etc/amanda/ndmp-passfile configuration file), you can use set property directory.
amrecover> setproperty directory //netapp1.company.com/vol/vol2/restored/