Table of contents
- 1.1. Welcome
- 1.2. Conventions followed in the Manual
- 1.3. Introduction
- 1.3.1. Backup Sets
- 1.3.2. ZMC Components
- 1.3.3. ZMC and the Zmanda Network
- 1.3.4. Features
- 1.3.4.1. Backup Features
- 1.3.4.2. Recovery Features
- 1.3.4.3. Reporting and Scheduling Capabilities
- 1.3.4.4. Plugins
- 1.3.5. Window Server Differences
- 1.4. ZRM Backup Server Requirements
- 1.4.1. Linux/Solaris
- 1.4.2. Windows
- 1.4.3. ZRM Server Package Dependencies
- 1.5. MySQL server (Backup Client) Requirements
- 1.6. MySQL database user for ZRM
- 1.7. Required Privileges for the MySQL Account
- 1.8. Enabling MySQL server binary logs
- 1.9. Requirements for Snapshot and Storage Checkpoint Backups
- 1.10. Requirements for InnoDB Hot Backup/MySQL Enterprise Backup
- 1.11. SSL Between MySQL Servers and ZRM server
- 1.12. Downloading ZRM for MySQL Packages
- 1.13. ZRM Server Components
- 1.14. MySQL Server (ZRM client) Components
- 1.15. The ZMC Rapid Installer (Linux and Unix)
- 1.16. The ZMC Rapid Installer (Windows)
- 1.17. Installing ZRM License
- 1.18. Secure Socket Layer (SSL) Certificate for ZMC web server
- 1.19. File Locations on ZRM Server
- 1.20. File Locations on MySQL server
- 1.21. Logging in to the Zmanda Management Console
- 1.21.1. Initial User name and Password
- 1.21.2. Lost Password
- 1.21.3. Zmanda Network Authentication
- 1.22. About Backup Sets
- 1.22.1. What a Backup Set Contains
- 1.22.2. Multiple backup set configurations
- 1.22.3. Backup Set Starter Page
- 1.22.4. Create New Backup Set
- 1.22.5. Backup Set Dashboard
- 1.23. Specifying what to Back Up
- 1.23.1. Server Parameters
- 1.23.2. MySQL User Parameters
- 1.23.3. What to Backup
- 1.23.4. What to Exclude
- 1.24. Backing up MySQL Application-specific files
- 1.25. MySQL cluster (NDB storage engine) backup/recovery
- 1.25.1. Backup What page
- 1.26. Backup Where
- 1.27. Backup When
- 1.28. Backup How
- 2.
The Backup how page lets you specify the backup method along with other options that let you optimize the type of backup given the performance required at your site.
All configuration parameters can be configured by selecting the links from the left panel - Backup Method, Backup Alerts/Logging, Compression/Encryption, Remote Backups and Pre/Post Backups. The Backup How page below shows the Backup Method selected and configured for Netapp Snapvault backup method.
Most of the settings have default values, inherited from the Site Settings page or from factory defaults. Default strings are shown in the text field with a gray background. Radio buttons options (Yes, No, Default) show the current default value in parentheses to the right of the Default radio button (Y or N).
- 2.1.1. Backup Method
- 3.
The backup method defines which method to use for full backups. ZRM supports different methods to perform full backups. Each backup set can have different full backup method. Each full backup method is described in a separate section. Snapshot backup method is described in the next chapter.
- 3.1.1.1. Logical backup using mysqldump
- 4. Following screenshot shows the logical full backup method. The databases/tables in the backup set are locked for updates during the backup process. The backup image contains SQL statements that can be changed if needed. Choosing Logical non-parallel option uses a mysqldump backup that copies MySQL binary logs regardless of the storage engine. MySQL binary logs track and save all database server transactions as a list of SQL statements. To implement a logical backup strategy, binary logging must be enabled on the MySQL server, and a path to the log files must be supplied (the default is /var/lib/mysql) in the Binary Log Path field. Logical backup method works with all MySQL storage engines except the MySQL cluster NDB storage engine. Logical backups can also be restored to any platform architecture or database that supports SQL. For example: Backups of MySQL database running on Redhat Enterprise server powerpc platform can be restored to Ubuntu server running on x86 platform. Because logical backups require a read lock on the database(s) or tables being backed up (not in the case all tables are using InnoDB storage engine), they can have a greater impact on the applications using the MySQL database. Logical backups also result in increased restore times, as restoring the data is accomplished by re-playing the transactions against the target database instead of just copying files. In case of InnoDB tables, the backups are performed as a single transaction and will not obtain any locks. Locking Options When the backup set contains MyISAM tables, the lock-tables option should be selected. When the backup set contains only InnoDB tables, the single-transaction option should be selected. Logical backup of mixture of InnoDB tables and MyISAM tables in the same backup set should be avoided. Logical Backup Options Parameters to the mysqldump MySQL command. Logical backup uses mysqldump command. You can customize the options using this field. For example: "--max_allowed_packet=1G" can be specified as value. These parameters are used in addition to parameters passed by ZRM. Default Character Set Specify the default character set that is used in the MySQL database. The default value is utf8; if the database uses a different character set, reset accordingly. Binary Log Path Enter the full path where the MySQL binary logs are stored once binary logging has been enabled. If nothing is entered here, the site default path is used. If the Site defaults page does not have binary log location specified, binary logs are expected to be in MySQL server datadir location. Flush Logs If you are backing up cloud database services (or when you do not have control over database server configuration) such as Amazon Relational Database services, you should set this parameter to No. Cloud database services does not allow end users to perform MySQL server operations. This parameter is applicable only for full backups. Include Stored Routines To improve the performance of database functions and procedures, MySQL versions 5.0 and higher allow users to compile and store them as reusable routines (Stored routines). This option specifies whether stored routines should be include during logical backups. The default value is No. If your version of MySQL supports this feature, it should probably be set to Yes. Setting the value to Default implies Site specific value is used for this parameter. On-The-Fly (OTF) Compression Specify whether backup image files stored on disk should be compressed as the backup progresses. The default is to start compression only after all backup files have been saved to disk. Turning this option on can save disk space, but results in slower backups.
- 5.
Users can perform Logical full backups using MyDumper (Download it from https://launchpad.net/mydumper) command. You have to select Full Backup Method as Logical and Logical Parallel as Yes as shown below.
Parallel Logical Backups can work with InnoDB and MyISAM storage engines. Read locks are obtained in case of MyISAM tables. If the backup set only has InnDB tables, locks are not used during backup and MySQL transactions are not impacted.
Logical Backup Options
All MyDumper options are set in this field. These parameters are passed to MyDumper command during full backups.
Include Triggers
This option specifies whether database triggers should be included during logical backups. The default value is No. If your version of MySQL supports this feature, it should probably be set to Yes. Setting the value to Default implies Site specific value is used for this parameter. The triggers are backed up only if the backup set contains databases (not specific tables).
Include Stored Routines
To improve the performance of database functions and procedures, MySQL versions 5.0 and higher allow users to compile and store them as reusable routines (Stored routines). This option specifies whether stored routines should be included during logical backups. The default value is No. If your version of MySQL supports this feature, it should probably be set to Yes. Setting the value to Default implies Site specific value is used for this parameter. The stored procedures are backed up only if the backup set contains databases (not specific tables).
Binary Log Path
Enter the full path where the MySQL binary logs are stored once binary logging has been enabled. If nothing is entered here, the site default path is used.
- 5.1.1.1. Raw Backup Method/without snapshots
- 6.
A raw backup makes a copy of the binary disk image of databases stored on non-transactional storage engines by using mysqlhotcopy. Although raw backups can be restored more quickly than logical backups, they can only be restored to same version of MySQL server on the same platform architecture. If any of the databases or tables are stored on a transactional storage engine (such as InnoDB), a logical mysqldump backup is taken instead unless snapshot backup method is configured.
Remote MySQL Binary Path
Path to the MySQL commands on the MySQL server.
Binary Log Path
Enter the full path where the MySQL binary logs are stored once binary logging has been enabled. If nothing is entered here, the site default path is used.
- 6.1.1.1. MySQL Enterprise Backup
- 7.
MySQL Enterprise Backup (MEB) tool available from Oracle (requires license from Oracle) can be used as the backup method for the backup set. Full, Differential and Chained differential backups can be performed using this tool. The mysql-zrm.conf parameter apply-log parameter should be to zero to perform differential and chained differential backups.
Select MySQL Enterprise Backup as the full backup method to use MySQL Enterprise Backup to perform the backup. MySQL Enterprise Backup tool is bundled as part of MySQL Enterprise Server Standard edition or premium versions. This option provides integration between ZRM and the Oracle product.
Above image shows the full backup method configured as MySQL Enterprise Backup.
Backups done by particular version of MySQL Enterprise Backup can be restored only by the same version of MySQL Enterprise Backup.
MySQL Enterprise Backup binaries must be installed on the ZRM server in the same location as MySQL server under the following use cases: streaming backup mode (default configuration) and when apply logs are performed during restores (apply-log parameter should be set to 0 in the backup set's mysql-zrm.conf).
MEB Mode
Regular or Streaming mode. Regular mode requires additional disk space on the MySQL server during backups. Streaming mode does not require disk space on the MySQL server during backups. Streaming mode requires the MySQL Enterprise Backup 3.6 or higher.
MEB Binary Path
Path to the InnoDB Hot Backup tools: the ibbackup binary and the mysqlbackup tool, which must be installed in the same path on the MySQL server being backed up and ZRM server. The default path is /usr/bin. Themysql user should have permissions to execute the mysqlbackup tool.
MEB disk (I/O throttle)
MEB disk throttle can be specified to throttle disk I/O during backup. It is specified in milliseconds, the backup sleeps for that time between disk I/O.
MEB Use Memory (in MB)
Amount of memory on the MySQL server that can be used MySQL Enterprise Backup. The default is to use as much as memory as available. If you reduce the memory available for MEB significantly, the backup performance will have significant impact.
MEB only InnoDB
MySQL Enterprise Backup tool is used for backups of tables with InnoDB storage engine only. The default is No.
Remote MySQL Binary Path
Path to the MySQL commands on the MySQL server.
Binary Log Path
Enter the full path where the MySQL binary logs are stored once binary logging has been enabled. If nothing is entered here, the site default path is used.
- 7.1.1.1. XtraBackup
- 8.
Select XtraBackup as the backup method to Xtrabackup tool to perform the backup. Xtrabackup tool can be downloaded from Percona or SkySQL. It is open source and can be downloaded to MySQL server. This option provides integration between ZRM and Xtrabackup. This allows backup to proceed without setting any locks or impacting database operation.
Full, differential and chained differential backups are performed using this tool. The mysql-zrm.conf parameter apply-log parameter should be to zero to perform differential and chained differential backups. This tool also users to restore a table from a database backup. Restores of table can be performed only to Percona MySQL servers.
Xtrabackup binaries must be installed on the ZRM server in the same location as MySQL server under the following use cases: streaming backup mode (default configuration) and when apply logs are performed during restores (apply-log parameter is set to 0 in the backup set's mysql-zrm.conf). Differential backups cannot be performed in Xtrabackup streaming backup mode. Use log incremental with Xtrabackup streaming full backup.
Backups done by particular version of XtraBackup can be restored only by the same version of XtraBackup tool.
XtraBackup Mode
Regular or Streaming mode. Regular mode requires additional disk space on the MySQL server during backups. Streaming mode does not require disk space on the MySQL server during backups. Xtrabackup 1.6 or higher is required for streaming mode.
XtraBackup Binary Path
You must then supply the path to the Xtrabackup tools: the xtrabackup binary and the innobackupex tool, which must be installed in the same path on the MySQL server being backed up. The default path is /usr/bin. The mysql user should have permissions to execute the innobackupex tool.
XtraBackup Use Memory (in MB)
Amount of memory used by Xtrabackup tool. The default is 100MB.
XtraBackup Parallel
Specifies the number of threads created by xtrabackup to copy data files. This option is useful when multiple tablespaces option is enabled (innodb_file_per_table MySQL server option) or the shared tablespace must be stored in multipe ibdata files with the innodb_data_file_path MySQL server option. The default is 1.
Throttle (in I/O per second)
Xtrabackup backups can be throttled by specifying the number of disk I/Os performed by the backup tool in a second.
XtraBackup No Lock
Use --no-lock option of Xtrabackup. Use this only if you are not planning to do log incremental backups and all your tables in the database are InnoDB.
XtraBackup Default File
If you want to use different my.cnf when xtrabackup starts up the InnoDB during backup. This is required if you are allowing on secure access to the database server.
Remote MySQL Binary Path
Path to the MySQL commands on the MySQL server.
Binary Log Path
Enter the full path where the MySQL binary logs are stored once binary logging has been enabled. If nothing is entered here, the site default path is used.
- 8.1.1. Backup Alerts/Logging
- 9.
Select Backup Alerts/Logging to send email notifications and control log verbosity.
Email Address (or Update Windows Event Log on Windows servers
On Linux/Solaris servers, enter the email address of the ZMC backup administrator. All backup run notifications and summary reports will be automatically sent to the email address based on the email policy. A mail user agent (MUA) such as Mailx must be manually configured on the MySQL server before any email can be sent. To email reports and notifications to more than one user, set up a group email alias on your mail server and enter group email alias here. Alternatively, you can enter multiple email addresses separated by space. For example:[email protected] [email protected] Windows ZRM servers, select whether to use the Windows Event Log to save and display notifications and summary reports. Note that even when logging successful ZRM operations, the Windows Event Log might show error message that "Event Description not found". The "Event description not found" messages can be safely ignored.
Email Policy
This policy determines when email should be sent to the configured Email Address. Policy can be After every backup (the default value), Never (no notification is performed) or Backup with error (when there are failures in the backup run).
Verbose Logging
Verbose logging should turned on or off. Zmanda Support Team will ask you turn on verbose logging for backup sets to troubleshoot problems in a backup set.
MySQL Replication
Specifies whether ZRM for MySQL will use the MySQL Replication facility that has been enabled on the MySQL server that is to be backed up. Backing up a replication slave reduces impact on the production database near zero while backups are in progress. When this option is enabled and the mMySQL server is a replication slave, ZRM for MySQL will back up the master.info, relay-log.info and any SQL_LOAD-* files if they exist. For further details on the benefits of using a replication slave for backup, see this MySQL documentation. Themaster.info and relay-log.info files are described here. Please note that the replication file names have to bemaster.info and relay-log.info. Please make sure relay-log-info-file and
master-info-file parameter in the MySQL server configuration file my.cnf is set to default value.
If you are backing up replication slave, you need to enable log-slave-updates in the replication slave in MySQL configuration file (my.cnf) for log incremental backups.
Copy Binary Logs
By default, ZRM copies binary logs during full backups (Default value is Yes). This allows ZRM to restore to any event between last backup before full backup and the full backup. You can turn this behavior off by setting value to No.
- 9.1.1. Compression/Encryption
- 10.
Backup can be compressed and encrypted. ZRM compression and encryption is performed on the ZRM server.
Compression Backup compression is performed on the ZRM server. Allows you to compress the image using gzip on the ZRM server. If the storage engine already compresses data (such as ARCHIVE storage engine), there is no value in setting this to Yes.Encryption
Backup encryption is performed on the ZRM server. Default encryption is performed using GPG. ZRM server should have GPG (GNU Privacy Guard) packages installed. These packages are part of Linux and Solaris distribution. The default encryption algorithm used is AES 256. If different key length or cryptographic algorithm is required, please modify gpg parameters in the script /usr/share/mysql-zrm/plugins/encrypt-plugin.pl on the ZRM server. Please contact Zmanda support team for help.Path to passphrase file
The full path to the encryption passphrase file. The encryption file is usually stored as /etc/mysql-zrm/<backup set name>/.passphrase on the ZRM server. The passphrase should be owned by mysql user and should have 400 permission. It is very important to protect the contents of the passphrase file. Passphrase file contains the sequence of words or a string that is used for encryption. It is important to choose a good passphrase. The longer and more random the passphrase, the more difficult to crack the encryption. The passphrase file should contain the passphrase in the first line (other lines in the file are not read). A method to generate passphrase is to use the following command:
$ gpg --gen-random 1 16 | gpg --enarmor | sed -n 5p > /etc/mysql-zrm/<backup set name>/.passphrase
Backup Encryption Caution: It is very important to store the encrypt-plugin.pl and the passphrase file used for the backup set. These files are necessary
for restoration. Without these files, it is impossible to restore the backup image and backup image is no longer useful.
- 10.1.1. Remote Backups
- 11.
ZRM uses copy plugins to move data from the MySQL server to the ZRM server. All remote MySQL backups must be use a copy plugin. Copy plugin is used in the following cases:
backing up any Windows-based MySQL server; use the Windows copy plugin. remote incremental backup is required copying replication-related files from a remote machine executing mysqlhotcopy (MySQL command) to copy the data from the remote MySQL server executing mysqlhotcopy to restore the data to a remote MySQL server. backing up remote machines via snapshot backups.
SSH
Secure Shell-based communication. Use when a higher level of security is required (such as when the client and server communicate across a firewall). This can be only used for non-Windows MySQL servers. You must then enter the SSH username on the remote MySQL server, and the path where MySQL commands are installed on the remote machine. For backup, it is necessary to set up password-less ssh configuration is required (i.e,mysql user on ZRM server should be able to ssh to MySQL server without being prompted for password). During restore, users will prompted for ssh password if needed. The user id and group id of mysql user must be same on the ZRM and MySQL server.
Socket
Socket-based communication. This is the default copy plugin. This plugin requires MySQL server running on non-Windows platform. This requires that the ZRM client components are installed on the remote machine, as described in the Installation Instructions. You must then enter a port for the remote socket (the factory default is 25300. The path where MySQL commands are installed on the remote machine must be provided. The user id and group id of mysql user must be same on the ZRM and MySQL server.
You can specify the port to be used for communication. This requires changes in the remote MySQL server installation (xinetd configuration files).
Windows
The Windows copy plugin is required for backing up any Windows-based MySQL server. It requires the ZRM for MySQL Windows client components described in the Installation Instructions. You must then enter the communications ports to use during backup (default is 10080) and restore (default is 10081) operations.
- 11.1.1. Pre-/Post- Backup
- 12.
Specify the full path and any command-line options to the script or utility you want executed before the backup run starts (pre-backup) or after the backup run is completed (post-backup). This feature can be used to check and prepare the MySQL server environment for backup. For example, you could use it to notify all MySQL database users that a backup is about to begin.
ZRM for MySQL does not check if the path is a valid path, nor if the plugin is present at the given location. The recommended location for plugins is /usr/share/mysql-zrm/plugins directory. A template file (pre-backup.pl or post-backup.pl) is installed in this location; use the template when writing your own pre-backup plugin. All pre-backup plugin scripts must accept the following command-line parameters (which are passed to the plugin using the Plugin Option(s) field:
--all-databasesUsed when all databases in the MySQL server are being backed up.
--database database1, database2, ...
Used when specific databases are backed up.
--database database1 --tables table1, table2, ...
Used when specific tables in a database are being backed up.
The script should be written to return a non-zero value on error; pre-backup plugin failures should cancel the backup and generate a failure message for reports and logs.
Post backup plugin are passed an additional parameter with information on location of backup images (--backup-directory path)
The post-backup plugin is executed twice: before the checksum is performed, and after the checksum is complete. See the man page for mysql-zrm-backup(1) for more details on how the post-backup plugin operates and the flags it returns. Note that although failures of the post-backup plugin are logged, they are not included in backup reports if the backup itself succeeded.
Pre-Scheduler plugin can be used to delay the execution of the scheduled backup run. You can use this plugin to avoid backup during certain operational procedures such as MySQL upgrade or database upgrades. The value returned by the plugin determines how many hours the scheduled execution of backup run is delayed. It can be delayed up to 11 hours.
You can optionally compress the data during transport. This might provide better performance.
- 12.1. Snapshot Plugins
- 12.2. Linux Logical Volume Manager Snapshots
- 12.3. Symantec VxFS snapshots
- 12.4. Network Appliance Snapshots
- 12.5. ZFS Snapshots
- 12.6. EMC SnapView Snapshots
- 12.7. Bluearc Titan Snapshots
- 12.8. Amazon EC2
- 12.8.1. Requirements
- 12.8.2. Configuring ZRM for MySQL to use Amazon EBS Snapshots
- 12.8.3. Restoring EBS snapshot backup
- 12.9. Network Appliance Snapshots
- 12.10. Netapp SnapVault Snapshots
- 12.11. Monitoring Backups
- 12.11.1. Backup Status icons
- 12.12. Events
- 12.12.1. Event Viewer
- 12.12.2. Filter Events
- 12.12.3. Log Rotate Utility
- 12.13. Summary Report
- 12.13.1. Selecting a backup date
- 12.13.2. Legend
- 12.13.3. Summary Panel
- 12.14. Custom reports
- 12.14.1. Predefined Reports
- 12.14.1.1. Backup Report
- 12.14.1.2. Application Impact Report
- 12.14.1.3. Backup Status Report
- 12.14.1.4. Backup Method Report
- 12.14.1.5. Backup Retention Policy Report
- 12.14.1.6. Backup Performance Report
- 12.14.1.7. Incremental Backup Report
- 12.14.1.8. Replication Backup Report
- 12.14.1.9. Cluster Backup Report
- 12.14.2. Customized Report
- 12.14.1. Predefined Reports
- 12.15. Database events report
- 12.15.1. Selecting Backup Date
- 12.15.2. Database Event Viewer
- 12.15.3. Database Event Search
- 12.15.4. Launching Restores from the Database Events Reports
- 12.16. Backup image integrity report
- 12.17. Convert Quick backups to Standard backups
- 12.18. ZMC User administration
- 12.18.1. ZMC User
- 12.18.2. Associating with Zmanda Network
- 12.18.3. Editing/Deleting ZMC User
- 12.19. Managing Backup Sets
- 12.19.1. Backup Set Creation
- 12.19.2. Modifying Backup Sets
- 12.20. Set Site Defaults
- 12.21. Admin Preferences
- 12.22. ZMC services status
- 12.22.1. ZRM License status
- 12.23. Restore What
- 12.23.1. Restore From
- 12.23.2. What to Restore
- 12.24. Restore Where
- 12.24.1. EBS snapshot restore parameters
- 12.25. Restore How
- 12.25.1. Copy Plugin Parameters
- 12.25.2. Restoring to a MySQL replication slave
- 12.25.3. Restoring a table from a database backup
- 12.26. Using the Zmanda Troubleshooting Scripts
- 12.26.1. Running the Support Script on the ZRM server
- 12.26.2. zm-support Options
- 12.26.3. Running the Windows Client Support Script
- 12.26.3.1. Location
- 12.26.3.2. Files Gathered
- 12.26.3.3. Zmanda Client for Windows Installation Logs
- 12.26.3.4. Zmanda Client for Windows Debug Logs
- 12.26.3.5. System Logs
- 12.26.3.6. Additional information
- 12.26.3.7. Output File
Welcome
Welcome to the Zmanda Management Console for ZRM for MySQL Enterprise Edition 3.5 User Guide. This manual describes how to use Zmanda Management Console web based user interface for managing backups on ZRM Enterprise Servers.
- Installing Zmanda Management Console.
- Configuring ZMC Backup Sets.
- Managing ZMC backup Sets.
Conventions followed in the Manual
# This is a system message.
Introduction
MySQL is one of most common and versatile database engines. ZRM Enterprise provides global backup and recovery management for MySQL servers.
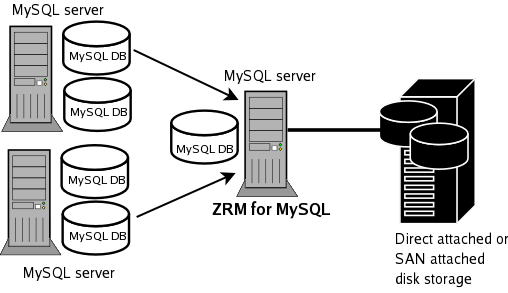
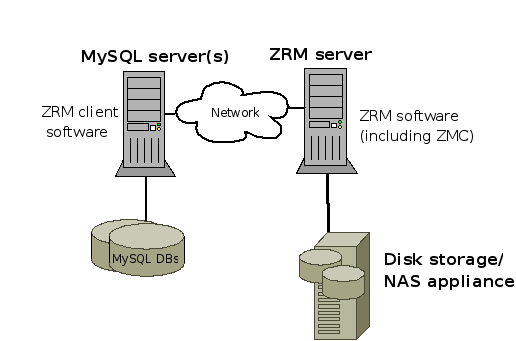
In addition to its command line and configuration file interface, ZRM for MySQL also includes the Zmanda Management Console for MySQL (ZMC). The ZMC is a a web-based management console that delivers all the automation, management, monitoring, and recovery capabilities of ZRM for MySQL in an intuitive graphical user interface.
The following diagram shows the local server running ZMC backing up two more MySQL servers with multiple MySQL databases. These are backed up by configuring at least two backup sets i.e. at least one backup set per MySQL server.
Backup Sets
Most ZMC operations work on backup sets. A backup set defines of the "what", "where", "when" and "how" of data that is to be backed up. ZMC users can have two roles: Administrator or Operator. All backups and reports previously created using community versions of ''ZRM'' can be managed using ZMC.
ZMC Components
ZMC consists of the following components:
- Apache web server
- Internal MySQL database server
- PHP, Perl and PHP/Perl modules.
All ZMC components are installed in a separate directory (under /opt/zmanda/zrm and /opt/zmanda/common), and therefore do not impact existing installations of AMP stack on the backup server.
ZMC runs on the ZRM server and can be accessed from any web browser. ZMC is supported on IE 9 or later on Windows, Firefox and Chrome on Windows and Linux.
ZMC and the Zmanda Network
The ZMC is closely integrated with the Zmanda Network, which provides documentation as well as context-sensitive help on messages and error resolution. The Zmanda Network is continuously updated with the latest ZRM information. This allows the ZMC to provide up-to-date suggestions and resolutions for specific issues faced by a backup administrator.
Features
ZRM for MySQL optimizes backup and restore operations on MySQL Databases. It provides full flexibility to individually leverage native MySQL/OS backup tools, levels, scheduling etc. It generates logs that assist in optimizing these capabilities. It also provides filters to easily locate anomalous database events.
Backup Features
- Backs up multiple MySQL databases managed by one or more MySQL servers.
- Backs up tables in a single database.
- Supports hot backup of databases.
- Supports multiple backup methods, depending on the storage engine used by MySQL tables.
- Support for Xtrabackup and MySQL Enterprise backup tools.
- Full, differential, and incremental database backups.
- Supports use of mysqldump, mysqlhotcopy, Xtrabackup, MySQL Enterprise Backup, storage and file system snapshots and MySQL replication to execute backups.
- Backups are integrated with Netapp Snapshots and Snapvault features.
- Creates consistent backups of the database regardless of the storage engine used by database tables.
- Supports SSL authentication between the local ZRM for MySQL and remote MySQL server to allow secure backups over the Internet and across firewalls.
- Verifies backed up data images.
- Backup images can be compressed as well as encrypted using standard tools such as gzip, GPG, etc .
- Backup runs can be cancelled by users with Administrative privileges.
Recovery Features
- Optionally maintain a backup index that stores information about each backup run.
- Includes a reporting feature that can be used to browse indexes.
- Supports recovery of full and incremental database backups.
- Perform selective, incremental restores based on binary log position, or by a given point in time, thus protecting the database from operator errors.
- Binary log filtering helps you decide what to restore and what to discard.
- Depending on the type of backups selected, data can be recovered to the same machine or to a different machine.
Reporting and Scheduling Capabilities
- ZRM for MySQL can schedule backup runs immediately or in daily/weekly/monthly intervals (even every 15 minutes.
- It automatically generates backup reports.
- It includes standard backup reports as well as custom (i.e. user-defined) backup reports.
- It can report any backup statistic or combination thereof.
- It can format reports as HTML or Text .
- It sends email notification about the backup run status.
- It can provide backup reports as RSS feed.
Plugins
ZRM for MySQL allows plugin operations to extend ZRM for MySQL capabilities. Plugins allow you to optimize the backup process for your environment. The following plugin operations are supported (see the Backup How page for detailed configuration information):
- Pre-scheduling
- Pre-backup
- Post-backup
- Copy plugins for Linux/Unix and Windows
- Binary log parser plugin
- Snapshot plugin (feature license required)
- InnoDB Hot Backup plugin (feature license required)
Window Server Differences
When running Windows-based ZRM servers (XP, 2003 Server, Vista), the following limitations apply
- ZRM Windows Server 3.1 works well with ZRM Windows Client 3.5.
- Backup methods that are supported are logical and snapshot backup using VSS. Raw backup method is not supported by MySQL on Windows
- No support for backup of Linux/Solaris MySQL servers; use ZRM on Linux or Solaris to back up MySQL servers running on multiple platforms to a single ZRM server.
- Support for native Windows compression & encryption. No support for encryption on Vista Home basic and Vista Home Premium.
- Backup of replication slaves running on Windows
- No Quick Snapshots. The number of snapshots that can be maintained on XP is limited to 1
- No backup data verification
- No support for MySQL clusters.
- No email/RSS notifications. Information will be logged in Windows event logs
Tested Platforms
This page provides the list of requirements for ZRM Backup Server, ZRM client (MySQL server), MySQL server configuration and requirements for various backup methods. Users must read this section before starting to install ZRM for MySQL components as described in Downloading and Installing instructions section.
Throughout this document, The MySQL Server refers the database server being backed up by the ZRM for MySQL Server, which also called the ZRM Server.
ZRM Backup Server Requirements
Backup server performs various CPU, Memory, Network, and Disk intensive operations. While hardware requirements will vary based on your backup environment, we recommend a server with at least 4GB of memory and a modern quad-core server-class CPU. The bandwidth of the network link between backup server and your network switch is also very critical. If network bonding is supported by your switch, we recommend providing a bonded connection to the backup server.
- You should have at least 2 GB of disk space on the disk where ZRM Enterprise software is being installed.
- Zmanda UI installation directory (/opt/zmanda/zrm) must not be a NFS mounted directory.
- Ensure that there is at least 10% free disk space in the Zmanda installation (/opt/zmanda/zrm) and temporary directories (/tmp).
Linux/Solaris
- Verify that the ZRM server has operating system accounts for a mysql user belonging to the mysql group. The account should have a login shell, and be able to execute commands on the ZRM server. If implementing a copy plugin to back up clients, matching accounts must be set up on the MySQL servers. The uid and gid of themysql user must match on the ZRM server and the MySQL server (backup client).
- The mysql user must be added to cron.allow file. This file is usually in /etc or /etc/cron.d directory. The crontab file must be also editable by mysql user.
- On ubuntu platform, the crontab for mysql must set the MAILTO parameter to a valid email address (or an empty string). The following example shows the entry for setting the parameter to an empty string:
MAILTO=””
- The ZRM server must have the locale set to en_US.UTF-8 (US English, UTF-8 Character set).
Windows
- ZRM server must be installed and run from the Administrator account.
- Windows server must be running US English edition
ZRM Server Package Dependencies
The following packages are required on the ZRM Server (32-bit versions of packages required):
Linux
- ZRM for MySQL requires the MySQL client commands listed below to be installed on the ZRM server. ZRM uses the following MySQL commands on the ZRM server:
- The MySQL client commands installed on the ZRM server must be compatible with the version of MySQL servers being backed up. Zmanda recommends installing the same version of MySQL software on the ZRM server and MySQL server. The ZRM server uses mysqlbinlog command to parse binary logs created by the MySQL servers. So, the version of mysqlbinlog command must be compatible with binary logs generated by different MySQL servers that are being backed up.
- MySQL Enterprise Backup and Xtrabackup binaries must be installed on the ZRM server in the same location as MySQL server under the following use cases: streaming backup mode (default configuration) and when apply logs are performed during restores (apply-log parameter should be set to 0 in the backup set's mysql-zrm.conf).
- The ZRM server assumes that the MySQL commands are installed in /usr/bin/. You can change this default either globally or by backup set. If necessary, you can change the client command location and binary log location inSet Site Defaults page. See the MySQL subsection of the Backup Tab for details.
- On some distributions (such as debian), the default mysql binary log location /var/log/mysql is owned by mysqluser and adm group. ZRM expects the binary logs to be owned by mysql user and mysql group. Please change the group ownership of the directory.
- mailx: The mailx package can be found as part of the Linux distribution. The mailx package must be configured to send mail from the ZRM machine to the MySQL database backup administrator.
- On 64-bit ubuntu/debian platforms, ZRM installer needs ia32-libs package. On 64bit RHEL/Oracle Enterprise Linux/Fedora/CentOS platforms, glibc.i686, libgcc.i686, libstdc++.i686 and ncurses-libs.i686 packages are required.
- ZRM server also installs ZRM client. So, all ZRM client dependencies are also required.
The dependency packages are installed by default on most Linux distributions. If you need to add them, you can use yum or apt-get, either from the distribution media, or from a distribution repository (run either as root):
#yum install package_name
or
#apt-get install package_name
Solaris
- ZRM for MySQL requires the MySQL client commands listed below to be installed on the ZRM server. ZRM uses the following MySQL commands on the ZRM server:
- The MySQL client commands installed on the ZRM server must be compatible with the version of MySQL servers being backed up. Zmanda recommends installing the same version of MySQL software on the ZRM server and MySQL server.
- The ZRM server assumes that the MySQL backup client's MySQL commands are installed in /usr/bin/. You can change this default either globally or by backup set. If necessary, you can change the client command location and binary log location in Set Site Defaults page. See the MySQL subsection of the Backup Tab for details.
- mailx: The mailx package can be found as part SUNWcsu package. ZRM uses mailx program to send email notification.
- GNU utilities (such as GNU tar, GNU find) are also required on the server.
The Zmanda Network downloads page collects all these packages in a downloadable tar archive (which is made available after you select a platform to download). If necessary, download the tar archive to the local system, extract it, and run pkgadd as the superuser to install any necessary packages:
# pkgadd -d package_name
Windows
- ZRM server can only run on 32bit Windows platform.
- ActivePerl version 5.8.8 is required. Please contact Zmanda if you do not have access to ActivePerl version 5.8.8. After downloading the file, run the Setup program. After you confirm the license agreement, the Setupprogram asks you what programs to install and prompts you for some installation details. Install all of the products in their default locations, and make sure that the Add Perl to the PATH environment variable andCreate Perl file extension association boxes are checked before clicking through the Finish dialog.
- Additional Perl modules are also required. These are installed as part of ZRM installation. ZRM installer requires connection to Internet during installation.
- ZRM for MySQL requires the MySQL client commands listed below to be installed on the ZRM server. ZRM uses the following MySQL commands on the ZRM server:
MySQL server (Backup Client) Requirements
- Verify that the version(s) of MySQL server(s) that you deploy are supported by Zmanda Recovery Manager for MySQL. Check the supported platform compatibility matrix.
- You must set up an operating system account for the mysql user. Our recommendation is the mysql user should have UID and GID that match mysql user on the ZRM server especially for ssh copy plugin. This user must have read/write access to the MySQL data directory and binary logs.
- MyDumper (Logical parallel backup tool) or MySQL Enterprise Backup or Xtrabackup (1.6 or later) tools must be installed on the MySQL server if the tool is going to be used for full backups. If you are planning to use Xtrabackup compression option, the compression tool, qpress must be installed on the MySQL server.
MySQL server (backup clients) package dependencies
Linux
- perl: The perl-DBI, perl-DBD-MySQL, and perl-XML-Parser modules are also required.
- perl LWP-UserAgent module is required for Netapp snapshot backups.
- xinetd
- sudo (required only for snapshot backup configurations)
- Gnu tar version 1.15 or later.
These programs are installed by default on most Linux distributions. If you need to add them, you can use yum orapt-get to install them, either from the distribution media, or from a distribution repository (you run either as root):
#yum install package_name
or
#apt-get install package_name
Solaris
- perl: The Perl-DBI, Perl-DBD-MySQL, and perl-XML-Parser modules are also required.
- perl LWP-UserAgent module is required for Netapp snapshot backups.
- SUNWcsu
- SUNWsshcu
- SUNWgzip
- SMCtar (version 1.15.1 or greater)
- SMCgpgme
- SMCsudo (required only for snapshot backup configurations)
- SMCgrep
- SMCcoreu
The Zmanda Network downloads page collects all these packages in a downloadable tar archive (which is made available after you select Solaris platform). If necessary, download the tar archive to the local system, extract it, and run pkgadd as the superuser to install any necessary packages:
# pkgadd -d package_name
If you are using ZRM dependency tar ball for installation, you may need additional dependency common-1.4.5-SunOS5.8-sparc-CSW.pkg that is not part of the tar ball.
Windows
- Databases to be backed up must be stored on NTFS volumes with the Volume Shadow Copy Service (VSS) enabled.
- Windows clients must open inbound TCP ports 10080 and 10081, and outbound TCP ports 700:800.
- Windows clients must open inbound TCP ports 10080 and 10081, and outbound TCP ports 700:800.
- The Remote Registry Service must be enabled before installation.
MySQL database user for ZRM
We recommend creating a MySQL database user for ZRM backup and recovery instead of using the MySQL root user. If the MySQL database backup user and restore user are different, set the privileges of the backup user in Backup Tab for the backup set.
Restore user privileges can be specified on the mysql-zrm(1) command line via the --user and --password options.
If you are using Xtrabackup or MySQL Enterprise Backup as the full backup method, the MySQL user should have privileges to access the database(s) from the localhost (mysql server) as well as the ZRM server.
Although MySQL allows dollar signs ($) in passwords, the ZMC does not. If you must use passwords that include dollar signs at your site, consider using one of the alternative methods for storing MySQL user passwords described in the MySQL article "Keeping your Password Secure".
Required Privileges for the MySQL Account
MySQL backup and restore users need, at minimum, the following MySQL privileges (MySQL 5.1.6 or later):
- backup user
- LOCK TABLES, SELECT, FILE, RELOAD, SUPER, UPDATE, TRIGGER, SHOW VIEW, EXECUTE, EVENT
- restore user
- CREATE, DROP, INDEX, SHUTDOWN, INSERT, ALTER, DELETE, UPDATE, TRIGGER, SUPER, REPLICATION CLIENT, CREATE VIEW
EXECUTE, SHOW VIEW and CREATE VIEW privileges are required for MySQL server version 5.0 or greater. Before MySQL 5.1.6, the SUPER privilege was required to create or drop triggers and so TRIGGER and EVENT privileges are not required.
MySQL backup user requires SUPER privileges even when MySQL replication is not being used. For incremental backups, ZRM for MySQL requires SUPER privileges to enable binary logging.
A MySQL replication slave backup user should have REPLICATION CLIENT privileges in addition to the above privileges.
Example: Command that grants minimal user privileges for database user dbabackup to backup and restore databaseexpenses (MySQL 5.1 server) remotely from machine server.company.com :
mysql> GRANT LOCK TABLES, EXECUTE, SELECT, FILE, RELOAD, DELETE, SUPER, CREATE, DROP, INDEX, SHUTDOWN, INSERT, ALTER, UPDATE, SUPER, REPLICATION CLIENT, TRIGGER, SHOW VIEW, CREATE VIEW
     -> ON expenses.*
     -> TO 'dbabackup'@'server.company.com'
     -> IDENTIFIED BY 'obscure';
ZRM for MySQL should be running on server.company.com. If you are restoring from logical backups, additional privileges will be required for the restore user. For example, if there are stored procedures in the logical backup image being restored, the restore user must have CREATE ROUTINE and ALTER ROUTINE privileges. If you are not sure of the list of privileges that are required for restoration, temporarily grant the restore user all privileges for the databases and/or tables being restored.
Note:
- If you are backing up remote MySQL server, backup user privileges should be granted for the backup user accessing from the MySQL server as well as the server running ZRM (ZRM server).
- RELOAD privilege is granted at MySQL server level (not at database level) and so following grant command for RELOAD privilege at MySQL server level. Please see MySQL documentation for privileges.
grant RELOAD on *.* to 'user'@'host' identified by 'password
Enabling MySQL server binary logs
MySQL backups (full and log incremental) require that binary logging on the MySQL server. To enable binary logging, start the MySQL server daemon (mysqld) with the --log-bin option:
mysqld --log-bin=BinLogFilename
Enabling binary logs on a MySQL server reduces performance by about 1%. Actual performance degradation depends on the type of database workload. It is the best practice to store binary logs in a different file system than the file system containing the database directories.
Consult MySQL reference manual for more information on MySQL binary logs.
log-slave-updates must be enabled on the replication slave mysqld options file (my.cnf) if you are performing backups of a MySQL replication slave. Please note when replication master is switched over to a slave and there is chained replication (master -> slave -> slave), there might be duplicate events if log-slave-updates is enabled on the slave.
Requirements for Snapshot and Storage Checkpoint Backups
ZRM for MySQL can create temporary snapshots of the file systems or storage volumes and use these snapshot volumes to do backups. If the database resides on a Veritas File System (VxFS), storage checkpoints can be leveraged.
Various storage and filesystem snapshots are supported. Some snapshot mechanisms are licensed and will require licenses to be purchased. All MySQL database files (data, log, indexes) must be stored on snapshot-capable storage volumes.
The requirements for each file system and storage snapshot is different. They are discussed in the Snapshot Plugins chapter.
Requirements for InnoDB Hot Backup/MySQL Enterprise Backup
The ibbackup command (which is installed as part of the MySQL Enterprise Backup or InnoDB Hot Backup product) must be installed on the MySQL Server. MySQL Enterprise Backup or InnoDB Hot Backup product must be purchased from Oracle or at www.innodb.com. ZRM provides integration with MySQL Enterprise Backup or InnoDB Hot Backup product. Make sure the mysql operating system user has permissions to execute the command. If ibbackup command is installed in a place other than /usr/bin, you must specify the path when you choose InnoDB Hot Backup on theBackup How page.
SSL Between MySQL Servers and ZRM server
SSL provides an additional layer of security while moving backups over a network. We recommended that you enable SSL on the MySQL server if the backups are performed on unsecured networks. Installing SSL between the local ZRM for MySQL server and remote MySQL server(s) is necessary only for logical backups of remote MySQL servers.
To verify the availability of SSL support in the MySQL server, you can either:
- Run the following command on the local server:
# mysqld --ssl --help
- When the SSL support does not exist, the system responds with a message like this:
060828 15:25:08 [ERROR] mysqld: unknown option '--ssl'
- Examine the value of the have_openssl system variable:
mysql> SHOW VARIABLES LIKE 'have_openssl';
+---------------+-------+
| Variable_name | Value |
+---------------+-------+
| have_openssl  | YES   |
+---------------+-------+
Consult the MySQL reference manual for configuring SSL on MySQL.
Zmanda recommends using either of the two options given below to configure SSL when remote backups of MySQL servers done using unsecured networks.
- Set SSL parameters in the my.cnf file of MySQL on the ZRM server.
 ssl-ca=mySQL_conf_dir/openssl/cacert.pem
 ssl-cert=mySQL_conf_dir/openssl/client-cert.pem
 ssl-key=mySQL_conf_dir/openssl/client-key.pem
- Set SSL parameters for all backup set in mysql-zrm.conf file of ZRM for MySQL or you can specify it in the SSL options field in Backup What page of ZMC.
 ssl-options="--ssl --ssl-ca=mySQL_conf_dir/openssl/cacert.pem
                    --ssl-cert=mySQL_conf_dir/openssl/client-cert.pem
                    --ssl-key=mySQL_conf_dir/openssl/client-key.pem"
Downloading ZRM for MySQL Packages
Download distribution files from from the Zmanda Network Downloads page. Note that there are a number of different packages for various MySQL server and ZRM server architectures.
If you are installing ZRM for MySQL version 3.7 over a previous version, please see the "Compatibility with Previous Versions of the Zmanda Recovery Manager for MySQL" section of the ZRM for MySQL 3.7 Release Notes.
ZRM Server Components
The ZRM Server is the backup server. It can run either Linux, Solaris, or Windows. The installer.run (or, for Windows,installer-win.exe) packages are binary executables for the ZMC Rapid Installer, which install the ZRM Server software, the Zmanda Management Console (ZMC) and all dependencies: this is the recommended method of installation. Theinstaller.run packages include the ZRM command line interface and ZRM client software. The installation instructions are provided in the next section.
Linux
- ZRM-enterprise-3.7-installer.run
- All supported linux distributions.
Solaris
- ZRM-enterprise-3.4-installer-sparc.run
- Solaris on Sparc platform
- ZRM-enterprise-3.7-installer-intel.run
- Solaris on Intel/AMD platform
Windows
- ZRM-enterprise-3.1-installer-win.exe
- Windows on x86 (32bit only)
MySQL Server (ZRM client) Components
The MySQL server is the machine being backed up (i.e., the backup client). No ZRM client components are required if logical backup and recovery of MySQL server.
Linux
- MySQL-zrm-enterprise-client-3.7-1.noarch.rpm
- RHEL, SLES and Fedora distribution. Install using the following command (run as root):
# rpm -i MySQL-zrm-enterprise-client-3.7-1.noarch.rpm
- mysql-zrm-enterprise-client_3.7_all.deb
- Ubuntu, Debian distribution. Install using the following command (run as root):
# dpkg -i mysql-zrm-enterprise-client_3.7_all.deb
Solaris
- MySQL-zrm-client-3.7-solaris.pkg
- Open Solaris and Solaris 10 on Intel/AMD and Sparc platforms. After downloading the Solaris client package, install using the following command (run as superuser) in the directory where the package was downloaded :
# pkgadd -G -d .
- The above command installs the package in all zones.
Windows
- ZRM-Windows-*.zip
- Windows 32bit and 64bit platforms. Latest version of Windows client is 3.7. Install by extracting the archive and running the resulting Setup.exe. Administrator privileges are required for installation.
- During installation, you have to specify the name of ZRM server or its IP address. If this information is not available at the time of ZRM client installation, You can use ZRM client configuration utility (Start > Programs > ZRM Client For MySQL > ZRM Client Configuration Utility > Server) to set the correct IP address of ZRM server and restart ZWC Service from the Services menu. ZRM client must be registered with ZRM server before backups are performed.
The ZMC Rapid Installer (Linux and Unix)
For installation using a method other than the Rapid Installer, please see the sections that follow.
1. Copy the Rapid Installer binary file to the host where the given component will be installed.
2. Log in to the host as the superuser.
3. Make sure that the Rapid Installer binary file is executable. For example:
# chmod +x ZRM-enterprise-3.7-installer.run
4. Run the installer by double-clicking on it, or enter the following command line:
# ./ZRM-enterprise-3.7-installer.run
5. The Rapid Installer then starts. Follow the on-screen instructions.
Important Note: When prompted to choose the Zmanda Web Server protocol, we strongly recommend that you choose https for security reasons. Even if you choose http for browser/ZMC communication, the ZMC still requires HTTPS for internal communication purposes, and will therefore prompt you for an SSL port during installation in all cases.
Note: The installer performs several tasks after creating and populating the Zmanda directories. These are completed after the progress bar (which only tracks the archive extraction) shows 100% completion. These tasks take time. Please wait till they complete.
6. After the ZRM for MySQL binaries have been extracted and installed, the Zmanda Management Console is launched and the readme file is displayed. The readme file includes the default ZRM for MySQL username and password. You can now login to the console using any supported browser and begin backing up MySQL databases.
7. After installing the ZRM server, please make sure license keys are installed on the ZRM server.
Rapid Installer Command Line Options
Run the installer with the --help option to see what command line parameters are available.
- --help
- Display the list of valid options.
- --version
- Display product version information.
- --optionfile optionfile
- Use command line parameters specified in optionfile.
- --mode mode
- Choose the installation mode, where mode is gtk (the default), xwindow, text, or unattended.
- --apache_server_port apache_server_port
- The ZMC Web Server port (default is 80).
- --apache_server_ssl_port apache_server_sslport
- ZMC Web Server SSL port (default is 443).
- --mysql_port mysql_port
- Specify the ZMC MySQL Server port (default is 3036).
Uninstalling ZRM for MySQL (Linux and UNIX)
Important Note to Customers of Amanda Enterprise Edition: Before running the uninstall script for ZRM for MySQL, you must first stop the Amanda Enterprise Edition services from running (enter /etc/init.d/zmc stop as root), then restart it manually after the uninstall script completes (/etc/init.d/zmc start).
You can unistall ZRM for MySQL by clicking the uninstall script located in /opt/zmanda/zrm/uninstall. Using this script, you can remove the ZRM for MySQL binaries, with the option of leaving configuration files intact. Follow the on-screen instructions after running the script.
The ZMC Rapid Installer (Windows)
Installation must be run from the Administrator account. First, make sure that system meets the requirements for ZRM servers on Windows. If the correct version of ActivePerl is not installed (5.8.8) before installing ZRM for MySQL server, the ZRM installation program will prompt you to install it before it will allow you to continue. If you do not have access to this version of Perl, please contact Zmanda Support Team.
- Obtain the Windows ZRM server installation program ZRM-enterprise-3.1-installer-win.exe from the Zmanda Network Downloads page. Go to the folder where you downloaded the file and double-click it to start the installation. Stay connected to the internet during the installation process. Installing some of the dependencies requires internet access.
- Follow the on-screen instructions. Because the installation program installs the Zmanda Windows Client as well as the web server and ZRM server, it must extract a large number of files before the setup process can begin. Please be patient.
- Important Note: When prompted to choose the Zmanda Web Server protocol, we strongly recommend that you choose https for security reasons. Even if you choose http for browser/ZMC communication, the ZMC still requires HTTPS for internal communication purposes, and will therefore prompt you for an SSL port during installation in all cases.
The installer performs several tasks after creating and populating the Zmanda directories. These are completed after the progress bar (which only tracks the archive extraction) shows 100% completion. These tasks take time. Please wait until they complete.
After the server and client software has been extracted and installed, the Zmanda Management Console is launched and the readme file is displayed. The readme file includes the default ZRM for MySQL username and password. You can now login to the console using any supported browser and begin backing up MySQL databases.
The following services are installed as part of ZRM for MySQL server, and must be running for the ZRM server to function:
- ZMC Service
- ZRMEnterpriseApache
- ZRMEnterpriseMySQL
- ZWC service
After installing the ZRM server, please make sure license file is installed on the ZRM server.
Uninstalling ZRM for MySQL Windows Server
You can use the Uninstall ZRM option added to the Windows Start->All Programs menu or the Add/Remove Programsoption from the Control Panel to remove ZRM for MySQL from the system. After you initiate the uninstall, you are prompted whether you would like to remove backup configuration data as well as the program itself. If you plan to upgrade, you should choose to keep the configuration data.
Note that removing the ZRM Windows Client requires that you use the Add/Remove Programs option available on the Windows Control Panel.
Installing ZRM License
After you have purchased a base license and any feature licenses (such as a snapshot license), the Zmanda Network Downloads page will include an option to download a license file (zmanda_license). On Linux/Solaris ZRM servers, download the license file to the /etc/zmanda directory, then make sure that the file permissions are set to 644 and that the owner is root. On Windows ZRM servers, download the file to ZRM_installation_dir\etc\zmanda as the Administrator.
Secure Socket Layer (SSL) Certificate for ZMC web server
Although ZRM for MySQL is shipped with pre-packaged Apache SSL certificate to get you started, Zmanda recommends you purchase (or create your own self-signed) SSL certificates and distribute them to all the browsers from which you wish to access the ZMC. The pre-packaged certificates are not secure (as they are shared by all ZRM for MySQL customers). These generic certificates will also generate security warnings on some browser versions.
Zmanda recommends that you either 1) Create self-signed certificates and distribute them to all the client machines that require access to the ZMC, or 2) Distribute certificates from a recognized Certificate Authority. Option 1 (self-signed certificates) is free, and is adequate for most organizations that deploy ZMC servers and the machines that access them behind the same firewall.
If using a certificate from a recognized Certificate Authority, your browser will automatically create the secure connection with no errors or warnings.
If using a self-signed certificate, you must then deploy a mechanism to get the relevant browser(s) to accept this new root CA. One method is to generate the certificate using a special format that can be directly imported by common web browsers, and then providing a link on a secure intranet for ZMC users to download (web browsers automatically display the import dialog if the file is in the correct format and sent by the intranet web server using the correct mimetype). PKCS12 (now part of OpenSSL, provides a mechanism to distribute self-signed private key certificates in a number formats recognized by different browsers.
Another approach is to manually add the new self-signed root CA to the root CA list of the client system, which will automatically provide access to the new CA for all web browsers on the client system. This article covers the procedures for doing this in a Microsoft Windows server environment.
For more details on certificate validation issues, see this article from OpenSSL.
File Locations on ZRM Server
ZRM for MySQL files are installed in following directories:
| ZRM Server File(s) | Location |
| CLI Executables | /usr/bin |
| Man pages | /usr/share/man |
| GUI/Web Components | /opt/zmanda/zrm |
| License key file | /etc/zmanda/zmanda_license |
| Backup Set and other configuration files | /etc/mysql-zrm, /etc/cron.d, /etc/logrotate.d |
| Plugin templates | /usr/share/mysql-zrm/plugins |
| README files and other offline documentation | /usr/share/doc/MySQL-zrm-enterprise-* or /usr/share/doc/mysql-zrm-enterprise |
| Libraries | /usr/lib/mysql-zrm |
| Log files (including ssh-copy plugin output) | /var/log/mysql-zrm/mysql-zrm.log |
| Backup images and catalog (default) | /var/lib/mysql-zrm |
| Zmanda Management Console | /opt/zmanda/zrm, /opt/zmanda/common |
File Locations on MySQL server
| MySQL Server File(s) | Location |
| Binary executables and scripts (Windows) | C:\Program Files\Zmanda\Zmanda Client for Windows\bin |
| Log files | Socket copy plugin output is logged to /var/log/mysql-zrm/socket-server.log on the client. There are other log files depending on the type of backup. |
Caution: Do not directly delete or change any of these files or directories unless directed to do so by the Zmanda Support Team. Changing any of these files directly can result in failed backups and other problems.
Logging in to the Zmanda Management Console
The ZMC is web-based, and can be accessed from any machine on the network. Internet Explorer 9 or later or FireFox or Chrome is the recommended browser.
To access ZMC, open any web browser and point it to the ZMC server. For example. if the backup server is ZMCbackupserver.company.com, and you have specified port 1234 for web services during the ZRM Enterprise installation process, use the following URL:
https://ZMCbackupserver.company.com:1234
By default, the ZMC web server uses port 443.
If you are running Amanda Enterprise and ZRM Enterprise products on the same server, you will have to use port number configured during Amanda Enterprise installation to access both Amanda Management console and ZRM Management console.
Initial User name and Password
After the you have downloaded and installed the ZMC, log in with the default user name "admin" using a password of "admin”.
Important note: We strongly recommend that you change the password as soon as possible.
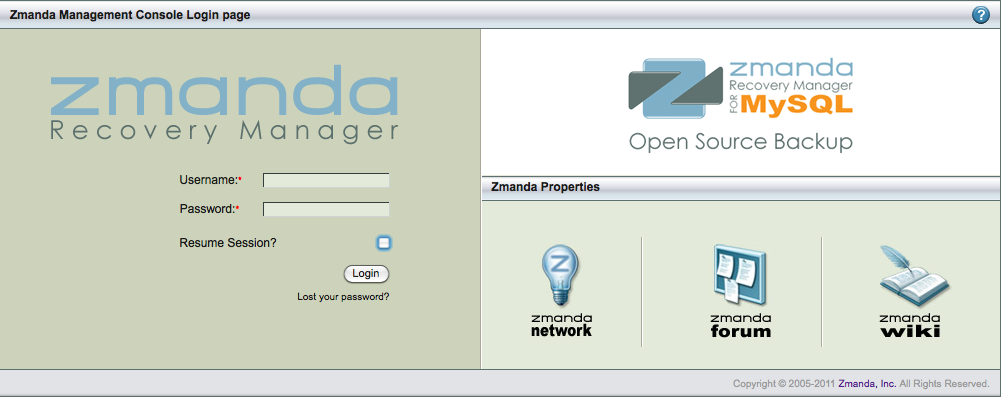
Lost Password
If you do not remember the password, please click Lost your password? link. Please enter the ZMC user name in theLost Password section. Please note that password will be mailed to the mail address registered to the ZMC user account. Please note that email service should be configured on the ZRM backup server to receive the lost password email.
If you have difficulty resetting the password, please contact Zmanda Support.
Zmanda Network Authentication
ZMC will ask Zmanda Network User name and password if you login as admin user. This authentication allows ZMC to connect to Zmanda Network to authenticate the user as well as obtain alerts including security alerts.
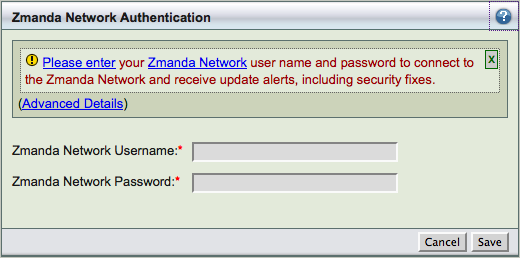
Zmanda Network Authentication is not supported when Web proxy server is in use. If there is a web proxy server or there is no internet connection on the Amanda server, please select Cancel button.
Zmanda Network Authentication is performed every time ZMC admin user logs in.
About Backup Sets
The backup set is a grouping mechanism that simplifies and optimizes backing up MySQL databases, and tables that are accessible for a MySQL server or is a part of MySQL cluster. It lets an administrator define a set of backup policies (what, how, where and when) to automatically schedule different backup runs.
All ZMC actions (backup, restore, reporting, and monitoring) are performed in the context of backup sets.
A backup set cannot include more than one MySQL server, unless those servers form a cluster. A backup set can include one or more databases. When selecting individual tables as backup sources, you must select a single database, then the tables it contains. A single backup set cannot contain tables from multiple databases.
Multiple backup sets are useful for protecting a large number of systems with different backup requirements, but many organizations with less complex backup requirements can define a single backup set to meet their needs. For example, on a network that includes several databases with high transaction rate along with other databases that change more slowly, you would probably want to create one backup set for the more active databases, and another backup set for the less active ones.
What a Backup Set Contains
A backup set is defined by the following properties:

- Name
- Besides being unique, the name must consist of alphanumeric characters. Dashes (-) and underline (_) characters are also allowed.
- What
- Type and Name of MySQL host: Identifies the MySQL server (identified by DNS name or IP) or cluster being backed up, and the database(s), or table(s) within in a database to back up.
- Where
- The destination directory where the backups will be stored until they are expired by the retention datespecified by the retention policy.
- When
- Specifies the backup cycle policies used when automatically generating backup schedules.
- How
- Specifies the backup method to use and other parameters such as Backup Mode, Replication, Encryption, snapshots, etc.
Multiple backup set configurations
ZRM for MySQL employs multiple levels of default inheritance to simplify the process of administering multiple backup sets:
- Factory settings
- These are the "built-in" assumptions that allow many administrators to use ZRM for MySQL right "out of the box" with few configuration changes.
- Site Settings
- These allow the admistrator to set global defaults used when creating backup sets. For example, if you have a single MySQL server and are creating multiple backup sets for different the databases it contains, you can set up a site-wide default MySQL server (and related parameters).
- Backup set
- The backup set itself allows you to override either Factory or Site settings.
Backup Set Starter Page
This is the first page of Zmanda Management Console (see below figure). The left panel can be used to create a new backup set. The right panel is the backup set dash board that shows the list of backup sets, status of the backup set backups and which MySQL server is being backed up.
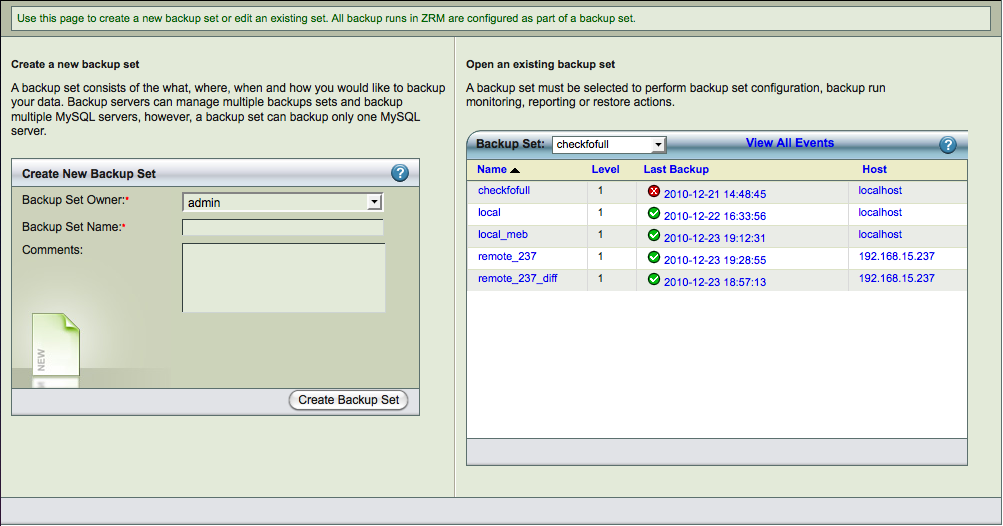
Create New Backup Set
- Backup Set Owner
- Use the dropdown menu to choose the ZRM for MySQL user who will own the backup set. The only available user will be Admin until you configure more users.
- Backup Set Name
- Specify an unique and descriptive name for the backup set. The name can include any alphanumeric characters, along with periods and hyphens. Spaces are not allowed. Backup Set Name cannot be changed after creation.
- Comments
- Enter an optional comment that describes the purpose of the backup set. The comment can contain any alphanumeric characters. Special characters such as # and newline are not allowed.
- Create Backup Set
- Click the Create Backup Set button when you are done. The Backup Summary page is then displayed, allowing you to set further options for the backup set.
Backup Set Dashboard
Backup Set Name
The list of backup sets configured on the ZRM server. They can be sorted. You can select a backup set by clicking on the name.
Last Backup Level
The level of backup performed last for the backup set. 0 means full backup. 1 means log incremental or differential or chained differential backup.
Last Backup Date stamp
Date and time of last backup performed for the backup set. The green icon indicates the last backup was successful. The Red icon indicates last backup was a failure and the backup set needs attention.
Host
Each backup set is associated with a MySQL server. The host name or IP address of the MySQL server.
Specifying what to Back Up
The Backup What page lets you define what databases and tables from a particular MySQL server to back up in the current backup set. To define multiple MySQL servers requires multiple backup sets.
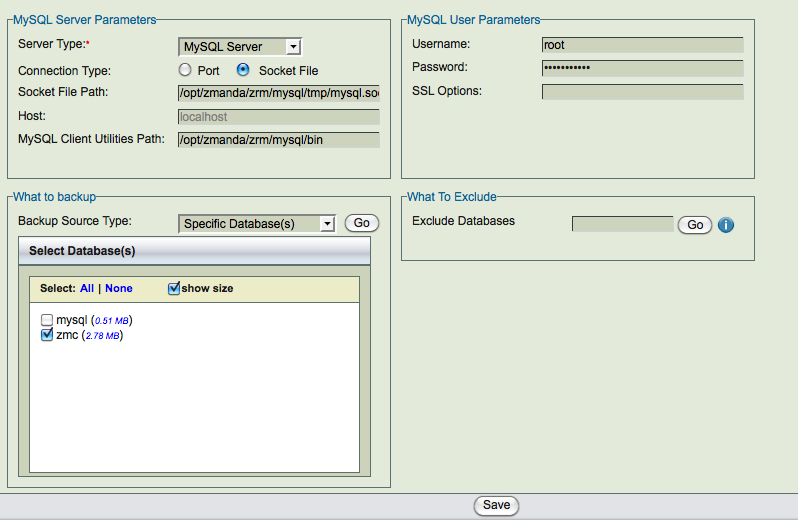
As with many of the Zmanda Console Management forms, the fields change depending on the context; selecting different values can change the options that are displayed.
Note also that backup sets inherit default values from the Set Site Defaults page, which in turn will default to factory settings unless you change them. Text fields show inherited defaults on a gray background (see Host parameter localhost in the example screen shown above).
Server Parameters
The first group of options (Server Parameters) let you specify the connection details for the MySQL Server to back up. MySQL Server is selected as the Server Type by default, and that is what is documented here. If you choose MySQL cluster, Backup What displays different options, which are described on the Backing Up a MySQL Cluster page.
- Connection Type
- Choosing Port lets you enter a port number for communication with the MySQL server; choosing Socket Filelets you enter a path to the socket file.
- Host
- Enter the host name or IP address of the MySQL server being backed up, or localhost if the MySQL server and the ZRM server are on the same machine. Binary logs must be enabled for the MySQL server.
- MySQL Client Utilities Path
- If you have installed the same versions of MySQL client commands on the ZRM server and the MySQL server (typically in /usr/bin), use the factory (Or Site Settings) defaults for all backup sets. If you have installed different versions of MySQL on the ZRM server and the MySQL server (i.e., the backup client), enter the full path to where MySQL binary commands are installed on the backup client. For example: /opt/lampp/bin or
C:\Program Files\MySQL\MySQL Server 5.0\bin\
MySQL User Parameters
User Name
Enter the username of the MySQL User on the MySQL server. If no user is specified here, ensure that you have the MySQL backup user (with appropriate privileges) specified explicitly as a Site Default, or that the MySQL user specified in the my.cnf or --options file has the necessary privileges described in System Requirements.
Password
Enter the password for the MySQL User. If you wish to prevent the password from being sent in plaintext over the network, you may wish to configure the MySQL username and password using the MySQL my.cnf or --options file. The following characters are allowed in passwords: a-z A-Z 0-9 _ - / . = " ' + * and space. For the remaining criteria please see this MySQL documentation.
SSL options
This field is valid only for logical full backups. If the connection from ZMC server to the remote server is via SSL, specify the MySQL ssl parameters here. If you are backing up databases on the localhost, leave this field empty. Please see configuring SSL connection between MySQL server and ZRM server.
What to Backup
Choose an option from the dropdown menu. Note that because the database(s) and table(s) shown on this page are updated dynamically based on information retrieved from the MySQL server, these may not match what has been set on the Site Settings page. The Go buttons allow you to refresh the connection to the MySQL server(s) to determine what databases and tables are currently available for backup. Available options are:
All Database(s)
- Choosing this option includes all databases and all tables for backup.
- Specific Database(s)
- Choosing this option displays a list of databases available for backup on the MySQL server. Check all the databases that you want to add to this backup set. Size of the databases are also displayed if show size checkbox is selected.This will help determine the size needed for full uncompressed backup images. See Note below.
- Specific Table(s)
- Choosing this option displays a dropdown menu that lets you select a database from which to select tables to backup, followed by the list of tables in the selected database; check all the tables that you want to add to this backup set. Size of the tables are also displayed if show size checkbox is selected. This will help determine the size needed for full uncompressed backup images. See Note below.
- If you are planning to use parallel logical backup as full method and select specific tables for backup, stored procedures, views and triggers will not be backed up. Please use Specific Databases if you want to back up stored procedures, views and/or triggers.
- Database names and table names cannot contain # character.
If you are planning to restore a table from logical backups (full backup method is logical), you must select specific table(s) in the backup set.
You must have innodb_file_per_table parameter enabled in the MySQL server to restore database(s) that use InnoDB storage engine.
Note: Database(s) or table(s) using innoDB storage engine can be restored to another MySQL server containing other InnoDB tables only if the restore target MySQL server is running Percona MySQL server and backup is done using Xtrabackup method.
If you are planning to use snapshot backup as full backup method and are using InnoDB storage engine, you should select all databases in the MySQL server. You will be able to restore all databases to the orginal or alternate server. You will not be able to selectively restore the database.
What to Exclude
Exclusions can be used to backup all databases except few or all tables in a database except few that match the specified pattern. This is useful when a MySQL server has mixture of production and test databases and test databases need not be backed up. It can also be used to split large environment (lot of databases or lot of tables) into multiple backup sets.
The pattern applies to database names if all databases or specific databases are in the backup set. The pattern is matched with table names if a specific tables are in the backup set.
The wildcards that are supported are:
- *
- matches one or more character. For example: zmanda*db pattern will exclude zmanda_bugs_db,zmanda_wiki_db and will not match zmanda_network names.
- ?
- match only one character. For example: zmanda_db? will match zmanda_test1 and they will be excluded from the backup set.
- [<char><char><char>...]
- match any character. For example: test[123] will match test1, test2 and test3.
- |
- match one of the patterns. For example: cat*|dog* will match all names that begin with cat or dog.
Backing up MySQL Application-specific files
MySQL applications such as Sugar and MediaWiki consist of MySQL databases and associated configuration files. Backing up the databases alone will not completely protect these application servers from mishaps. For this reason, Zmanda allows you to add configuration files to backup, however the ZMC GUI does not yet support this. To add such application-specific files to the backup, edit the MySQL configuration file, mysql-zrm.conf for the given backup set, and use the --config-file-list option to mysql-zrm-backup(1) command to specify the files you wish to backup.
All application files that are backed up are compressed or encrypted depending on the backup set configuration. Backup of configuration files specified by config-file-list in the mysql-zrm.conf are backed up only during full backups. Incremental backup of these files are not performed. The backup is performed as mysql user. So, mysql user should have permissions to read these files.
This functionality is available only on Linux and Solaris platforms.
To use this functionality:
-
Define config-file-list parameter in the mysql-zrm.conf for the backup set. Edit /etc/mysql-zrm/<backup set name>/mysql-zrm.conf. for example:
config-file-list="/etc/mysql-zrm/<backup set name>/application-configuration-files"
The configuration file can be in any directory in the ZRM server.
-
(optional) It might be useful to generate the application configuration file dynamically before the backup run. This will allow all application files to be part of the backup set. The generation of configuration file can be done using pre-backup-plugin. Pre-backup plugin can be configured in ZMC Backup|How page.
- The pre-backup plugin can be use find command to generate list of files in the application directory. You can specify list of directories or files to exclude to find command. Following script can be used to backup ZMC dependency configuration files. This script can be used as a pre-backup plugin.
#!/bin/sh
#
# List of directories to backup
#
dirs="/opt/zmanda/zrm /opt/zmanda/common";
#
# List of sub-directories to be excluded from the backup
#
exclude_dirs="/opt/zmanda/zrm/tmp
             /opt/zmanda/zrm/php/tmp
             /opt/zmanda/zrm/mysql/tmp";
#
# List of files that should be excluded
#
exclude_filename_wildcards="*.tmp *svn*";
#
# configuration_file: List of files to be backed up. Do not change this value without
# fixing mysql-zrm.conf
#
configuration_file="/etc/mysql-zrm/zmc-backup/zmc-configuration-files";
excl_fname_pattern="";
for exclude in $exclude_filename_wildcards;
do
       excl_fname_pattern="$excl_fname_pattern -o -name '$exclude'";
done
# strip the first -o
excl_fname_pattern=`echo $excl_fname_pattern | sed -e 's/-o//1'`;
excl_dir_pattern="";
for exclude in $exclude_dirs;
do
       excl_dir_pattern="$excl_dir_pattern -o -type d -path $exclude -prune";
done
rm -f $configuration_file
for dir in $dirs;
do
       find $dir -type f -not '(' $excl_fname_pattern $excl_dir_pattern ')' -print >> $configuration_file;
done
exit 0;
MySQL cluster (NDB storage engine) backup/recovery
-
Please note that MySQL cluster is backed up using NDB management tools (ndb_mgm and ndb_restore) tools. NDB management tools are required on the ZRM server.
-
Full backup of each NDB data node is performed on each data node in the backup directory (configured inBackup|Where page). The backup directory must be present in each NDB data node and cannot be the same directory across nodes. The backup is then copied to ZRM server using copy plugin. The ssh or socket copy plugin must be configured in each NDB data node (See Backup|How page).
-
Incremental backups of MySQL cluster cannot be performed on NDB data nodes. Since there can be multiple SQL nodes in a NDB cluster, the incremental backups cannot be performed correctly.
Backup What page
By default, ZRM for MySQL shows the options for a MySQL server on the Backup What page. When you chooseCluster as the server type, options appropriate for MySQL Cluster are displayed.
- NDB Connect String
- This identifies the cluster to connect with for making the backup. To back up multiple clusters, multiple backup sets are required, each set with the appropriate NDB connect string. The connect string is not validated when you save the settings, so be careful to enter a valid connect string if you want to avoid subsequent backup failures. Consult the [MySQL Cluster documentation] for further details.
- MySQL Client Utilities Path
- The location of MySQL binary commands used to manage the cluster server.
- What to Backup
- When performing backups on clusters, all databases are backed up; the What to backup option is grayed out and disabled.
Backup Where
This page specifies where the backup images for the backup set will be stored, and how long to retain them.
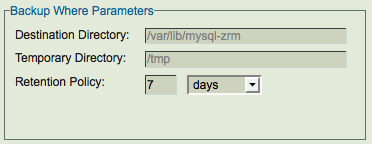
- Destination Directory
- Regardless of where the remote MySQL server is hosted, backups are stored under the backup directory of the local machine where ZMC runs. The default /var/lib/mysql-zrm. If you specify another directory, you must create it yourself on both the ZRM server and the MySQL server, and ensure that its permission settings allow read/write access to the mysql backup user. The directory used on the MySQL server and ZRM server cannot be the same i.e cannot be the same CIFS or NFS share.
- The recommended practice is to mount a filesystem at /var/lib/mysql-zrm. Use local, NFS, or CIFS mounted storage for storing MySQL backup data. The MySQL backup data can be migrated to other storage devices using Network-based backup and recovery utilities such as Amanda. If you are using NFS or CIFS storage as Destination directory, the root user and mysql user should have privileges to read and write to this directory.
- You must allocate sufficient disk space to store the MySQL databases. If sufficient disk space is not available, the backup run will fail. The destination directory should have at least 150% of uncompressed backup space available for a successful backup run. This additional space is required even when backups are configured for compression, since the additional space is used for compression during the backup run. The additional space is freed after the backup run.
- Example: Backup set "daily" requires 150GB of disk space for uncompressed backups and backup image upon compression are 100GB. The backup directory filesystem should have at least 225GB (1.5 * 150GB) for space.
- After backup run is completed, only 100GB of disk space will be used.
- The destination directory must not be under autofs controlled mount point because snapshot based backups mount the file system or storage snapshot under the Destination directory.
- Temporary Directory
- The default is to use the OS-specified temporary directory ($TMPDIR on Linux). It is recommended that the default value is changed so that sufficient temporary space if available for backup and restoration. In any case, the directory must exist on both the client and server, and have permissions set to allow read/write access to the MySQL backup user. If $TMPDIR is defined differently on the ZRM server and the MySQL server, you must explicitly set the path here and make sure that directory exists on both machines. In case of Solaris /tmp is memory based file system and filling it up will cause processes to run out of memory. So, default value must be changed.
- The disk space used in the temporary directory depends on the backup method.
- Logical backup, MyDumper and Snapshot backup - Few kilobytes are required during backup and size of full backup image is required during restoration. The space is required on the ZRM server.
- Raw backup (using mysqlhotcopy) - Size of full backup image plus 10% is required during backup as well as restoration. The space is required on the MySQL server.
- Xtrabackup tool - During backup, disk space equal to full size of backup image is required on the MySQL server. During restoration of full backups, space equivalent to backup image size is required on the ZRM server. If restoration involves full backup, differential/chained differential backups, size of temporary directory on the ZRM server must be sum of all backup images. Streaming backup mode does not require disk space equal to full backup image size on the MySQL server.
- MySQL Enterprise Backup - Size of full backup image plus 10% is required during backup on mysql server.
During restoration of full backups, space equivalent to backup image size is required on the ZRM server. If restoration involves full backup, differential/chained differential backups, size of temporary directory on the ZRM server must be sum of all backup images. Space is not required on the MySQL server. Streaming backup mode does not require disk space equal to full backup image size on the MySQL server.
- Retention Policy
- A retention policy sets the limit of the period for which the backup set will be retained. Images older than the retention policy specified are automatically purged. The retention policy for a backup image is stored in the backup index at the time of backup. So, changing the retention policy will not change the retention policy of backup runs that have been completed. If the retention policy is not specified, the backup images are retained forever.
Backup When
This ZMC page allows users to schedule backup runs for the backup set. Users can add a schedule a new backup run (Add Schedule), modify an existing scheduled run (Modify Schedule) and delete an existing scheduled run (Delete Schedule).
ZRM uses operating system crontab tool to implement this functionality.
The figure below shows a backup schedule that is being created. There is a weekly full backup scheduled at 2am (local time on the ZRM server) on Sundays. A Log incremental backup is being added on other days at 2am.
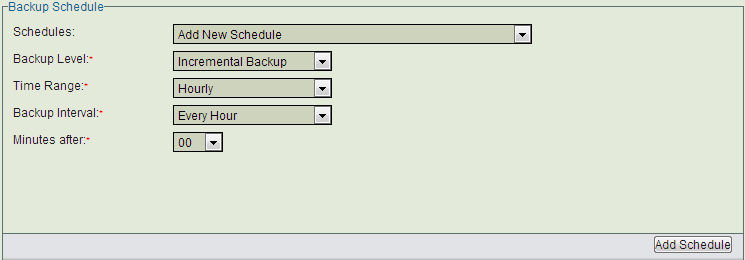
Schedules
List of schedules that have been configured for the backup set. If there are no scheduled backup runs, Add New Schedule is displayed. ZRM does not check to see if the scheduled backup runs overlap. Overlapping backup runs can be scheduled for certain backup methods.
Backup Level
There are various backup levels as shown below.
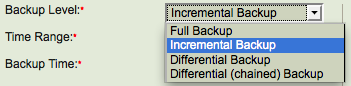
Full backup means all databases/tables in the backup set (specified in Backup What page) are backed up. It also backs up all binary logs from the MySQL server. The method used for Full backup is determined by Backup How page parameters.
Log incremental Backup is available for all backup methods. The incremental backup will contain all binary logs since the last full backup or last incremental backup. This backup type requires Binary logs to be enabled on the MySQL server. The incremental backup in earlier ZRM versions is log incremental backup.
Differential Backup is available only for MySQL Enterprise Backup. This backup contains all block level changes since last full backup. Using this backup incremental type when compared to Chained Differential incremental type, makes the restoration easier but the backup size becomes larger for every successive Differential backup.
Chained Differential Backup is available only for MySQL Enterprise Backup. This backup contains all block level changes since last differential backup or full backup.
Time Range
The values can be Hourly, Daily, Weekly, Monthly. Weekly backup allows you select the list of specific days and Monthly backup allows you select the list of specific dates in a month. Hourly backups can be scheduled by selecting Daily backup and specifying various backup times. Hourly backups can be scheduled every hour or every 30 minutes between two specific hours of the day (for example: backups are done every hour between 7am and 9pm daily)
Backup Time
Specific time of the day (24 hour clock) when the backup run starts. The local time zone of the ZRM server is used. This field is displayed when user selects Monthly/Weekly/Daily Time Range.
Minutes After
The user can specify minutes after the hour when the backup should start. This value can be specified when the Time Range is set to Hourly. For example: If the value is set to 18, the backups will start 18 minutes after every hour.
Backup How
The Backup how page lets you specify the backup method along with other options that let you optimize the type of backup given the performance required at your site.
All configuration parameters can be configured by selecting the links from the left panel - Backup Method, Backup Alerts/Logging, Compression/Encryption, Remote Backups and Pre/Post Backups. The Backup How page below shows the Backup Method selected and configured for Netapp Snapvault backup method.
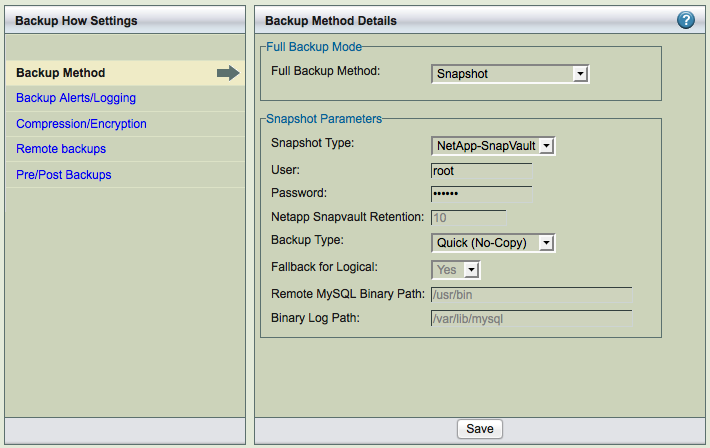
Most of the settings have default values, inherited from the Site Settings page or from factory defaults. Default strings are shown in the text field with a gray background. Radio buttons options (Yes, No, Default) show the current default value in parentheses to the right of the Default radio button (Y or N).
Backup Method
The backup method defines which method to use for full backups. ZRM supports different methods to perform full backups. Each backup set can have different full backup method. Each full backup method is described in a separate section. Snapshot backup method is described in the next chapter.
Logical backup using mysqldump
Following screenshot shows the logical full backup method. The databases/tables in the backup set are locked for updates during the backup process. The backup image contains SQL statements that can be changed if needed.
Choosing Logical non-parallel option uses a mysqldump backup that copies MySQL binary logs regardless of the storage engine. MySQL binary logs track and save all database server transactions as a list of SQL statements. To implement a logical backup strategy, binary logging must be enabled on the MySQL server, and a path to the log files must be supplied (the default is /var/lib/mysql) in the Binary Log Path field.
Logical backup method works with all MySQL storage engines except the MySQL cluster NDB storage engine. Logical backups can also be restored to any platform architecture or database that supports SQL. For example: Backups of MySQL database running on Redhat Enterprise server powerpc platform can be restored to Ubuntu server running on x86 platform.
Because logical backups require a read lock on the database(s) or tables being backed up (not in the case all tables are using InnoDB storage engine), they can have a greater impact on the applications using the MySQL database. Logical backups also result in increased restore times, as restoring the data is accomplished by re-playing the transactions against the target database instead of just copying files. In case of InnoDB tables, the backups are performed as a single transaction and will not obtain any locks.
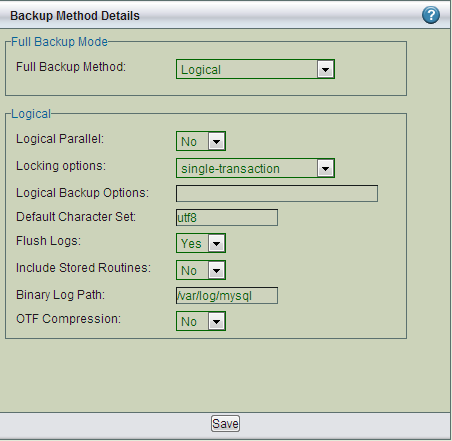
Locking Options
When the backup set contains MyISAM tables, the lock-tables option should be selected. When the backup set contains only InnoDB tables, the single-transaction option should be selected. Logical backup of mixture of InnoDB tables and MyISAM tables in the same backup set should be avoided.
Logical Backup Options
Parameters to the mysqldump MySQL command. Logical backup uses mysqldump command. You can customize the options using this field. For example: "--max_allowed_packet=1G" can be specified as value. These parameters are used in addition to parameters passed by ZRM.
Default Character Set
Specify the default character set that is used in the MySQL database. The default value is utf8; if the database uses a different character set, reset accordingly.
Binary Log Path
Enter the full path where the MySQL binary logs are stored once binary logging has been enabled. If nothing is entered here, the site default path is used. If the Site defaults page does not have binary log location specified, binary logs are expected to be in MySQL server datadir location.
Flush Logs
If you are backing up cloud database services (or when you do not have control over database server configuration) such as Amazon Relational Database services, you should set this parameter to No. Cloud database services does not allow end users to perform MySQL server operations. This parameter is applicable only for full backups.
Include Stored Routines
To improve the performance of database functions and procedures, MySQL versions 5.0 and higher allow users to compile and store them as reusable routines (Stored routines). This option specifies whether stored routines should be include during logical backups. The default value is No. If your version of MySQL supports this feature, it should probably be set to Yes. Setting the value to Default implies Site specific value is used for this parameter.
On-The-Fly (OTF) Compression
Specify whether backup image files stored on disk should be compressed as the backup progresses. The default is to start compression only after all backup files have been saved to disk. Turning this option on can save disk space, but results in slower backups.
Parallel Logical Backup using MyDumper
Users can perform Logical full backups using MyDumper (Download it from https://launchpad.net/mydumper) command. You have to select Full Backup Method as Logical and Logical Parallel as Yes as shown below.
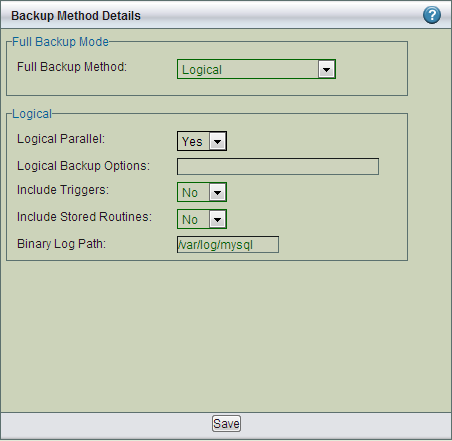
Parallel Logical Backups can work with InnoDB and MyISAM storage engines. Read locks are obtained in case of MyISAM tables. If the backup set only has InnDB tables, locks are not used during backup and MySQL transactions are not impacted.
Logical Backup Options
All MyDumper options are set in this field. These parameters are passed to MyDumper command during full backups.
Include Triggers
This option specifies whether database triggers should be included during logical backups. The default value is No. If your version of MySQL supports this feature, it should probably be set to Yes. Setting the value to Default implies Site specific value is used for this parameter. The triggers are backed up only if the backup set contains databases (not specific tables).
Include Stored Routines
To improve the performance of database functions and procedures, MySQL versions 5.0 and higher allow users to compile and store them as reusable routines (Stored routines). This option specifies whether stored routines should be included during logical backups. The default value is No. If your version of MySQL supports this feature, it should probably be set to Yes. Setting the value to Default implies Site specific value is used for this parameter. The stored procedures are backed up only if the backup set contains databases (not specific tables).
Binary Log Path
Enter the full path where the MySQL binary logs are stored once binary logging has been enabled. If nothing is entered here, the site default path is used.
Raw Backup Method/without snapshots
A raw backup makes a copy of the binary disk image of databases stored on non-transactional storage engines by using mysqlhotcopy. Although raw backups can be restored more quickly than logical backups, they can only be restored to same version of MySQL server on the same platform architecture. If any of the databases or tables are stored on a transactional storage engine (such as InnoDB), a logical mysqldump backup is taken instead unless snapshot backup method is configured.
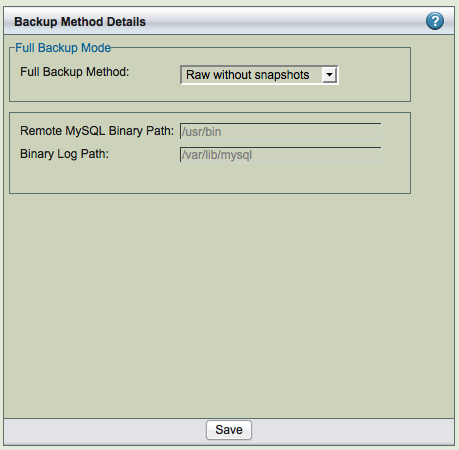
Remote MySQL Binary Path
Path to the MySQL commands on the MySQL server.
Binary Log Path
Enter the full path where the MySQL binary logs are stored once binary logging has been enabled. If nothing is entered here, the site default path is used.
MySQL Enterprise Backup
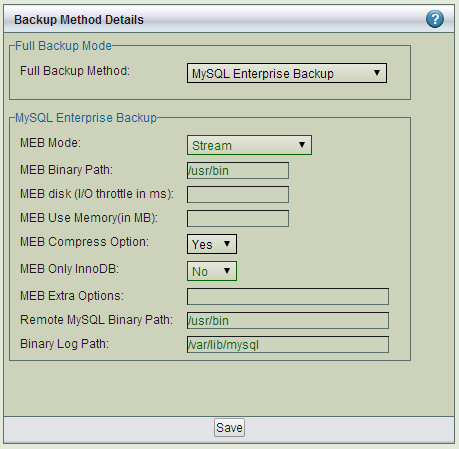
MySQL Enterprise Backup (MEB) tool available from Oracle (requires license from Oracle) can be used as the backup method for the backup set. Full, Differential and Chained differential backups can be performed using this tool. The mysql-zrm.conf parameter apply-log parameter should be to zero to perform differential and chained differential backups.
Select MySQL Enterprise Backup as the full backup method to use MySQL Enterprise Backup to perform the backup. MySQL Enterprise Backup tool is bundled as part of MySQL Enterprise Server Standard edition or premium versions. This option provides integration between ZRM and the Oracle product.
Above image shows the full backup method configured as MySQL Enterprise Backup.
Backups done by particular version of MySQL Enterprise Backup can be restored only by the same version of MySQL Enterprise Backup.
- MySQL Enterprise Backup binaries must be installed on the ZRM server in the same location as MySQL server under the following use cases: streaming backup mode (default configuration) and when apply logs are performed during restores (apply-log parameter should be set to 0 in the backup set's mysql-zrm.conf).
MEB Mode
Regular or Streaming mode. Regular mode requires additional disk space on the MySQL server during backups. Streaming mode does not require disk space on the MySQL server during backups. Streaming mode requires the MySQL Enterprise Backup 3.6 or higher.
MEB Binary Path
Path to the InnoDB Hot Backup tools: the ibbackup binary and the mysqlbackup tool, which must be installed in the same path on the MySQL server being backed up and ZRM server. The default path is /usr/bin. Themysql user should have permissions to execute the mysqlbackup tool.
MEB disk (I/O throttle)
MEB disk throttle can be specified to throttle disk I/O during backup. It is specified in milliseconds, the backup sleeps for that time between disk I/O.
MEB Use Memory (in MB)
Amount of memory on the MySQL server that can be used MySQL Enterprise Backup. The default is to use as much as memory as available. If you reduce the memory available for MEB significantly, the backup performance will have significant impact.
MEB only InnoDB
MySQL Enterprise Backup tool is used for backups of tables with InnoDB storage engine only. The default is No.
Remote MySQL Binary Path
Path to the MySQL commands on the MySQL server.
Binary Log Path
Enter the full path where the MySQL binary logs are stored once binary logging has been enabled. If nothing is entered here, the site default path is used.
XtraBackup
Select XtraBackup as the backup method to Xtrabackup tool to perform the backup. Xtrabackup tool can be downloaded from Percona or SkySQL. It is open source and can be downloaded to MySQL server. This option provides integration between ZRM and Xtrabackup. This allows backup to proceed without setting any locks or impacting database operation.
Full, differential and chained differential backups are performed using this tool. The mysql-zrm.conf parameter apply-log parameter should be to zero to perform differential and chained differential backups. This tool also users to restore a table from a database backup. Restores of table can be performed only to Percona MySQL servers.
Xtrabackup binaries must be installed on the ZRM server in the same location as MySQL server under the following use cases: streaming backup mode (default configuration) and when apply logs are performed during restores (apply-log parameter is set to 0 in the backup set's mysql-zrm.conf). Differential backups cannot be performed in Xtrabackup streaming backup mode. Use log incremental with Xtrabackup streaming full backup.
Backups done by particular version of XtraBackup can be restored only by the same version of XtraBackup tool.
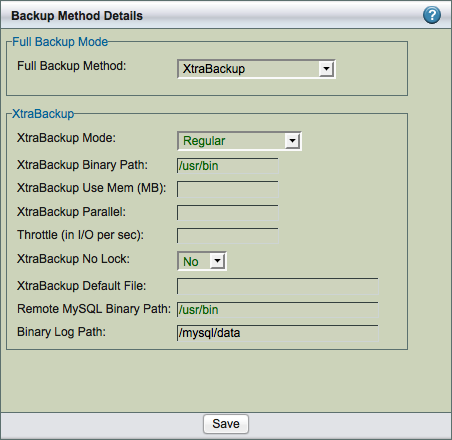
XtraBackup Mode
Regular or Streaming mode. Regular mode requires additional disk space on the MySQL server during backups. Streaming mode does not require disk space on the MySQL server during backups. Xtrabackup 1.6 or higher is required for streaming mode.
XtraBackup Binary Path
You must then supply the path to the Xtrabackup tools: the xtrabackup binary and the innobackupex tool, which must be installed in the same path on the MySQL server being backed up. The default path is /usr/bin. The mysql user should have permissions to execute the innobackupex tool.
XtraBackup Use Memory (in MB)
Amount of memory used by Xtrabackup tool. The default is 100MB.
XtraBackup Parallel
Specifies the number of threads created by xtrabackup to copy data files. This option is useful when multiple tablespaces option is enabled (innodb_file_per_table MySQL server option) or the shared tablespace must be stored in multipe ibdata files with the innodb_data_file_path MySQL server option. The default is 1.
Throttle (in I/O per second)
Xtrabackup backups can be throttled by specifying the number of disk I/Os performed by the backup tool in a second.
XtraBackup No Lock
Use --no-lock option of Xtrabackup. Use this only if you are not planning to do log incremental backups and all your tables in the database are InnoDB.
XtraBackup Default File
If you want to use different my.cnf when xtrabackup starts up the InnoDB during backup. This is required if you are allowing on secure access to the database server.
Remote MySQL Binary Path
Path to the MySQL commands on the MySQL server.
Binary Log Path
Enter the full path where the MySQL binary logs are stored once binary logging has been enabled. If nothing is entered here, the site default path is used.
Backup Alerts/Logging
Select Backup Alerts/Logging to send email notifications and control log verbosity.
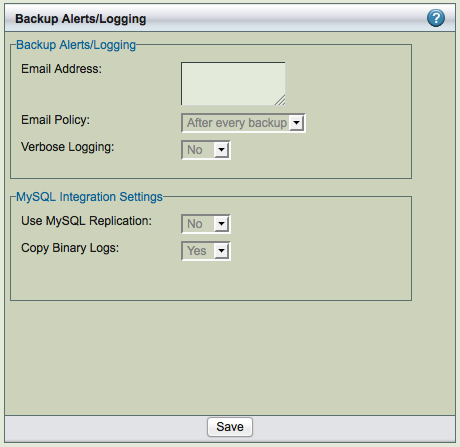
- Email Address (or Update Windows Event Log on Windows servers
- On Linux/Solaris servers, enter the email address of the ZMC backup administrator. All backup run notifications and summary reports will be automatically sent to the email address based on the email policy. A mail user agent (MUA) such as Mailx must be manually configured on the MySQL server before any email can be sent. To email reports and notifications to more than one user, set up a group email alias on your mail server and enter group email alias here. Alternatively, you can enter multiple email addresses separated by space. For example:[email protected] [email protected]
- On Windows ZRM servers, select whether to use the Windows Event Log to save and display notifications and summary reports. Note that even when logging successful ZRM operations, the Windows Event Log might show error message that "Event Description not found". The "Event description not found" messages can be safely ignored.
- Email Policy
- This policy determines when email should be sent to the configured Email Address. Policy can be After every backup (the default value), Never (no notification is performed) or Backup with error (when there are failures in the backup run).
Select Backup Alerts/Logging to send email notifications and control log verbosity.
- On Linux/Solaris servers, enter the email address of the ZMC backup administrator. All backup run notifications and summary reports will be automatically sent to the email address based on the email policy. A mail user agent (MUA) such as Mailx must be manually configured on the MySQL server before any email can be sent. To email reports and notifications to more than one user, set up a group email alias on your mail server and enter group email alias here. Alternatively, you can enter multiple email addresses separated by space. For example:[email protected] [email protected]
- On Windows ZRM servers, select whether to use the Windows Event Log to save and display notifications and summary reports. Note that even when logging successful ZRM operations, the Windows Event Log might show error message that "Event Description not found". The "Event description not found" messages can be safely ignored.
- This policy determines when email should be sent to the configured Email Address. Policy can be After every backup (the default value), Never (no notification is performed) or Backup with error (when there are failures in the backup run).
Verbose Logging
Verbose logging should turned on or off. Zmanda Support Team will ask you turn on verbose logging for backup sets to troubleshoot problems in a backup set.
- MySQL Replication
- Specifies whether ZRM for MySQL will use the MySQL Replication facility that has been enabled on the MySQL server that is to be backed up. Backing up a replication slave reduces impact on the production database near zero while backups are in progress. When this option is enabled and the mMySQL server is a replication slave, ZRM for MySQL will back up the master.info, relay-log.info and any SQL_LOAD-* files if they exist. For further details on the benefits of using a replication slave for backup, see this MySQL documentation. Themaster.info and relay-log.info files are described here. Please note that the replication file names have to bemaster.info and relay-log.info. Please make sure relay-log-info-file and
master-info-file parameter in the MySQL server configuration file my.cnf is set to default value.
- If you are backing up replication slave, you need to enable log-slave-updates in the replication slave in MySQL configuration file (my.cnf) for log incremental backups.
- Copy Binary Logs
- By default, ZRM copies binary logs during full backups (Default value is Yes). This allows ZRM to restore to any event between last backup before full backup and the full backup. You can turn this behavior off by setting value to No.
Compression/Encryption
Backup can be compressed and encrypted. ZRM compression and encryption is performed on the ZRM server.
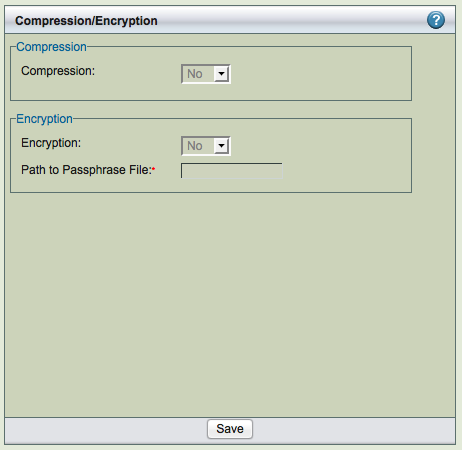
- Compression
- Backup compression is performed on the ZRM server. Allows you to compress the image using gzip on the ZRM server. If the storage engine already compresses data (such as ARCHIVE storage engine), there is no value in setting this to Yes.
- Encryption
- Backup encryption is performed on the ZRM server. Default encryption is performed using GPG. ZRM server should have GPG (GNU Privacy Guard) packages installed. These packages are part of Linux and Solaris distribution. The default encryption algorithm used is AES 256. If different key length or cryptographic algorithm is required, please modify gpg parameters in the script /usr/share/mysql-zrm/plugins/encrypt-plugin.pl on the ZRM server. Please contact Zmanda support team for help.
- Path to passphrase file
The full path to the encryption passphrase file. The encryption file is usually stored as /etc/mysql-zrm/<backup set name>/.passphrase on the ZRM server. The passphrase should be owned by mysql user and should have 400 permission. It is very important to protect the contents of the passphrase file. Passphrase file contains the sequence of words or a string that is used for encryption. It is important to choose a good passphrase. The longer and more random the passphrase, the more difficult to crack the encryption. The passphrase file should contain the passphrase in the first line (other lines in the file are not read). A method to generate passphrase is to use the following command:
$ gpg --gen-random 1 16 | gpg --enarmor | sed -n 5p > /etc/mysql-zrm/<backup set name>/.passphrase
Backup Encryption Caution: It is very important to store the encrypt-plugin.pl and the passphrase file used for the backup set. These files are necessary
for restoration. Without these files, it is impossible to restore the backup image and backup image is no longer useful.
Remote Backups
ZRM uses copy plugins to move data from the MySQL server to the ZRM server. All remote MySQL backups must be use a copy plugin. Copy plugin is used in the following cases:
-
- backing up any Windows-based MySQL server; use the Windows copy plugin.
- remote incremental backup is required
- copying replication-related files from a remote machine
- executing mysqlhotcopy (MySQL command) to copy the data from the remote MySQL server
- executing mysqlhotcopy to restore the data to a remote MySQL server.
- backing up remote machines via snapshot backups.

- Secure Shell-based communication. Use when a higher level of security is required (such as when the client and server communicate across a firewall). This can be only used for non-Windows MySQL servers. You must then enter the SSH username on the remote MySQL server, and the path where MySQL commands are installed on the remote machine. For backup, it is necessary to set up password-less ssh configuration is required (i.e,mysql user on ZRM server should be able to ssh to MySQL server without being prompted for password). During restore, users will prompted for ssh password if needed. The user id and group id of mysql user must be same on the ZRM and MySQL server.
- Socket
Socket-based communication. This is the default copy plugin. This plugin requires MySQL server running on non-Windows platform. This requires that the ZRM client components are installed on the remote machine, as described in the Installation Instructions. You must then enter a port for the remote socket (the factory default is 25300. The path where MySQL commands are installed on the remote machine must be provided. The user id and group id of mysql user must be same on the ZRM and MySQL server.
You can specify the port to be used for communication. This requires changes in the remote MySQL server installation (xinetd configuration files).
- Windows
- The Windows copy plugin is required for backing up any Windows-based MySQL server. It requires the ZRM for MySQL Windows client components described in the Installation Instructions. You must then enter the communications ports to use during backup (default is 10080) and restore (default is 10081) operations.
- Windows
Pre-/Post- Backup
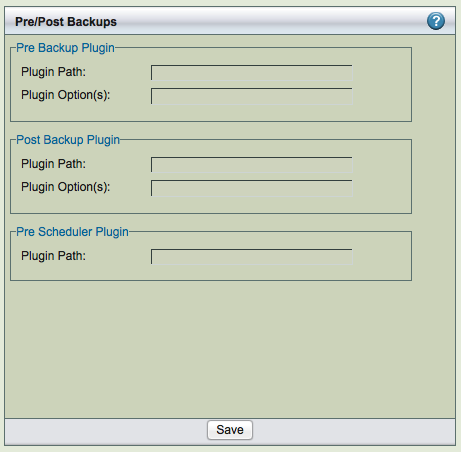
Specify the full path and any command-line options to the script or utility you want executed before the backup run starts (pre-backup) or after the backup run is completed (post-backup). This feature can be used to check and prepare the MySQL server environment for backup. For example, you could use it to notify all MySQL database users that a backup is about to begin.
ZRM for MySQL does not check if the path is a valid path, nor if the plugin is present at the given location. The recommended location for plugins is /usr/share/mysql-zrm/plugins directory. A template file (pre-backup.pl or post-backup.pl) is installed in this location; use the template when writing your own pre-backup plugin. All pre-backup plugin scripts must accept the following command-line parameters (which are passed to the plugin using the Plugin Option(s) field:
--all-databases- Used when all databases in the MySQL server are being backed up.
--database database1, database2, ...
Used when specific databases are backed up.
--database database1 --tables table1, table2, ...
Used when specific tables in a database are being backed up.
The script should be written to return a non-zero value on error; pre-backup plugin failures should cancel the backup and generate a failure message for reports and logs.
Post backup plugin are passed an additional parameter with information on location of backup images (--backup-directory path)
The post-backup plugin is executed twice: before the checksum is performed, and after the checksum is complete. See the man page for mysql-zrm-backup(1) for more details on how the post-backup plugin operates and the flags it returns. Note that although failures of the post-backup plugin are logged, they are not included in backup reports if the backup itself succeeded.
Pre-Scheduler plugin can be used to delay the execution of the scheduled backup run. You can use this plugin to avoid backup during certain operational procedures such as MySQL upgrade or database upgrades. The value returned by the plugin determines how many hours the scheduled execution of backup run is delayed. It can be delayed up to 11 hours.
You can optionally compress the data during transport. This might provide better performance.
Snapshot Plugins
ZRM for MySQL can be licensed to use various 3rd party snapshot and storage checkpoint mechanisms to acquire a quiescent, consistent copy of the MySQL database, while minimizing application downtime. Unlike other backup methods, snapshots and storage checkpoints scale well; they do not increase the backup window as databases grow.
Because snapshot and storage checkpoint mechanisms are faster than backups to other media, this reduces the time that database tables must be locked. These technologies create a consistent copy of the MySQL database with little impact on MySQL applications, and thus scale well as databases grow. If the MySQL databases or tables use only transactional storage engines such as InnoDB, the time the application is locked is further reduced. While taking snapshots of databases or tables that use non-transactional storage engines such as MyISAM, ZRM for MySQL flushes the database pages to the disk and obtains a read lock on the database(s) / table(s). The read lock is held only for a moment. File system I/O is stopped before taking a snapshot when the database resides on the file systems that support freeze/thaw operations such as XFS, VxFS (Veritas file systems).
Snapshot Type as full backup method are configured in the Backup How page. Only snapshots that are licensed appear in the drop down box.
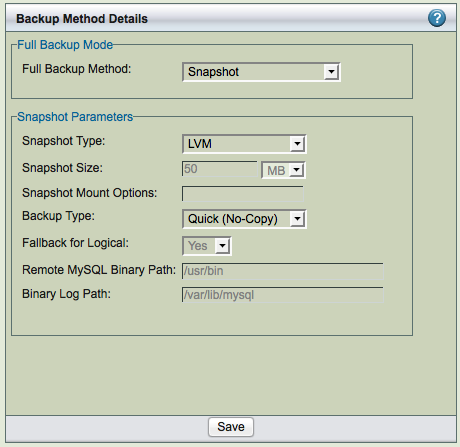
The snapshots are named "zrm<unique string_<yyyymmddhhmmss>". This will allow users to identify when the snapshots were taken.
Supported Mechanisms
ZRM for MySQL supports a number of different snapshot mechanisms provided by OS, filesystem, and storage appliance vendors (follow the links for details on requirements and configuration):
- VxFS: The Symantec Veritas File System. ZRM for MySQL supports all versions of VxFS (including HP's JFS and OJFS). Depending on licenses purchased ZRM for MySQL can use either a filesystem snapshot or a storage checkpoint for backup.
- NetApp: If the database resides on a NetApp storage system (connected using NFS), ZRM for MySQL can use the NetApp snapshots to back up a snapshot of the MySQL database. ZRM for MySQL snapshots can be integrated with Netapp SnapVault. The Netapp snapshots can be used only for backups of MySQL server running on Linux.
- Logical Volume Manager: On Linux platforms, ZRM for MySQL can use Logical Volume Manager snapshots.
- ZFS: ZRM for MySQL can take advantage of ZFS snapshot capability when backing up a MySQL server installed on a Solaris ZFS file system.
- EMC Snapview: ZRM for MySQL can take advantage of EMC Snapview capability when backing up a MySQL server installed on an EMC CLARiiON networked storage system.
- Hitachi Bluearc Titan: ZRM for MySQL can take advantage of Bluearc Titan storage snapshot capability when backing up a MySQL server installed on Bluearc Titan storage using NFS.
- Amazon EBS : Amazon Elastic Block Storage snapshots to backup MySQL databases running on Amazon EC2.
- Microsoft Volume Shadow Copy Service (VSS): On Windows platforms, ZRM for MySQL always uses the Microsoft Volume Shadow Copy Service to perform snapshot backups; no license is required. There are no special requirements beyond installing the Windows client, which is described in the Windows client section of the installation instructions. Please make sure Volume Shadow Services (VSS) services are running on the Windows MySQL server.
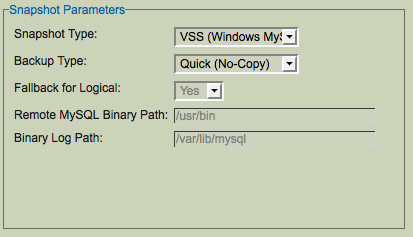
Quick (No-copy) option
When the Quick (No-copy) snapshot Backup Type is enabled, ZRM for MySQL uses the snapshot itself as the backup rather than transferring the data into a standard backup archive on the ZRM server.
Quick snapshot backups are appropriate for large databases and for databases that have high transaction rates. In addition to eliminating data transfer bottlenecks during backup, quick snapshot backups also provide much faster database restoration than other backup methods.
Because quick snapshot backups do not copy the data off of the MySQL server, they does not protect data against server media failure. For this reason, quick snapshot backups can be converted at any time into standard backups stored on the ZRM server by using the Convert Backup option on the Reports menu tab, described in Converting Quick Snapshots to Standard Backups.
Setting Retention Policies for the Quick Snapshot Option
Because using the quick snapshot option for backups is so fast and convenient, administrators tend to schedule many of them. This is fine, so long as you set retention policies to prevent collecting too many snapshots on the MySQL server. Depending on the snapshot technology implemented, retaining an excessive number of snapshot backups can:
- cause the MySQL server to perform more slowly
- cause the MySQL server to run into disk space limitations
- exceed the number of snapshots per server that are allowed by the given technology.
Refer to the documentation provided by the snapshot technology vendor when scheduling and setting retention policies for snapshot backups.
Linux Logical Volume Manager Snapshots
Logical Volume Management (LVM) is a way of virtually partitioning a hard disk space such that it can be flexibly allocated to various applications. It is being utilized by an increasing number of MySQL installations.
ZRM for MySQL has an optional mechanism to help backup such installations using snapshots (a feature license is required). It can create temporary snapshots of the logical volumes and use the snapshot volume to do backups. The advantage of using snapshots is that you need to lock the database tables only for the time taken to create a snapshot. The snapshots are removed when the backups are completed. Snapshots help to create a consistent copy of the MySQL database as the consistency is ensured before the snapshot is taken.
On file systems such as XFS, VxFS (Veritas file systems) that support freeze/thaw operations, file system activity is stopped before taking a snapshot.
MySQL Configuration
- Sudo privileges must be configured for mysql user on the MySQL server (see the next section).
- If you are backing up a remote MySQL server, the destination directory specified on the Backup Where page must exist on the MySQL server as well as the ZRM server. The MySQL backup user (OS-level) must have read/write permission to access this directory.
The mysql data must reside on logical volumes. The following are some of the possible configurations
- All MySQL data is on a single logical volume.
- Specific database directories are on different logical volumes.
- For databases containing InnoDB based tables, the lvm snapshot can only be used if the database directory, the InnoDB data files, and the InnoDB logs are on the same logical volume.

Pre-conditions for Using LVM Snapshots
The MySQL backup user must be granted sudo privileges to execute lvm commands on the MySQL server. Add a line similar to the following example to /etc/sudoers on the MySQL server:
mysql <FQDN of MySQL Server>=NOPASSWD:/bin/mount,NOPASSWD:/bin/umount,NOPASSWD:/bin/df,NOPASSWD:/usr/sbin/lvdisplay,NOPASSWD:/usr/sbin/lvcreate,NOPASSWD:/usr/sbin/lvremove,NOPASSWD:/sbin/fuser
Where MySQLserver.mycompany.com is the fully-qualified domain name for the MySQL server. Note that if lvmcommands are installed in other locations, the above example would not work without editing it to reflect the different paths. Please see KB article for more information sudo configuration.
Additional free extents in the logical volume are needed for creating snapshots. You can check extents using thevgdisplay command.
The free extents required are specified in mysql-zrm.conf
LVM stores the snapshot blocks corresponding to the blocks that are modified in the original logical volume in the snapshot volume. If the database is highly active during the backup, many blocks will be modified and the snapshot volume may run out of space.
Specifying a sufficient amount of space for creating the snapshot is critical; if the snapshot volume runs out of space, the backup will not be consistent.
All MySQL database files (data, log, indexes) must be stored in LVM logical volumes to ensure consistency. If any of the files are not on LVM, the snapshot is skipped, and either a raw backup via mysqlhotcopy or a logical backup using mysqldump will be taken based on the storage engines of the tables in each of the databases.
Configuration Parameters
The Backup How page allows you to select LVM snapshots as a backup mechanism.
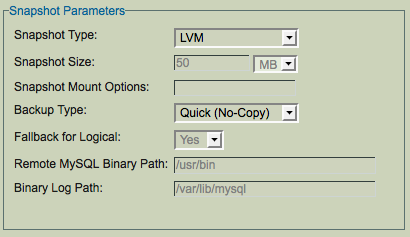
- Snapshot Size
Set the size of the LVM snapshot. For raw backups, each specified database is first checked to ensure that it is on an LVM volume, and then a snapshot of the specified size is created and used to backup the database (unless the quick (no-copy) option is selected; see below). If the specified database is not on a LVM volume, either mysqlhotcopy or mysqldump is used to create the backup.
Size of LVM snapshot depends on amount of activity in the logical volume during the backup window. This is difficult to predict. If the value is too small, the backup will fail. Select a value conservatively for the first backup run. The ZRM logs on the server (/var/log/mysql-zrm/mysql-zrm.log) shows the amount of snapshot space that was used during backup window when the backup completes successfully. This value can be used to tune the snapshot size configuration. Look for the value of COW-table size as shown below in the log message:
Tue May 04 12:59:28 2010: INFO: Output of the command sudo lvdisplay
/dev/nik_vg/zrm5pEeycW9LA 2>/tmp/ZRMKLOSo2o9 is   --- Logical volume ---
   LV Name                /dev/nik_vg/zrm5pEeycW9LA
   VG Name                nik_vg
   LV UUID                DronVf-GybO-rSQf-3Uqb-RG6I-krvP-aLTw8o
   LV Write Access        read/write
   LV snapshot status     active destination for /dev/nik_vg/lv_mysql
   LV Status              available
   # open                 0
   LV Size                30.00 GB
   Current LE             7680
   COW-table size         12.00 MB
   COW-table LE           3
   Allocated to snapshot  0.65%
   Snapshot chunk size    8.00 KB
   Segments               1
   Allocation             inherit
   Read ahead sectors     0
   Block device           253:4
- Snapshot Mount Options
- List of file system mount options used when the lvm snapshot(s) are mounted on the MySQL server during full backup process. This field is optional.
- Backup Type
- Choose the method of snapshot backup. The Standard (Copy) option specifies that the snapshot should be copied to a standard ZRM for MySQL backup archive. The Quick (No Copy) option specifies that the snapshot itself should be used as a near-line backup. Quick backups are convenient as they provide faster backups and restores, but because they remain on the MySQL server they do not protect against media or server failure. Note that if the quick option is specified, the compress and encrypt options are ignored, and the backup size will always be zero. In addition, no checksums are performed, which means that quick snapshot backups cannot be verified. Quick snapshot backups may be converted to standard backups stored on the ZRM server using the Convert Backup option available from the Reports menu tab.
- Fallback for Logical
If this field is set to yes and snapshot backup fails, the logical backup is attempted. Set the value to No if you do not want to do logical backup if there is a snapshot backup failure.
Remote MySQL Binary Path
Path to the MySQL commands on the MySQL server
Binary Log Path
Location of binary logs on the MySQL server that are used for log incremental backups.
Advantages of Using LVM Snapshots for Backup
- Hot backup for transaction based storage engines (no impact on the application using the database) and Warm backups for other storage engines.
- Backup time is not dependent on the size of the database. As a result, this backup method is suitable for large databases.
- Almost instantaneous. The database gets locked only for the time taken to create the snapshot.
Disadvantage of Using LVM Snapshots for Backup
- Works well only for filesystems that support freeze operation such XFS, VxFS.
- Additional disk space for logical volume snapshots is required.
- LVM snapshots can be used only for local backups.
Symantec VxFS snapshots
Symantec Veritas file systems (a.k.a VxFSs) allow two technologies to minimize application downtime during backup runs:
- Snapshot devices, which mirror the original storage and allow "freezing" for backup while the original data stays live.
- Storage checkpoints, which use the same filesystem volumes as the original to only mirror changed data.
ZRM for MySQL includes an optional VxFS plugin that integrates with the Veritas File System to leverage native Storage Checkpoint capability.
This page describes the configuration of VxFS snapshot/storage checkpoint backups, including requirements for the MySQL database.
MySQL Configuration Requirements
- Both the ZRM server and MySQL server require the configuration of sudo privileges (see the next section) On Solaris platforms, this means the SMCsudo package must be installed.
- If you are backing up a remote MySQL server, the destination directory specified on the Backup Where page must exist on the MySQL server as well as the ZRM server. The MySQL backup user (OS-level) must have read/write permission to access this directory.
All MySQL data and logs must reside on VxFS volumes. The following are some of the possible configurations:
- All MySQL data is on a single VxFS Volume
- Specific database directories are on different volumes
- For databases containing InnoDB-based tables, the snapshot can only be used if the database directory, the InnoDB data files and the InnoDB logs are all on VxFS volumes.
- The InnoDB shared data files are on a separate VxFS volume
- The InnoDB logs are on a separate VxFS volume
Refer to Veritas-supplied VxFS documentation for details on VxFS storage checkpoint configuration.
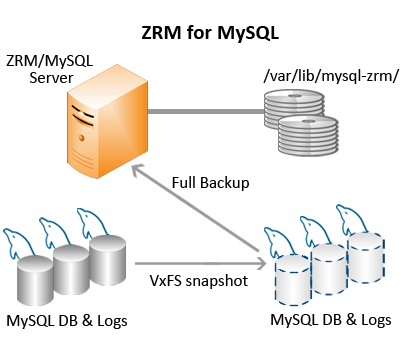
The VxFS volumes are mounted on ZRM server. ZRM user "mysql" should have permissions to read and write to the volumes.
Pre-conditions for Using VxFS Snapshots
- The MySQL backup user must be granted sudo privileges to execute VxFS commands on the MySQL server. Add a line similar to the following example to /etc/sudoers on the MySQL server:
     mysql MySQLserver.mycompany.com Server>=NOPASSWD:/bin/mount,NOPASSWD:/bin/umount,NOPASSWD:/bin/df, \
      NOPASSWD:/sbin/fsckptadm, NOPASSWD:/sbin/fuser
where MySQLserver.mycompany.com is the fully-qualified domain name for the MySQL server. Note that if VxFScommands are installed in non-standard locations, the above example would not work without editing it to reflect the different paths. Please see KB article for more information on sudo configuration.
- All MySQL database files (data, log, indexes) must be stored in VxFS volumes to ensure consistency. If any of the files are not on VxFS volumes, a raw backup using mysqlhotcopy, or a logical backup using mysqldumpwill be taken based on the storage engines of the tables in each of the databases.
Configuring ZRM for MySQL to use VxFS Snapshots
To activate use of VxFS storage checkpoints, you must select the VxFS Snapshot Type for Backup Method from theBackup How page:
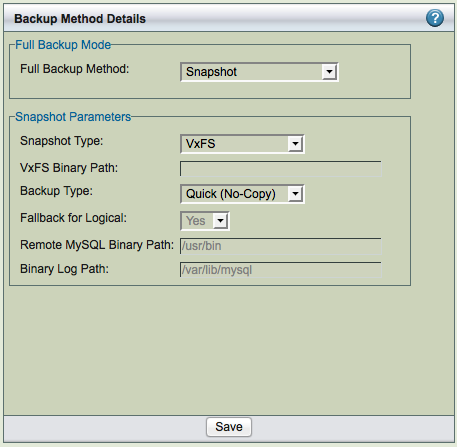
There are two options for VxFS snapshots:
- VxFS Binary Path
- Supply the path to VxFS fsckptadm command (the default is /opt/VRTS/bin
- Backup Type
- Choose the method of snapshot backup. The Standard (Copy) option specifies that the snapshot should be copied to a standard ZRM for MySQL backup archive. The Quick (No Copy) option specifies that the snapshot itself should be used as a near-line backup. Quick backups are convenient as they provide faster backups and restores restores, but because they remain on the MySQL server they do not protect against media or server failure. Note that if the quick option is specified, the compress and encrypt options are ignored. In addition, no checksums are performed, which means that quick snapshot backups cannot be verified. Quick snapshot backups may be converted to standard backups stored on the ZRM server using the Convert Backup option available from the Reports menu tab.
Fallback for Logical
If this field is set to yes and snapshot backup fails, the logical backup is attempted. Set the value to No if you do not want to do logical backup if there is a snapshot backup failure.
Remote MySQL Binary Path
Path to the MySQL commands on the MySQL server.
Binary Log Path
Location of binary logs on the MySQL server that are used for log incremental backups.
Network Appliance Snapshots
Network Appliance storage systems include the Network Appliance SnapManager software, which facilitates near-instantaneous hot backups and rapid restores.
ZRM for MySQL includes an optional snapshot plugin that integrates with SnapManager software to create consistent MySQL backups using ONTAP API. It creates temporary snapshots of the Network Appliance volumes to back up. The snapshots are removed when the backup run is completed (if regular backups are being performed). ZRM for MySQL using snapshots performs backups with minimal impact on MySQL applications.
This page describes the command-line configuration of Network Appliance snapshot backups, including requirements for the MySQL database.
MySQL Configuration Requirements
- Sudo privileges must be configured for mysql user on the MySQL server (see the next section). On Solaris platforms, this means the SMCsudo package must be installed.
- If you are backing up a remote MySQL server, the destination directory specified on the Backup Where page must exist on the MySQL server as well as the ZRM server. The MySQL backup user (OS-level) must have read/write permission to access this directory.
All MySQL data and logs must reside on Network Appliance volumes. The following are some of the possible configurations
- All MySQL data is on a single Network Appliance Volume
- Specific database directories are on different volumes
- For databases containing InnoDB-based tables, the snapshot can only be used if the database directory, the InnoDB data files and the InnoDB logs are all on Network Appliance volumes.
- The InnoDB shared data files are on a separate Network Appliance volume
- The InnoDB logs are on a separate Network Appliance volume

The Network Appliance volumes must be mounted on the ZRM server using NFS. The ZRM server's mysql user must have permissions to read and write to the volumes. If the Network Appliance volumes are accessed using some other protocol such as iSCSI, please contact Zmanda Support Team.
Pre-conditions for Using Network Appliance Snapshots
- The mysql operating system user must be granted sudo privileges to execute Network Appliance commands on the MySQL server. Add a line similar to the following example to /usr/local/etc/sudoers on the MySQL server:
mysql MySQLserver.mycompany.com=NOPASSWD:/usr/sbin/mount,NOPASSWD:/usr/sbin/umount,NOPASSWD:/usr/local/bin/df,NOPASSWD:/sbi
n/fuser
- where MySQLserver.mycompany.com is the fully-qualified domain name of the MySQL server. Note that if themount, umount and df commands are installed in non-standard locations, the above example would not work without editing it to reflect the different paths. Please see KB article for more information on sudo configuration.
- The snap reserve for the Network Appliance volume must be adequate to accommodate changed data. The Network Appliance default of 20% may be low or high for your site, depending on data change rates.
- To determine the snap reserve, use the Network Appliance snap reserve volumename command.
- All MySQL database files (data, log, indexes) must be stored in Network Appliance volumes to ensure consistency.
- If any of the files are not on Network Appliance volumes, a raw backup using mysqlhotcopy, or a logical backup using mysqldump will be taken based on the storage engines of the tables in each of the databases.
- If you using Netapp snapshots from a remote MySQL server (ZRM client installation), you will have to install Perl LWP-UserAgent module in the default perl installation.
Configuring ZRM for MySQL to use Netapp snapshots
To activate use of Network Appliance Snapshots, you must select the NetApp SnapShot Type for Backup Method from the Backup How page:
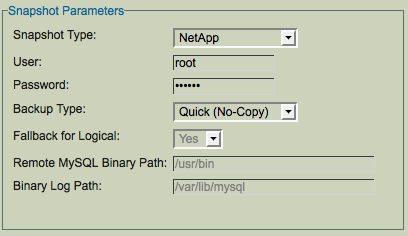
- NetApp User/Password
- Supply a valid Network Appliance username and password. The Netapp user should have privileges to perform snapshots on the appliance.
- Backup Type
- Choose the method of snapshot backup. The Standard (Copy) option specifies that the snapshot should be copied to a standard ZRM for MySQL backup archive. The Quick (No Copy) option specifies that the snapshot itself should be used as a near-line backup. Quick backups are convenient as they provide faster backups and restores, but because they remain on the MySQL server they do not protect against media or server failure. Note that if the quick option is specified, the compress and encrypt options are ignored. In addition, no checksums are performed, which means that quick snapshot backups cannot be verified. Quick snapshot backups may be converted to standard backups stored on the ZRM server using the Convert Backup option available from the Reports menu tab.
Fallback for Logical
If this field is set to yes and snapshot backup fails, the logical backup is attempted. Set the value to No if you do not want to do logical backup if there is a snapshot backup failure.
Remote MySQL Binary Path
Path to the MySQL commands on the MySQL server.
Binary Log Path
Location of binary logs on the MySQL server that are used for log incremental backups.
ZFS Snapshots
Sun Microsystem's Solaris ZFS filesystem include snapshot capability, which facilitates near-instantaneous hot backups and rapid restores.
If you purchase the feature license from Zmanda (available at the Zmanda Network Downloads page), ZRM for MySQL includes an optional snapshot plugin that integrates with ZFS to create consistent MySQL full backups. It creates temporary snapshots of the ZFS volumes on which to perform a full backup. When snapshots are enabled, ZRM for MySQL can perform backups with minimal impact on MySQL applications. Database writes will be blocked only during snapshot creation, which typically takes less than a second regardless of database size.
This page describes the configuration of ZFS snapshot backups, including requirements for the MySQL database.
MySQL Configuration Requirements
- Sudo privileges must be configured for mysql user on the MySQL server (see the next section). On Solaris platforms, this means the SMCsudo package must be installed.
- If you are backing up a remote MySQL server, the destination directory specified on the Backup Where page must exist on the MySQL server as well as the ZRM server. The MySQL backup user (OS-level) must have read/write permission to access this directory.
To take advantage of ZFS snapshots, all MySQL database files (data, log, indexes) belonging to the backup set must be stored in ZFS volumes to ensure consistency.
If any of the files are not on ZFS volumes, a raw backup using mysqlhotcopy, or a logical backup using mysqldumpis performed depending on the storage engines of the tables in each of the databases.
Refer to the Solaris ZFS documentation for details on ZFS administration.
Here are some valid scenarios of database storage on ZFS:
- All MySQL data is stored on a single ZFS Volume
- Specific database directories are stored on different volumes
- For databases containing InnoDB-based tables, the snapshot can only be used if the database directory, the InnoDB data files and the InnoDB logs are all on ZFS volumes.
- The InnoDB shared data files are on a separate ZFS volume
- The InnoDB logs are on a separate ZFS volume
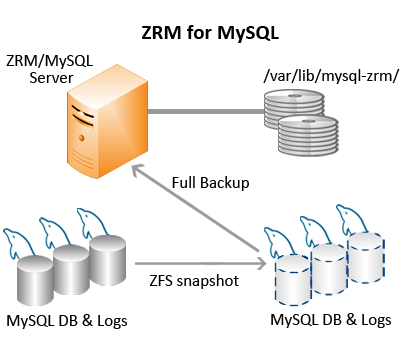
MySQL Backup User sudo Privileges
The MySQL backup user (described in System Requirements) must be granted sudo privileges to execute ZFScommands on the MySQL server. Add a line similar to the following example to /usr/local/etc/sudoers on the MySQL server:
mysql MySQLserver.mycompany.com=NOPASSWD:/usr/sbin/df,NOPASSWD:/usr/sbin/zfs
where MySQLserver.mycompany.com is the fully-qualified domain name for the MySQL server. If the MySQL database resides on the the ZRM server, the ZRM server name should be used. Note that if ZFS commands are installed in non-standard locations, the above example would not work without editing it to reflect the different paths. Please see KB article for more information on sudo configuration.
To test the sudo configuration, run the command as the "mysql" user. The command should execute correctly without prompting for a password. For example:
  # su - mysql
  $ /usr/local/bin/sudo /usr/sbin/df
Configuring ZRM for MySQL to use ZFS Snapshots
To activate use of ZFS Snapshots for full backups, simply select the ZFS Snapshot Type for Backup method from theBackup How page:
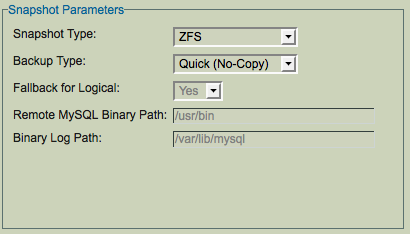
- Backup Type
- Choose the method of snapshot backup. The Standard (Copy) option specifies that the snapshot should be copied to a standard ZRM for MySQL backup archive. The Quick (No Copy) option specifies that the snapshot itself should be used as a near-line backup. Quick backups are convenient as they provide faster backups and restores, but because they remain on the MySQL server they do not protect against media or server failure. Note that if the quick option is specified, the compress and encrypt options are ignored. In addition, no checksums are performed, which means that quick snapshot backups cannot be verified. Quick snapshot backups may be converted to standard backups stored on the ZRM server using the Convert Backup option available from the Reports menu tab.
Fallback for Logical
If this field is set to yes and snapshot backup fails, the logical backup is attempted. Set the value to No if you do not want to do logical backup if there is a snapshot backup failure.
Remote MySQL Binary Path
Path to the MySQL commands on the MySQL server.
Binary Log Path
Location of binary logs on the MySQL server that are used for log incremental backups.
EMC SnapView Snapshots
EMC Clariion Storage features EMC SnapView, a snapshot technology that facilitates near-instantaneous hot backups and rapid restores.
If you purchase the feature license from Zmanda (available at the Zmanda Network Downloads page), ZRM for MySQL includes an optional snapshot plugin that integrates with EMC SnapView to create consistent MySQL full backups. It creates temporary snapshots of the EMC SnapView volumes on which to perform a full backup. When snapshots are enabled, ZRM for MySQL can perform backups with minimal impact on MySQL applications. Database writes will be blocked only during snapshot creation, which typically takes less than a second regardless of database size.
This page describes the configuration of EMC SnapView snapshot backups, including requirements for the MySQL database.
MySQL Configuration Requirements
- Sudo privileges must be configured for mysql user on the MySQL server (see the next section). On Solaris platforms, this means the SMCsudo package must be installed.
- If you are backing up a remote MySQL server, the destination directory specified on the Backup Where page must exist on the MySQL server as well as the ZRM server. The MySQL backup user (OS-level) must have read/write permission to access this directory.
All MySQL data and logs must reside on Clariion storage.
Refer to EMC-supplied Clariion documentation for details on EMC SnapView .
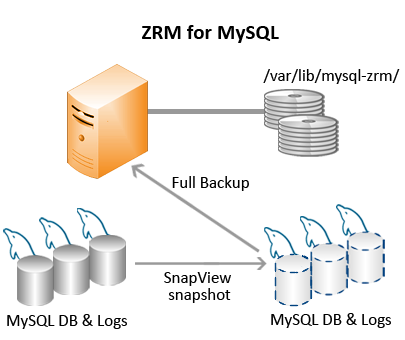
The Clariion volumes are mounted on ZRM server (direct attached or SAN attached). ZRM user "mysql" should have permissions to read and write to the volumes.
Pre-conditions for Using EMC Snapview Snapshots
- The MySQL backup user must be granted sudo privileges to execute EMC commands on the MySQL server. Add a line similar to the following example to /etc/sudoers on the MySQL server:
mysql MySQLserver.mycompany.com Server>=NOPASSWD:/bin/mount,NOPASSWD:/bin/umount,NOPASSWD:/bin/df, \
      NOPASSWD:/opt/Navisphere/navicli,NOPASSWD:/sbin/fdisk,NOPASSWD:/sbin/fuser
- where MySQLserver.mycompany.com is the fully-qualified domain name for the MySQL server. Note that if EMCcommands are installed in non-standard locations, the above example would not work without editing it to reflect the different paths. Please see KB article for more information on sudo configuration.
- All MySQL database files (data, log, indexes) must be stored in SnapView volumes to ensure consistency. If any of the files are not on SnapView volumes, a raw backup using mysqlhotcopy, or a logical backup using mysqldump will be taken based on the storage engines of the tables in each of the databases.
- EMC NaviSphere (including the navicli and naviseccli utility) is required, and must be installed on the MySQL server being backed up and the ZRM server. This software is not shipped with ZRM for MySQL; contact EMC to obtain these programs.
Configuring ZRM for MySQL to use EMC SnapView Snapshots
To activate use of EMC SnapView Snapshots, simply select the EMC SnapView Snapshot Type as the Backup Methodfrom the Backup How page:
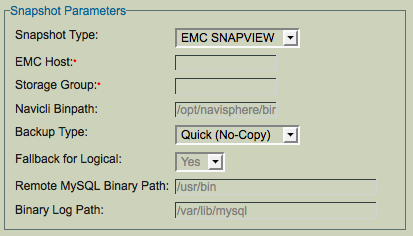
- EMC Host
- Specify the fully qualified domain name or IP address of the Clariion storage system. This is a mandatory parameter as there is no default.
- Storage Group
- Specify the EMC/Clariion Storage Group that you want to add to the snapshot. This is a mandatory parameter as there is no default.
- Navicli Binpath
- The path to where navicli and naviseccli are stored. The default value is /opt/Navisphere/bin.
- Backup Type
- Choose the method of snapshot backup. The Standard (Copy) option specifies that the snapshot should be copied to a standard ZRM for MySQL backup archive. The Quick (No Copy) option specifies that the snapshot itself should be used as a near-line backup. Quick backups are convenient as they provide faster backups and restores, but because they remain on the MySQL server they do not protect against media or server failure. Note that if the quick option is specified, the compress and encrypt options are ignored. In addition, no checksums are performed, which means that quick snapshot backups cannot be verified. Quick snapshot backups may be converted to standard backups stored on the ZRM server using the Convert Backup option available from the Reports menu tab.
Fallback for Logical
If this field is set to yes and snapshot backup fails, the logical backup is attempted. Set the value to No if you do not want to do logical backup if there is a snapshot backup failure.
Remote MySQL Binary Path
Path to the MySQL commands on the MySQL server.
Binary Log Path
Location of binary logs on the MySQL server that are used for log incremental backups.
Bluearc Titan Snapshots
Bluearc Titan storage series provides snapshot capability that allows for near-instantaneous hot backups and rapid restores. BlueArc can store up to 1,024 snapshot images per volume on Titan.
If you purchase the feature license from Zmanda (available at the Zmanda Network Downloads page), ZRM for MySQL includes an optional snapshot plugin that integrates with Bluearc Titan series to create consistent MySQL full backups. It creates temporary snapshots of the Bluearc volumes on which to perform a full backup. When snapshots are enabled, ZRM for MySQL can perform backups with minimal impact on MySQL applications. Database writes will be blocked only during snapshot creation, which typically takes less than a second regardless of database size.
This page describes the configuration of Bluearc Titan snapshot backups, including requirements for the MySQL database.
MySQL Configuration Requirements
- Sudo privileges must be configured for mysql user on the MySQL server (see the next section). On Solaris platforms, this means the SMCsudo package must be installed.
- If you are backing up a remote MySQL server, the destination directory specified on the Backup Where page must exist on the MySQL server as well as the ZRM server. The MySQL backup user (OS-level) must have read/write permission to access this directory.
All MySQL data and logs must reside on Bluearc storage. Please see Bluearc Administration Guide on how to configure Bluearc storage volumes.
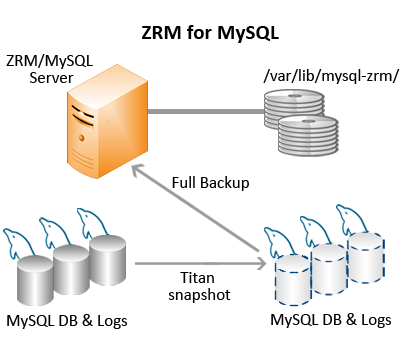
ZRM user "mysql" should have permissions to read and write to the volumes.
Pre-conditions for Using Bluearc Titan Snapshots
- The MySQL backup user must be granted sudo privileges to execute Bluearc ssc command and some system commands on the MySQL server. Add a line similar to the following example to /etc/sudoers on the MySQL server:
mysql MySQLserver.mycompany.com=NOPASSWD:/bin/mount,NOPASSWD:/bin/umount,NOPASSWD:/bin/df, \
      NOPASSWD:<path to ssc command>
- where MySQLserver.mycompany.com is the fully-qualified domain name for the MySQL server. Please correct the path to ssc command in the above example. Please see KB article for more information on sudo configuration.
- All MySQL database files (data, log, indexes) must be stored in Bluearc storage to ensure consistency. If any of the files are not on Bluearc storage, a raw backup using mysqlhotcopy, or a logical backup using mysqldumpwill be taken based on the storage engines of the tables in each of the databases.
- The Bluearc ssc command is required on the MySQL server. This command is available from Bluearc for all customers. Please contact Bluearc for more information.
- BlueArc Virtual Volumes are logical entities that reside on top of the base volume of Titan. Snapshot of Virtual volumes is not supported. So, the base volumes will have to be exported to the MySQL server so that snapshot backup method can be used.
- The export name should be the same name as file system name i.e, File system label and Export name must be the same. For example: Consider the following Titan configuration
smet3-1:$ filesystem-list
Name               Dev   On span            State  EVS  Cap(GB)  Confined Flag
-----------------  ----  -----------------  -----  ---  -------  -------- ----
test1               1025  zManda             Mount   2      106        0
smet3-1:$ vn 2 nfs-export list | more
          Export name: /test1
          Export path: /
    File system label: test1
     File system size: 107 GB
File system free space: 19.0 GB
    File system state:
            formatted = Yes
              mounted = Yes
               failed = No
     thin provisioned = No
     Browse snapshots: Yes
         Read Caching: Disabled
Configuring ZRM for MySQL to use Bluearc Titan Snapshots
To activate use of Bluearc Titan Snapshots, simply select the Bluearc Titan Snapshot as the Backup Method in theBackup How page. Please note that snapshots are performed only for full backups. This option will appear only if the Zmanda optional license for Bluearc Titan snapshots has been installed on the ZRM server.
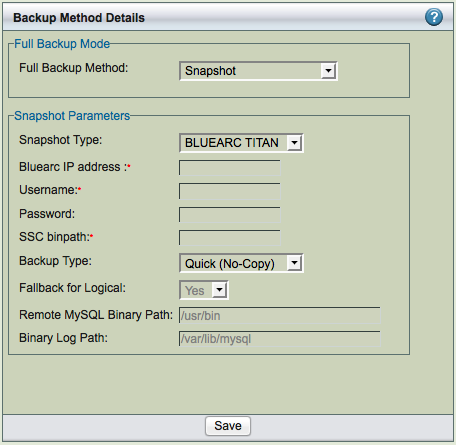
- Bluearc IP address
- IP address of Bluearc Titan storage device (hostnames are not allowed). This is a mandatory parameter as there is no default.
- Username
- User on the Bluearc storage. The user must be have Supervisor role. Supervisor can only perform snapshot operations. This paramater is mandatory.
- Password
- Bluearc storage user password.
- SSC Binpath
- The absolute path to ssc command. The ssc is command line tool available from Bluearc for Linux/Solaris platform. This command must be installed on the MySQL server.
- Backup Type
- Choose the method of snapshot backup. The Standard (Copy) option specifies that the snapshot should be copied to a standard ZRM for MySQL backup archive. The Quick (No Copy) option specifies that the snapshot itself should be used as a near-line backup. Quick backups are convenient as they provide faster backups and restores, but because they remain on the MySQL server they do not protect against media or server failure. Note that if the quick option is specified, the compress and encrypt options are ignored. In addition, no checksums are performed, which means that quick snapshot backups cannot be verified. Quick snapshot backups may be converted to standard backups stored on the ZRM server using the Convert Backup option available from the Reports menu tab.
Fallback for Logical
If this field is set to yes and snapshot backup fails, the logical backup is attempted. Set the value to No if you do not want to do logical backup if there is a snapshot backup failure.
Remote MySQL Binary Path
Path to the MySQL commands on the MySQL server.
Binary Log Path
Location of binary logs on the MySQL server that are used for log incremental backups.
Amazon EC2
ZRM for MySQL can backup MySQL servers running on Amazon EC2 instances in Amazon cloud. The backups are stored in Amazon S3 cloud storage. The backup images can be restored only to an Amazon EC2 instance. The backups are performed using Elastic Block Store (EBS) snapshots to S3.
If you purchase the feature license from Zmanda (available at the Zmanda Network Downloads page), ZRM for MySQL includes an optional snapshot plugin that integrates with Amazon EBS to create consistent MySQL full backups. It creates snapshots of the EBS volumes on which to perform a full backup. When snapshots are enabled, ZRM for MySQL can perform backups with minimal impact on MySQL applications. Database writes will be blocked only during snapshot creation, which typically takes less than a second regardless of database size.
This page describes the configuration of Amazon EBS snapshot backups, including requirements for the MySQL databases in the cloud.
Requirements
- ZRM server and MySQL server must be running Linux EC2 instances. Solaris and Windows platforms are not supported.
- ZRM client software must be installed on the MySQL server EC2 instance.
- Perl module Net::Amazon::EC2 must be installed on the ZRM server under /opt/zmanda/zrm directory. This perl module is available only from CPAN. To install this module, run the following commands as superuser on the ZRM server:
# /opt/zmanda/zrm/perl/bin/cpan

At CPAN prompt, type "install Net::Amazon::EC2"
- The destination directory specified on the Backup Where page must exist on the MySQL server as well as the ZRM server. The MySQL backup user (OS-level) must have read/write permission to access this directory.

- All MySQL database files (data, log, indexes) must be stored in non-partitioned Amazon Elastic Block Store (EBS) volumes. ZRM user "mysql" should have permissions to read and write to the volumes. Please see Amazon documentation on how to use Elastic Block Storage in Amazon EC2.
- Only Quick backup method is supported. Regular backups cannot be performed.
- The number of EBS snapshots (full backups) that can be created depends on the Amazon account limit. The default limit is 500 EBS snapshots per amazon account. If full backups have to be retained for a long time, please contact Amazon to increase the EBS snapshot limit.
- Please make sure that the system date and time on the MySQL server and ZRM server if they are running on Amazon EC2 is correct. Incorrect date and time will result in failure of EBS snapshots and hence the backups.
- The MySQL backup user must be granted sudo privileges to execute system commands "df" and "xfs_freeze" (if XFS file system is in use) on the MySQL server. Add a line similar to the following example to /etc/sudoers on the MySQL server:
mysql ec2-75-101-206-181.compute-1.amazonaws.com=NOPASSWD:/bin/df,NOPASSWD:/usr/sbin/xfs_freeze,NOPASSWD:/bin/mount,NOPASSW
D:/bin/umount,NOPASSWD:/sbin/fuser
- where ec2-75-101-206-181.compute-1.amazonaws.com is the IP address of ZRM server on Amazon EC2. Please see KB article for more information on sudo configuration.
Configuring ZRM for MySQL to use Amazon EBS Snapshots
- Install the EBS snapshot license on the ZRM server. You will have to download the license file from Zmanda network and copy it to /etc/zmanda directory.
- Choose the Amazon EC2 instance's private DNS name as the host name for the MySQL server in the Backup|What page. For example: domU-12-31-39-06-70-22.compute-1.internal
- Select Snapshot Type as Amazon EBS in the Snapshot Type drop down box after selecting Backup Method in the Backup How page.
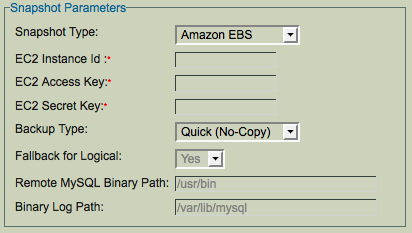
Amazon EC2 access key
- Amazon account access key identifier. This information can be obtained from Amazon account page (Select Your Account -> Access Identifiers)
- Amazon EC2 secret key
- Amazon account secret key identifier. This information can be obtained from Amazon account page (Select Your Account -> Access Identifiers)
- Amazon EC2 instance id
- The Instance ID of the Amazon EC2 instance where MySQL server is running. This MySQL server should be configured in the Backup|What page in the backup set. Usually, the ID begins with string "i-". This information can be obtained from the AWS Management Console (Amazon account information is required).
- Backup Type
- Only Quick backup is supported. The Quick (No Copy) option specifies that the snapshot itself should be used as a near-line backup. Quick backups are convenient as they provide faster backups and restores. Backups are stored in highly reliable and scalable Amazon S3 that offers protection against media or server failure. Note that if the quick option is specified, the compress and encrypt options are ignored. In addition, no checksums are performed, which means that quick snapshot backups cannot be verified. Quick snapshot backups using EBS cannot be converted into regular backups.
Fallback for Logical
If this field is set to yes and snapshot backup fails, the logical backup is attempted. Set the value to No if you do not want to do logical backup if there is a snapshot backup failure.
Remote MySQL Binary Path
Path to the MySQL commands on the MySQL server.
Binary Log Path
Location of binary logs on the MySQL server that are used for log incremental backups.
Restoring EBS snapshot backup
Elastic Block store snapshot backups can be restored only to an Amazon EC2 instance. There are two ways to do restoration of EBS snapshot backups.
-
Restoration of EBS snapshots to an EC2 where MySQL server is already running. This method is the recommended method. It can be used to restore MySQL backups back to original EC2 instance. This method is supported by Zmanda Management Console. For more details on how to configure destination Amazon EC2 instance id and other EBS parameters in the restore process, please see Restore Where page.
-
Restoration of EBS snapshots to an EC2 where MySQL server is not running. This method is useful for quick recovery of MySQL data. This restoration option is available in command line only.
mysql-zrm-manage-backup --mount-snapshots --source-directory <directory where backup images are stored> \
--ec2-instance-id <instance id of amazon ec2 where the snapshots have to be mounted> \
--device-fs-map <name of the mapping file containing devices and mount points>
The EBS devices are mounted at the mount points specified in the device mapping file on the destination amazon ec2 instance. The user can start a MySQL server with the datadir and logdir pointing to the mounted EBS devices to start accessing restored data.
An example of device mapping file:
/dev/sdf=/db
/dev/sdk=/innodb_data
/dev/sdn=/innodb_logs
and MySQL server to use the above data will have to be configured as follows in the MySQL server options file (my.cnf)
datadir=/db
innodb_data_home_dir=/innodb_data
innodb_log_group_home_dir=/innodb_logs
Use --dismount-existing option to mysql-zrm-manage-backup command if the EC2 where backups are being restored to already has EBS volumes mounted at the mount points.
Network Appliance Snapshots
Network Appliance storage systems include the Network Appliance SnapManager software, which facilitates near-instantaneous hot backups and rapid restores.
ZRM for MySQL includes an optional snapshot plugin that integrates with SnapManager software to create consistent MySQL backups using ONTAP API. It creates temporary snapshots of the Network Appliance volumes to back up. The snapshots are removed when the backup run is completed (if regular backups are being performed). ZRM for MySQL using snapshots performs backups with minimal impact on MySQL applications.
This page describes the command-line configuration of Network Appliance snapshot backups, including requirements for the MySQL database.
MySQL Configuration Requirements
- Sudo privileges must be configured for mysql user on the MySQL server (see the next section). On Solaris platforms, this means the SMCsudo package must be installed.
- If you are backing up a remote MySQL server, the destination directory specified on the Backup Where page must exist on the MySQL server as well as the ZRM server. The MySQL backup user (OS-level) must have read/write permission to access this directory.
All MySQL data and logs must reside on Network Appliance volumes. The following are some of the possible configurations
- All MySQL data is on a single Network Appliance Volume
- Specific database directories are on different volumes
- For databases containing InnoDB-based tables, the snapshot can only be used if the database directory, the InnoDB data files and the InnoDB logs are all on Network Appliance volumes.
- The InnoDB shared data files are on a separate Network Appliance volume
- The InnoDB logs are on a separate Network Appliance volume
The Network Appliance volumes must be mounted on the ZRM server using NFS. The ZRM server's mysql user must have permissions to read and write to the volumes. If the Network Appliance volumes are accessed using some other protocol such as iSCSI, please contact Zmanda Support Team.
Pre-conditions for Using Network Appliance Snapshots
- The mysql operating system user must be granted sudo privileges to execute Network Appliance commands on the MySQL server. Add a line similar to the following example to /usr/local/etc/sudoers on the MySQL server:
mysql MySQLserver.mycompany.com=NOPASSWD:/usr/sbin/mount,NOPASSWD:/usr/sbin/umount,NOPASSWD:/usr/local/bin/df,NOPASSWD:/sbi
n/fuser
- where MySQLserver.mycompany.com is the fully-qualified domain name of the MySQL server. Note that if themount, umount and df commands are installed in non-standard locations, the above example would not work without editing it to reflect the different paths. Please see KB article for more information on sudo configuration.
- The snap reserve for the Network Appliance volume must be adequate to accommodate changed data. The Network Appliance default of 20% may be low or high for your site, depending on data change rates.
- To determine the snap reserve, use the Network Appliance snap reserve volumename command.
- All MySQL database files (data, log, indexes) must be stored in Network Appliance volumes to ensure consistency.
- If any of the files are not on Network Appliance volumes, a raw backup using mysqlhotcopy, or a logical backup using mysqldump will be taken based on the storage engines of the tables in each of the databases.
- If you using Netapp snapshots from a remote MySQL server (ZRM client installation), you will have to install Perl LWP-UserAgent module in the default perl installation.
Configuring ZRM for MySQL to use Netapp snapshots
To activate use of Network Appliance Snapshots, you must select the NetApp SnapShot Type for Backup Method from the Backup How page:
- NetApp User/Password
- Supply a valid Network Appliance username and password. The Netapp user should have privileges to perform snapshots on the appliance.
- Backup Type
- Choose the method of snapshot backup. The Standard (Copy) option specifies that the snapshot should be copied to a standard ZRM for MySQL backup archive. The Quick (No Copy) option specifies that the snapshot itself should be used as a near-line backup. Quick backups are convenient as they provide faster backups and restores, but because they remain on the MySQL server they do not protect against media or server failure. Note that if the quick option is specified, the compress and encrypt options are ignored. In addition, no checksums are performed, which means that quick snapshot backups cannot be verified. Quick snapshot backups may be converted to standard backups stored on the ZRM server using the Convert Backup option available from the Reports menu tab.
Fallback for Logical
If this field is set to yes and snapshot backup fails, the logical backup is attempted. Set the value to No if you do not want to do logical backup if there is a snapshot backup failure.
Remote MySQL Binary Path
Path to the MySQL commands on the MySQL server.
Binary Log Path
Location of binary logs on the MySQL server that are used for log incremental backups.
Netapp SnapVault Snapshots
Network Appliance storage systems include the Network Appliance SnapVault software, which facilitates near-instantaneous hot backups and replicating the snapshot to another Netapp filer. ZRM also uses Snaprestore to perform rapid restores from the snapshots.
ZRM for MySQL includes an optional snapshot plugin that integrates with SnapVault software to create consistent MySQL backups using ONTAP API. It creates temporary snapshots of the Network Appliance volumes to back up. The quick snapshot backups are replicated to another Netapp filer using Snapvault replication. ZRM for MySQL using SnapVault performs backups with minimal impact on MySQL applications.
This page describes the command-line configuration of Network Appliance snapshot backups, including requirements for the MySQL database.
MySQL Configuration Requirements
- Sudo privileges must be configured for mysql user on the MySQL server (see the next section). On Solaris platforms, this means the SMCsudo package must be installed.
- If you are backing up a remote MySQL server, the destination directory specified on the Backup Where page must exist on the MySQL server as well as the ZRM server. The MySQL backup user (OS-level) must have read/write permission to access this directory.
- Only quick backup method is supported. Log incremental backups are copied over to the ZRM server.
All MySQL data and logs must reside on Network Appliance volumes. The following are some of the possible configurations
- All MySQL data is on one or more Network Appliance Volume(s).
- Specific database directories are on different volumes
- For databases containing InnoDB-based tables, the snapshot can only be used if the database directory, the InnoDB data files and the InnoDB logs are all on Network Appliance volumes.
- The InnoDB shared data files are on a separate Network Appliance volume
- The InnoDB logs are on a separate Network Appliance volume
The Network Appliance volumes must be mounted on the ZRM server using NFS. The ZRM server's mysql user must have permissions to read and write to the volumes.
Pre-conditions for Using Network Appliance Snapshots
- The mysql operating system user must be granted sudo privileges to execute Network Appliance commands on the MySQL server. Add a line similar to the following example to /usr/local/etc/sudoers on the MySQL server:
mysql MySQLserver.mycompany.com=NOPASSWD:/usr/sbin/mount,NOPASSWD:/usr/sbin/umount,NOPASSWD:/usr/local/bin/df,NOPASSWD:/sbi
n/fuser
- where MySQLserver.mycompany.com is the fully-qualified domain name of the MySQL server. Note that if themount, umount and df commands are installed in non-standard locations, the above example would not work without editing it to reflect the different paths. Please see KB article for more information on sudo configuration.
- The snap reserve for the Network Appliance volume must be adequate to accommodate changed data. The Network Appliance default of 20% may be low or high for your site, depending on data change rates.
- To determine the snap reserve, use the Network Appliance snap reserve volumename command.
- All MySQL database files (data, log, indexes) must be stored in Network Appliance volumes to ensure consistency.
- If you using Netapp snapshots from a remote MySQL server (ZRM client installation), you will have to install Perl LWP-UserAgent module in the default perl installation.
- Snapvault configuration between primary and secondary filer should be configured. ZRM does not set up this configuration. The snapshot is replicated to the remote filer on its schedule (not kicked off by the ZRM backups).
Configuring ZRM for MySQL to use Netapp SnapManager
To activate use of Network Appliance Snapshots, you must select the NetApp SnapShot Type for Backup Method from the Backup How page:
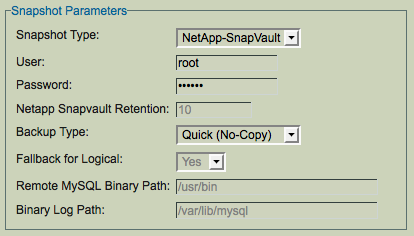
- NetApp User/Password
- Supply a valid Network Appliance username and password. The Netapp user should have privileges to perform snapshots on the appliance.
- Backup Type
- The Quick (No Copy) option specifies that the snapshot itself should be used as a near-line backup. Quick backups are convenient as they provide faster backups and restores, but because they remain on the MySQL server they do not protect against media or server failure. Note that if the quick option is specified, thecompress and encrypt options are ignored. In addition, no checksums are performed, which means that quick snapshot backups cannot be verified. Only Quick (No Copy) option is supported for this backup method.
Netapp Snapvault Retention
The number of snapshot copies retained. The default is 10.
Fallback for Logical
If this field is set to yes and snapshot backup fails, the logical backup is attempted. Set the value to No if you do not want to do logical backup if there is a snapshot backup failure.
Remote MySQL Binary Path
Path to the MySQL commands on the MySQL server.
Binary Log Path
Location of binary logs on the MySQL server that are used for log incremental backups.
The Backup Summary page conveniently lists all revelent settings for the backup set in one place, showing each option, and where the option was set (i.e., either factory, site, or in the backup set itself).
Backup Summary provides information about the configuration parameter values for the backup set and where it was set - Factory Settings (ZRM default value), Site Defaults (Set in Set Site Defaults page) and Backup Set (Set in Backup What/Where/When/How pages).
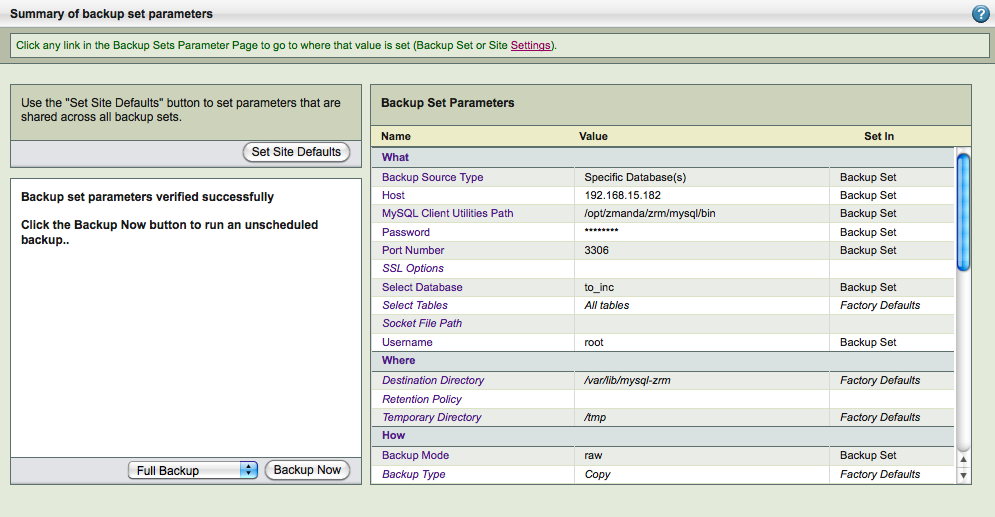
The summary items are listed under headings that correspond to the Backup page where the option is set. Note that the "Backup Type" field in this context refers to whether a copy of the backup was transferred to the ZRM server. This field will display Copy for all backup operations except for Quick Snapshots, where it will display No-copy.
You can click on the Set Site Defaults to see and modify the site configuration default values for the ZRM server.
This page allow performs configuration check on ZRM server and the MySQL server for the backup set configuration. All errors/warnings are displayed in the left panel. If there are errors, backups will not be performed. Warnings about disk space availability on the backup destination location are also displayed. It is important to enable binary logs for the MySQL server for both full as well log incremental backups.
You can also start Full, Log Incremental, Differential, Chained Differential backups using Backup Now button. Last two backup options are available only if MySQL Enterprise Backup is selected in ZMC Backup How page. This is a good way to test the backups before scheduled backups run.
Monitoring Backups
The Monitor page shows the progress of backup run. The Backup run goes through various phases. Each phase is displayed and time taken by each phase is displayed when it is completed. It is possible to abort a backup run when it is absolutely necessary. The backup will stop at the next appropriate time (most likely at the beginning of the next phase). The cancel button will appear during the backup run. The client process are not terminated and will have to be terminated manually.
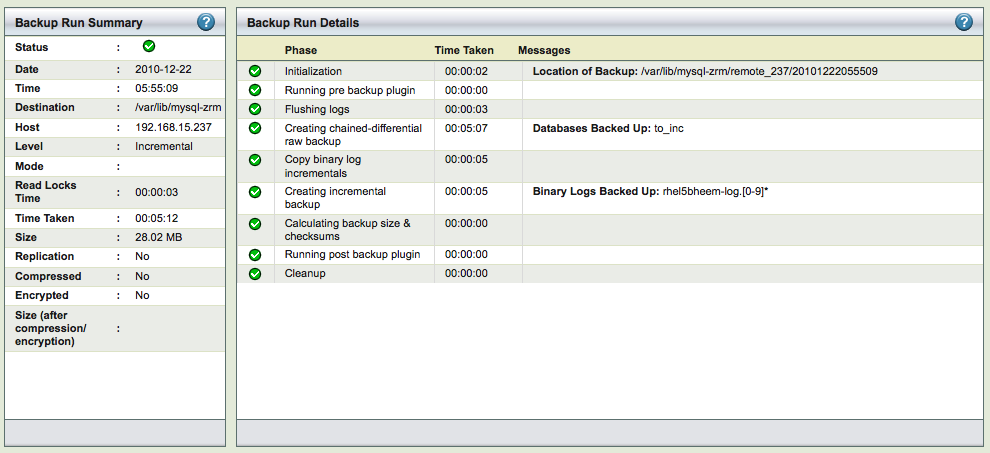
The left panel shows summary and configuration of the backup run. The Monitor shows information about the most recent backup run or the backup run in progress.
The backup processes divided into multiple phases. The right panel shows the progress of each phase. The name of the phase, time taken for each phase and any important messages regarding the phase are displayed.
Backup Status icons
- The yellow exclamation point (!) indicates warnings. They may require attention to prevent future backup failures.
- The green checkmark symbol indicates a task that executed successfully.
- The red octagon ("stop sign") symbol indicates backup has failed.
Events
ZMC provides all backup and configuration check events across backup sets in the Event Viewer as shown below.
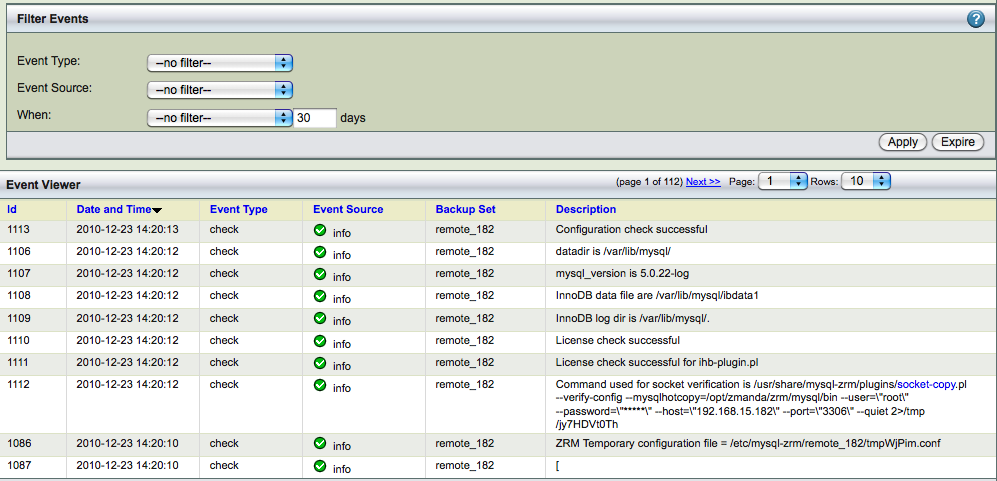
Event Viewer
The columns of the page are:
- Id
- Event identifier
- Date and Time
- Time stamp of the event, displayed in 24-hour format
Event Type
Configuration check and backup
- Event Source
- The source of the event or log is either the local ZMC console or the Zmanda network. It also shows failure,warning, or info. All failure events need immediate attention.
- Backup Set
- Displays the backup set name if the event is not a Zmanda Network Alert.
- Description
- Event description. Some event descriptions have links. Clicking the links will provide information from knowledgebase in the Zmanda Network or the wiki about how to resolve the problem if it is an error.
Alerts can also come from Zmanda Network, providing security and product updates. The ZMC can generate many events during a backup process and configuration process. By clicking on the header of any column, the view of the page can be altered so that it is sorted as per that column.
Filter Events
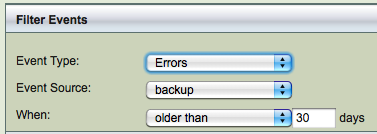
You can select the events in the viewer using Event Type and Event Source. Event Type can be Errors or Warnings. Event Source can be backup or check. You can filter based on the time stamp.
You can purge events using Expire button. Select the events to be removed using When field. Events take space in the internal database and if there are disk space constraints, it is important to expire events regularly when they are no longer needed.
Log Rotate Utility
ZMC works with a log rotate utility that allows sysadmins to effectively prune active logs.
Sysadmins should rotate the logs using crontab.
For example:
0 1 * * 1,5 logrotate /etc/logrotate.d/zmc_logrotate (For 1 AM on Monday and Friday of each week)
The pruned logs are not saved by the utility; they are simply pruned by it. You must manually copy the logs before pruning if you wish to retain them.
Report Summary across all backup sets and all backups runs is available in this page.
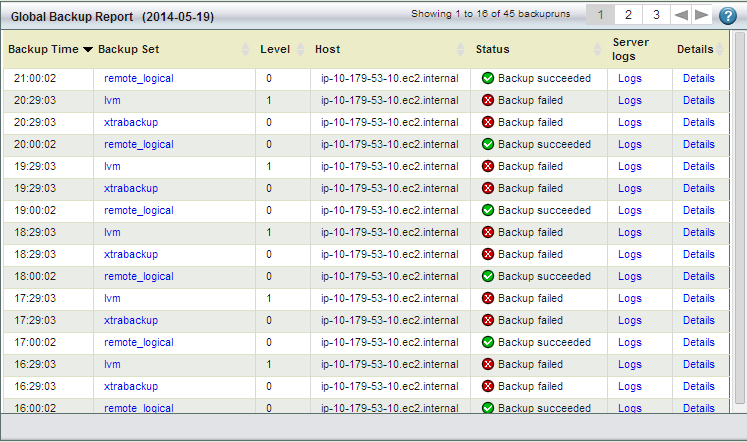
The backup date is selected from the calendar on the left hand side. All the backup runs for all backup sets for that date are displayed. The time of backup(Backup Time), backup set name, backup level, MySQL server host name (Host), status of backups are displayed. You can sort on any of the column to look at the backup runs for a backup set or all failures. The default sort order is based on the backup time. The last column ZRM Server logs provides a link to the backup logs for that backup run. Clicking on the Logs link shows:
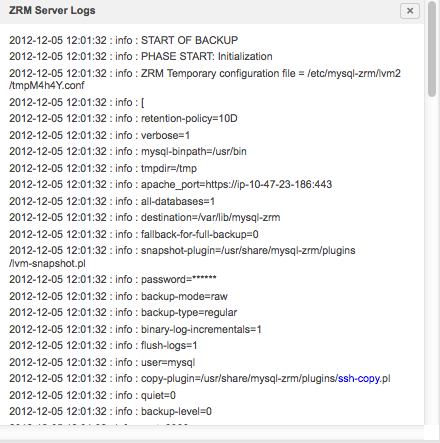
The log viewer can be used to review the logs for particular backup run. This information can be used to troubleshoot the problems in case the information available in the Report Summary is insufficient to fix the backup failure.
The Details column provides the information a summary of backup details (what was backed up and backup parameters).
Summary Report
ZRM for MySQL automatically generates backup reports after the backup run is completed (or if it fails for some reason). This backup summary report includes:
- status of the current/last backup run
- the backup type (in other words, whether the backup was a quick (no-copy) snapshot backup.
- backup statistics
- location of the backup image
- backup level.
If the machine where ZMC is running is configured to send mail, reports can be automatically e-mailed after every backup run.
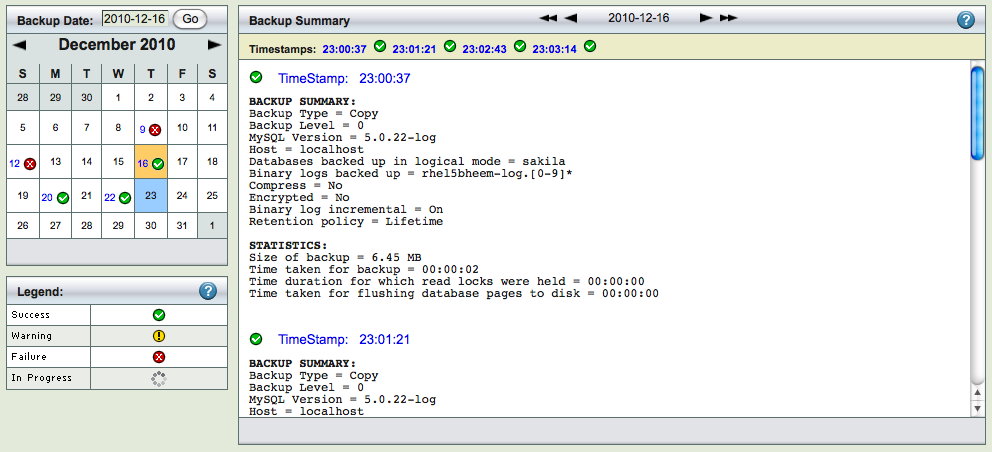
The Summary Report page is divided into two panels.
- The left panel shows a calendar control from which you can select report dates, and a legend that explains the report icons.
- The right panel displays the report for date selected on the calendar.
You can select reports using any of the following:
- Browse buttons at the top of the report itself.
- You can enter a date on the left panel and click the Go button.
- You can pick a date off the calendar.
Selecting a backup date
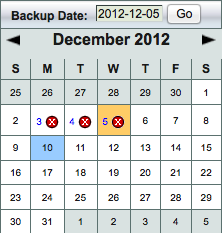
You can either enter the date (mm/dd/yy[yy]) and click Go, or click on any icon in the calendar. When you click Go (or click on a different date), the report shows any summary data (if any is available) for that date.
Legend
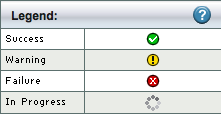
Legend shows four possible status for a backup run:
- Error
- Requires immediate attention
- Warning
- A recoverable failure
- Success
- Successful backup run, the data backed up can be recovered from this image
- Progress
- Backup run is in progress. Please check Monitor page for more information about this backup run
Summary Panel
The date browse buttons allow to conveniently move back and forth one day (using < or >) or one week (using <<or>>) at a time.
Timestamp links below the browse buttons show the time at which the backup run was initiated. If there are multiple backups in a day, you will see multiple time stamps. Clicking on a Timestamp link go to the Restore What page with the date and time automatically filled in.
- Backup Summary
- The what, when, where and how of the backup run. Note that Backup Type indicates whether the backup is a standard backup copied to the ZRM server (Copy), a quick snapshot backup (No-copy), or a quick snapshot that has been converted to a standard backup (Copy (converted)).
- Statistics
- How much data was backed up and how long it took. Note that quick snapshot (No-copy) backups always display a backup size of zero, because no data transfer occurs when this type of backup is run.
Custom reports
ZRM for MySQL generates a number of Predefined backup reports you can easily customize. ZRM for MySQL automatically generates backup reports after each backup run is completed.
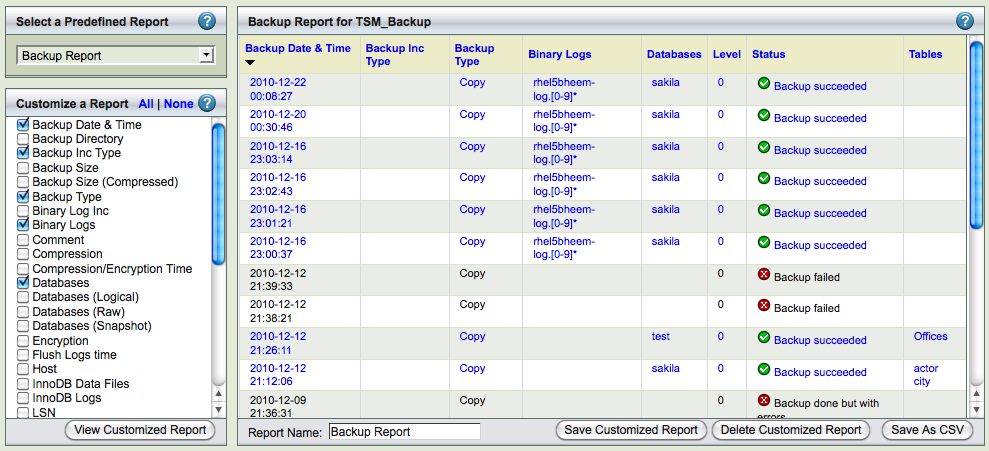
The Custom Reports displays a list of predefined reports, along with checkboxes that allow the user to customize reports.
- The left panel shows a list of predefined reports; beneath this list is a series of checkboxes that let you customize the display.
- The right panel displays the Report.
Predefined Reports
The predefined reports are shown and described below. The reports are shown displaying the default columns; you can customize each of the reports to display the desired
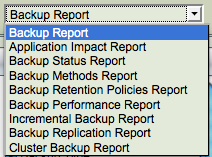
column fields. The Backup Date and Time column is common to all the reports. It identifies and differentiates between different Backup Runs of the same backup set. A few key columns are discussed below.
When any link is clicked, ZRM for MySQL jumps to the Restore What page with the date and time filled in based on the backup you selected from the report.
Backup Report
The Backup Report has columns that display Level, Database and Tables, corresponding to the Backup Whatparameters. It also has a column that shows the status of the run.
Application Impact Report
The Application Impact Report displays the Read Lock Time and Total Time for each run. These allow you to determine how the backup run affected database application performance.
Backup Status Report
The Backup Status Report displays the Status and the Destination Directory where the data has been backed up. The Status of the run is also displayed.
Backup Method Report
The Backup Method Report displays the backup method (i.e. Databases Logical, Databases Raw and Snapshots) used to create the backup. The data in these columns will not change across runs. By changing the backup set selection in the drop down box at the top of the page, can quickly see which backup sets have what methods.
Backup Retention Policy Report
Backup Performance Report
The Backup Performance Report displays compression and performance statistics for the backup set.
Incremental Backup Report
Replication Backup Report
Cluster Backup Report
Customized Report

Database events report
The Database Events page lets you find and view all the database events logged and copied during incremental backups. This is useful when you need to find a particular malicious or erroneous transaction so you can roll back the unintended change. Once you find the problem event, you can easily launch a restore operation that will roll back all changes to the moment before the damage occurred. To back up and restore at the transaction level requires that binary logging is enabled on the MySQL server.
- It is possible to restore selected events or undo selective events from the database. You can also search for errors and save the search query for future searches. This will make identification of erroneous events easier.
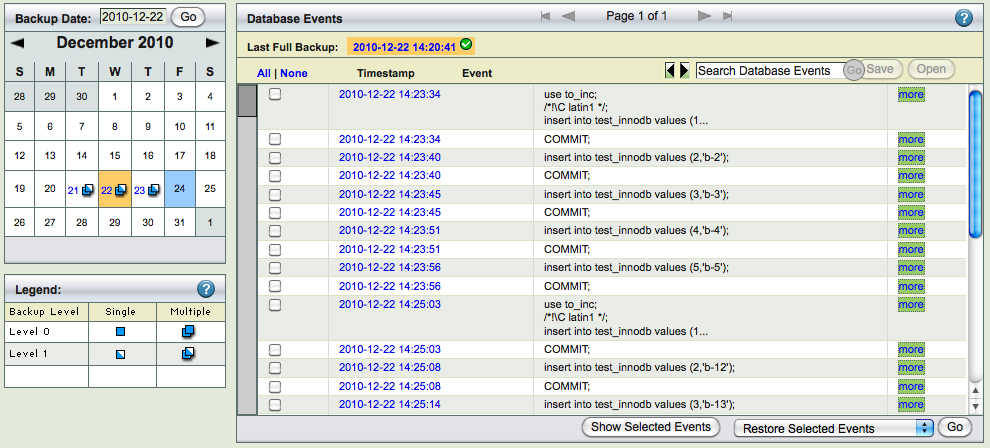
The left panel displays a calender control that lets you select a backup icon from dates on which single or multiple backups where processed.
The right panel features controls that help you locate events within the selected backup. When you open the page, the right panel displays events from the selected backup date for the selected backup set. Binary log backups are stored as part of full and log incremental backups.
Parsing of binary logs from the backup images can take time (up to few minutes). To refresh the report page using Parse Events button at the bottom of the page (as shown below) The backup images are parsed again and report is re-populated.
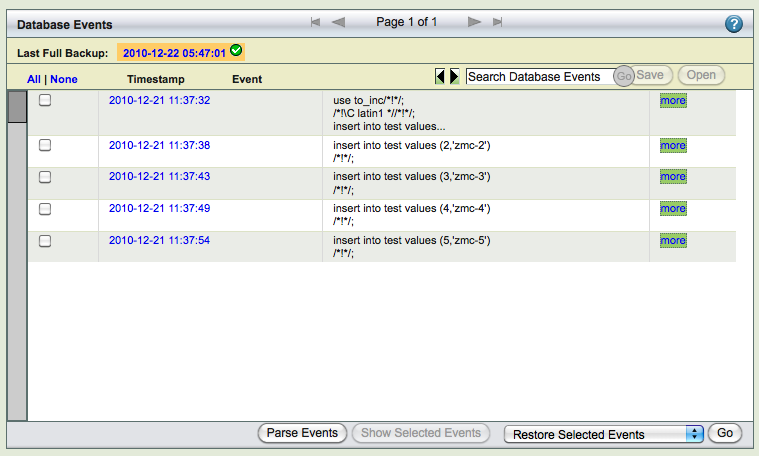
Selecting Backup Date
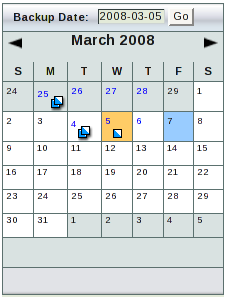
There two methods for selecting a backup:
- You can click a backup icon on the calendar.
- You can enter the backup date (mm/dd/yy[yy]) at the top of the left panel and click Go to select a backup date.
The calendar shows the dates on which full backup (level 0) and incremental backups (level 1) were performed. If the multiple backup runs happened on a calendar day, it is shown with a different icon. You can select any date that has full or incremental backups.
The binary logs in the backups are parsed and displayed in the database events window. When user selects a backup date, the backups done on that date are parsed. You can use Parse Events button to parse the backup image again. Page refresh will not parse backups again.
Note: If no backup exists for the selected date, then no data is displayed. This does not necessarily mean that database event logs do not exist for that date; they may be available from a binary log that was backed up subsequently. In other words, the Database Events log includes all data from a given backup to the next backup that included logged events.
Database Event Viewer
After you have selected a backup that includes log data, the events viewer lists the events it contains in a summary list. You can click on the more link to get complete description of the event as shown below.
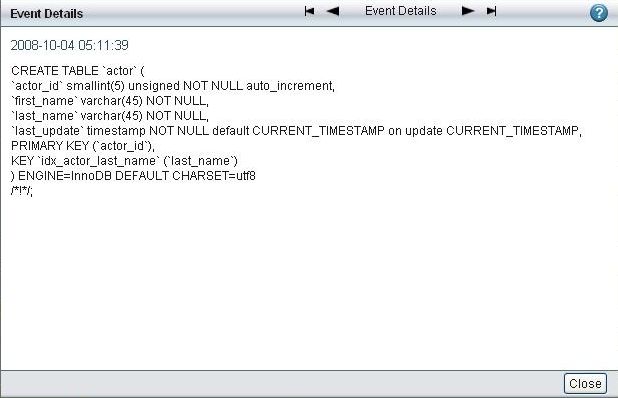
Database Event Search
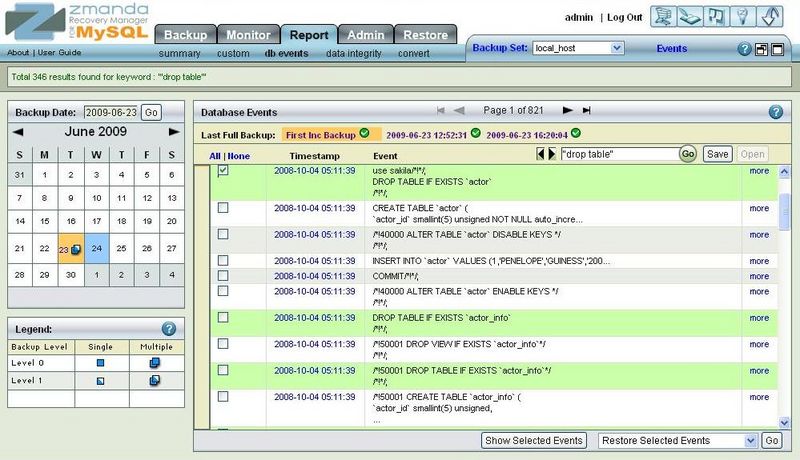
You can enter a text string to search for specific database events. You can use MySQL fulltext search Boolean operators to further control the search. For example, you can quote entire phrases to find them, and use plus (+) operator to refine searches on individual words.
- + A leading plus sign indicates that this word must be present in each row that is returned.
- - A leading minus sign indicates that this word must not be present in any of the rows that are returned. You can use both + and - together
- * The asterisk serves as the truncation (or wildcard) operator. Unlike theother operators, it should be appended to the word to be affected. Words match if they begin with the word preceding the * operator.
- " A phrase that is enclosed within double quote (“"”) characters matchesonly rows that contain the phrase literally, as it was typed. Search "open source backup" we will do the search for exact that phrase only.
All the search results are selected. The search results are also highlighted. It is possible to use the left and right arrow buttons next to the search box to go from one search result to another.
Search queries can be named and saved for future searches (Use Save button next to the search box). Clicking Openbutton next to the search box to use saved search queries. Saving search queries can help in performing the same queries on multiple backup sets or multiple backup dates.
Launching Restores from the Database Events Reports
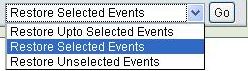
After selecting the event(s) using the checkbox next to each event, you can restore to a selected event (of course, only one event should be selected) or restore only the selected events or restore everything except the selected event (undo selected events). Multiple events can be selected for restoration or undo the effects of the selected events. Restoring to a selected event is equivalent of point-in-time recovery i.e, all database events starting from last full backup to the specified event are restored.
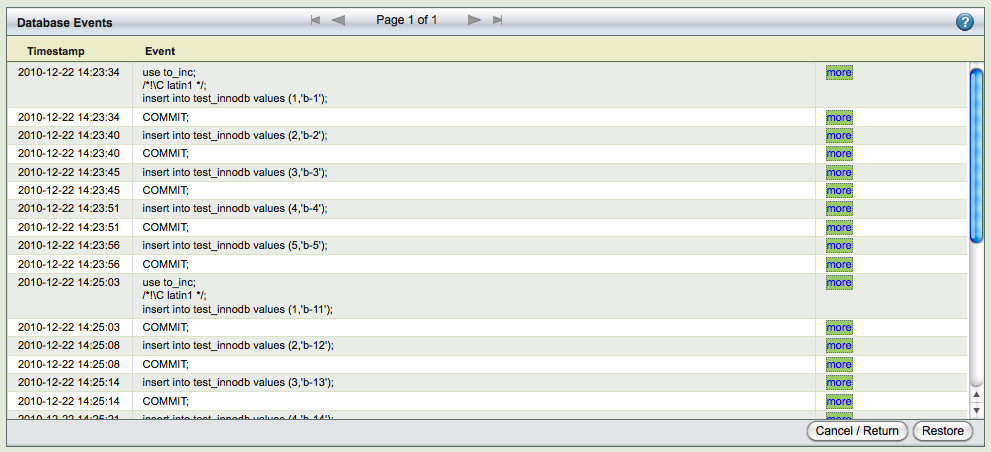 |
Show selected events button shows all the selected events in one page as shown above. This can be used to review selected events and confirm the restoration process. Clicking Go in the Database event report or Restore in the selected events page takes you to Restore What page to continue with restoration process.
Selective restores should be performed carefully. Otherwise, there can be restoration failures or data loss. Few important points that user must be aware of:
- ZRM does not have capability of verifying if the selected events for restoration or the undo operation makes sense from the database or the database application. It is up to the user confirm that the restoration of events will keep the database consistent from application point of view and there will be loss of data.
- While performing selective restore, database constraints should be met after selective restoration. Selective restore can fail due to database constraints.
- The mysql user used for restoration (defined in Backup What page) should have privileges to perform the selected events being restored. The privileges should be granted to the user before attempting restoration.
- Selective restoration depends on the time to be in sync between the ZRM server and MySQL server in case of remote MySQL servers. Otherwise, correct events may not be restored.
This report page provides information about backup images who have been purged because they are no longer within retention policy. This information can be used in case the ZRM is integrated with Netbackup or TSM or Network backup software. This will allow to get backup images that are stored in different device (i.e, not under control of ZRM). This report provides information about all backup sets (irrespective of which backup set is selected). It also provides information when the backup image was deleted on the selected date in the calendar. Backup Date is the backup image creation date i.e, time stamp of the backup run. The Purged Backup Dir is the location of the backup image from where it was removed. Retention Policy of the backup image and Backup level are also available. 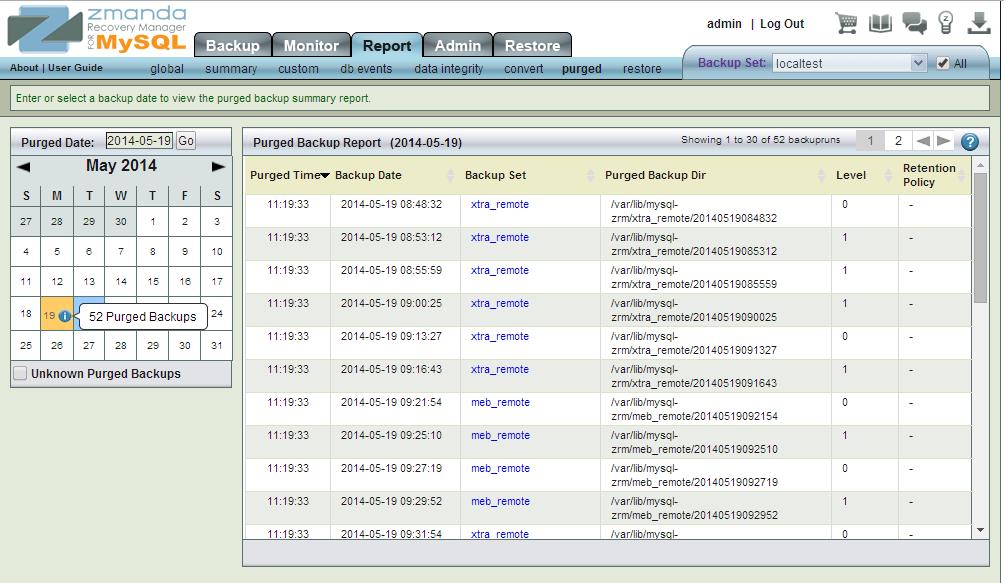
This report provides a summary of all restore operations performed across all backup sets (irrespective of which backup set has been selected).
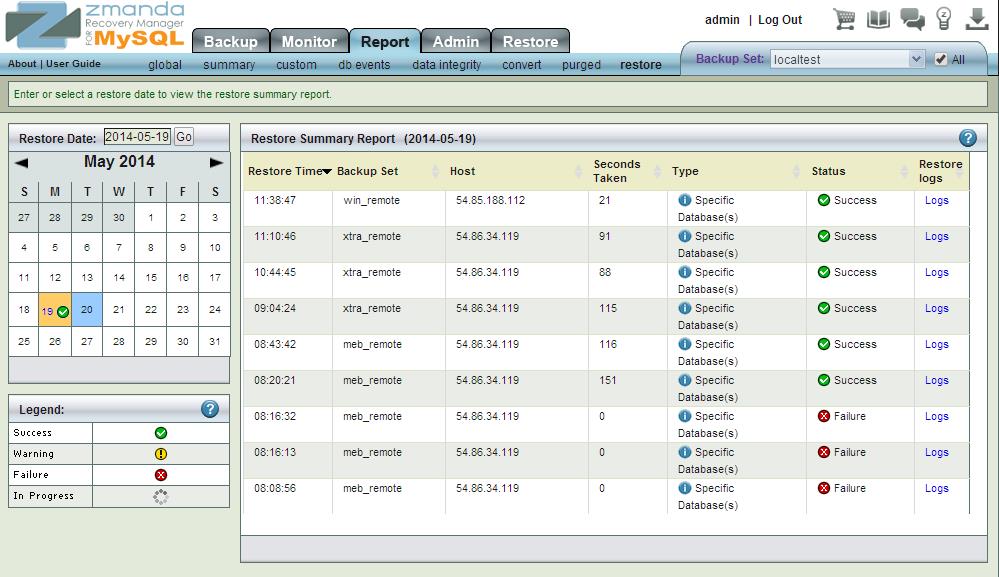
Select the date of restoration on the calendar. The Restore Time is the time when the restoration started. The Host is the MySQL server host to which databases/tables were restored to. Seconds Taken is the time taken in seconds to perform the restoration. The Status column shows the status of restore operation. You can click on Logs column to look at the restoration logs. You can find the details of restoration in the logs.
Only restores performed using the ZRM management interface are available in this page. Command line restores are not available in this report.
Backup image integrity report
The Data Integrity page provides a tool to query and confirm that the backed up data has not been altered since it was backed up. Verifying the integrety of data is important when you move a backup image from the hard disk to save space, and then move it back online in preparation for restoring it. In all circumstances, verifying the backup image is recommended before restoring databases from it.
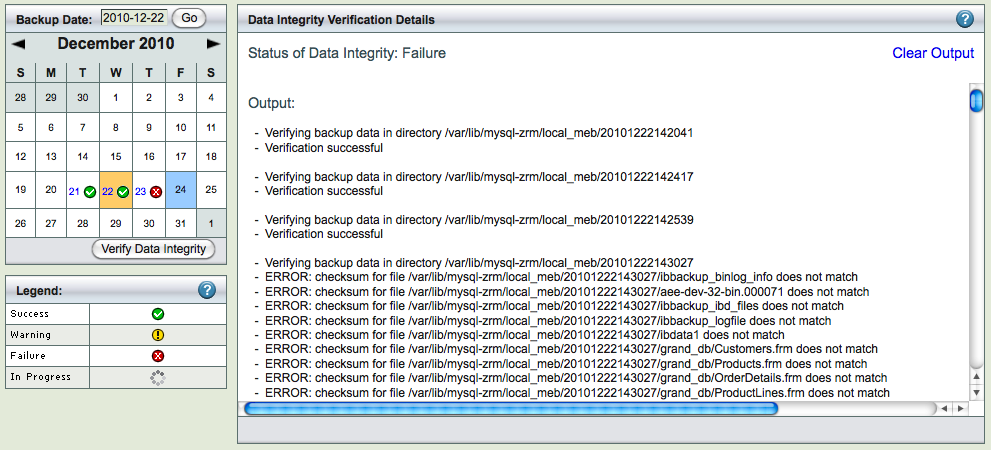
- The left panel contains a Calender Control that allows Users to navigate to the Backup Date when the backup took place.
- The right panel displays status and results of the verification process.
Clicking the Verify Data Integrity button starts the verification process. After you click the Verify Data Integritybutton, the right panel shows the progress and result of the verification.
When you open the page, the Status panel displays a message 'No Task launched' until you click the Verify Data Integrity button. The message changes to Running after you click Verify Data Integrity. The verification process assumes that the backed up data is present in the same directory where it was originally backed up. If the data is not present, the verification fails.
Note that Quick Snapshot backups involve no backup images (just snapshots), and therefore cannot be verified.
Convert Quick backups to Standard backups
This page displays any Quick (No-copy) backups that have been performed, allowing you to select and convert the quick snapshot to a standard ZRM backup stored on the ZRM server:
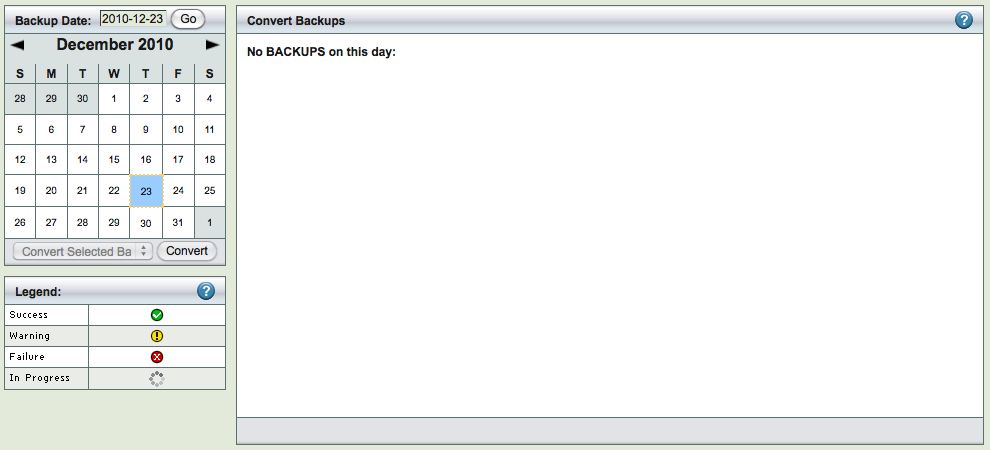
Quick snapshots and the reasons for converting them are described in Snapshots overview section. The Convert page is divided into two panels:
- The left panel contains a Calender Control that let you select a backup by date and time to convert. Backups are displayed in the calendar as indicated by the legend. Quick full backups are only displayed.
- The right panel displays the results of the verification process.
You can either enter the date (mm/dd/yy[yy]) and click Convert, or click on backup icon in the calendar. When you click Convert, ZRM for MySQL begins converting the backup for that date.
Clicking the Convert button starts the conversion. Status is displayed as described below. Note that once a quick snapshot has been successfully converted, it is no longer available for selection in the calendar.
ZMC User administration
The Admin Users provides a convenient way to create, edit, view and delete ZRM for MySQL users. It also lets you register ZMC users with the Zmanda Network. Please take the time to register users with the Zmanda Network; registration is required for accessing the Zmanda Network Knowledgebase from within the Zmanda Management Console.
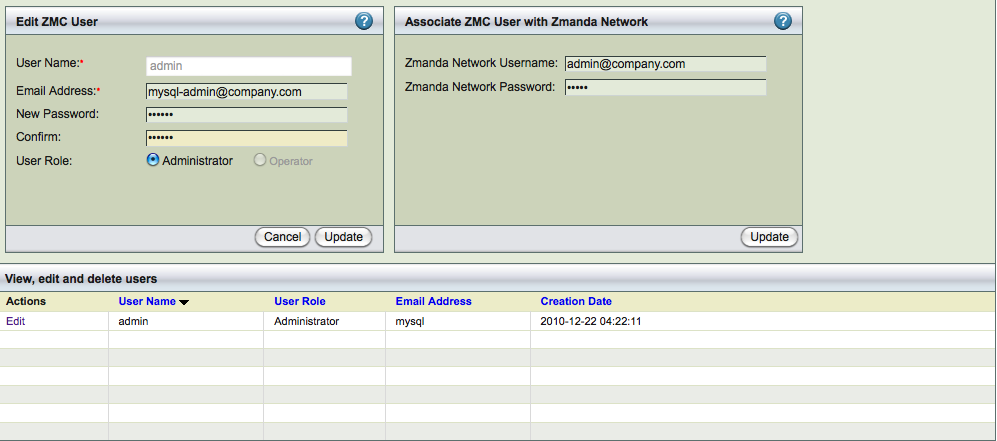
ZMC User
The default username is Admin, with a password of admin. You should change this upon first login. ZMC users are not linked to LDAP or Active Directory services.
- User name
- Choose a user name. The name can be any alphanumeric string. Dots (.) and dashes (-) are allowed; spaces are not.
- Email address
- This address will be used if the user's password must be recovered (see the Login page).It is important to configure the ZRM server to send emails. Otherwise, emails sent to this address will not be delivered.
- Password
- The ZMC user password. You must enter it twice for confirmation purposes.
- User Role
- ZRM for MySQL implements a Simple RBAC (Role Based Access Control) scheme: A user can either be anoperator or an administrator.
An administrator can:
- create backup sets and assign their ownership to anyone in the system.
- edit or delete backup sets owned by any other user in the system.
- see all events and all alerts.
An operator can:
- Create backup sets owned by that operator.
- Edit or delete backup sets owned by that operator.
- See all alerts, but only the events attached to the backup set owned by that operator.
Associating with Zmanda Network
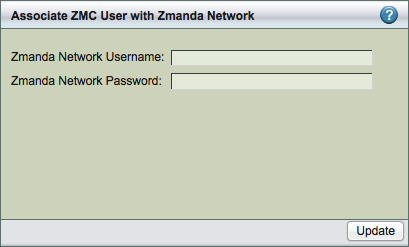
- Zmanda Network username and password
- These fields lets you associate the ZMC user with an existing Zmanda Network login ID. Enter the username (i.e., the email address) and password that were provided during Zmanda network registration. Click the Addbutton to validate the Zmanda network login details. If the login credentials are correct (i.e., they match those in the Zmanda Network), the change is updated on the ZMC user list.
Editing/Deleting ZMC User
All Users can edit their own password and email address; only users with administrator privileges can edit or delete another user's account.
Managing Backup Sets
The main functionality of the Admin Backup Sets page is to create, edit, delete backup sets. It also provides a way to duplicate backup set configurations.
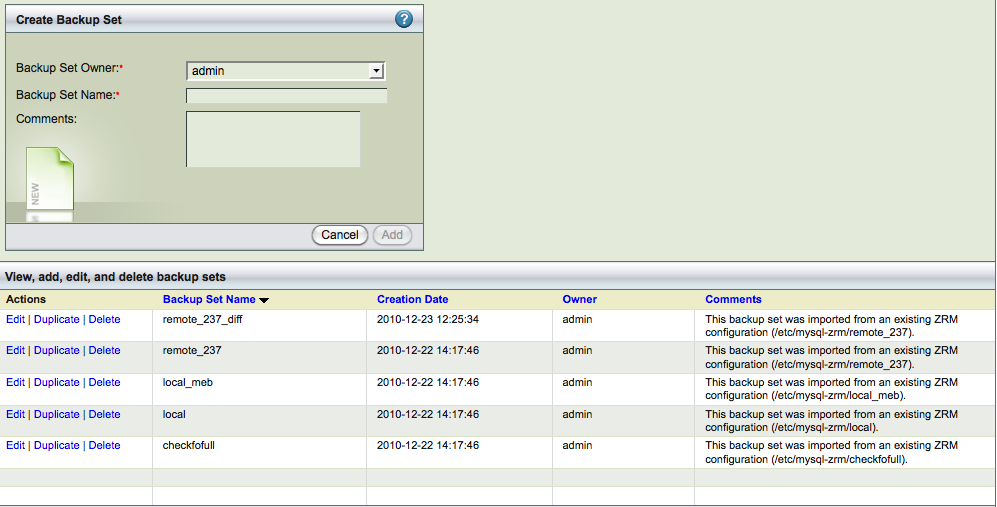
- The top panel, Create Backup Set and Comments, lets you create backup sets along with comments.
- The bottom panel, View, duplicate, edit and delete backup sets, lets you manage backup sets.
Backup Set Creation
- Backup Set Owner
- Specify which ZMC user owns the backup set. By default, the owner is the user who created the backup set. All users can transfer their ownership to another user by editing the backup set and clicking the Updatebutton.
- Backup Set Name
- Specify an unique and descriptive name for the backup set. The name can include any alphanumeric characters, along with periods and dashes (as long as they are surrounded by alphanumerics; for example: admin-backup is allowed, whereas admin--backup is not). Spaces are not allowed.
- Comments
- Enter an optional comment that describes the purpose of the backup set.
- Click Save to create the backup set. After it has been saved, it will be added to the list of backup sets. Other than name and comments, it will inherit all of its settings and options from the Site Settings page. Note that if the backup set list consists of multiple pages, you will have to page to the end of the list to see the new backup set.
Modifying Backup Sets
The Duplicate, Edit and Delete links let you manage the backup set list. Click on the appropriate link to the left of the backup set to perform the operation.
- Duplicate a backup Set
- Adds a duplicate copy of the given backup set to the bottom of the list. This allows you to create a backup set that inherits its properties from the source backup set rather than the Set Site Defaults page. Duplicate sets are named after the original, with the _copy suffix appended. Edit the backup set as necessary to meet your requirements.
- Edit Backup Set
- Click to edit the given backup set.
- Delete Backup Set
- Removes the given backup set (and all its settings) from the ZMC. The ZMC will prompt for confirmation; proceed with caution as there is no way to undo the deletion. If you attempt to delete a backup set that is active (i.e., selected from the Backup Set dropdown at the top right of the page), the ZMC will take you to theCreate a New Backup Set page after confirmation, otherwise you will remain on the Admin Backup Sets page. Note that deleting a backup set has no affect on backups already completed using that set or the backup images.
Set Site Defaults
The Set Site Defaults specifies the global default values for backup sets. Setting the appropriate defaults for your site will make backup set configuration much easier. Changes set here take effect when the next backup run is executed.
If you have multiple MySQL servers backed up by ZRM, you should store all parameters common to all MySQL servers as site defaults. These values are inherited by all backup sets. You can configure MySQL server specific information such as IP address of MySQL server in the backup set configuration.
Backup Summary provides information about the configuration parameter value and where it was set - Factory Settings (ZRM default value), Site Defaults (Set in Set Site Defaults page) and Backup Set (Set in Backup What/Where/When/How pages).
The values can be modified by Administrator user.
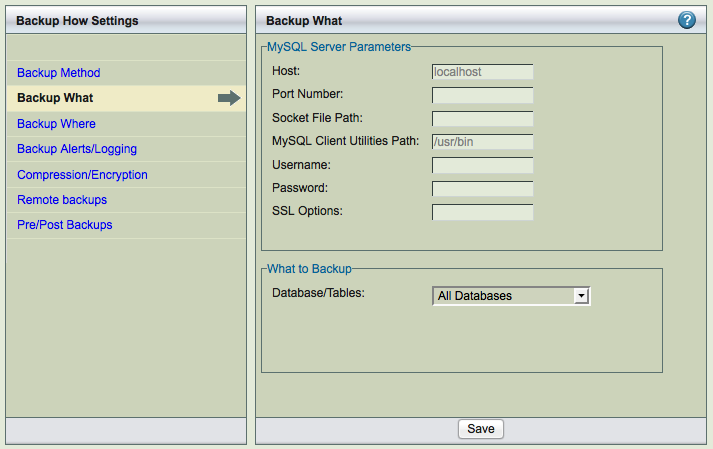
Admin Preferences
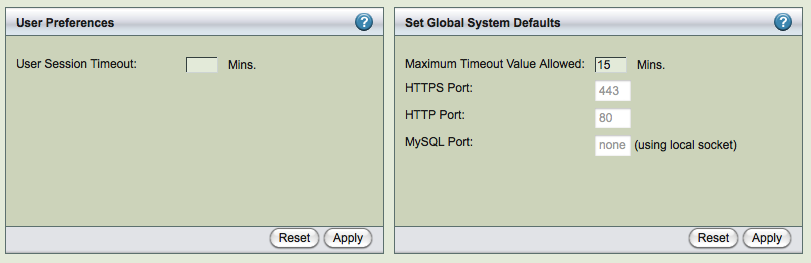
The Admin Preferences page lets you set the user and session timeouts and look at the ports used by ZMC Apache processes and MySQL processes.
- User session timeout
- Set the number of minutes you (i.e. the user who is logged in to ZMC) is allowed to stay logged in with no activity. The default is 0, which allows the user to stay logged in the maximum number of minutes allowed by the Session Timeout setting (described below). The user session timeout cannot exceed the session timeout.
- Maximum Timeout Allowed
- Set the number of minutes any user is allowed to stay logged into the ZMC. The default is 15 minutes, with a maximum of 300 minutes allowed. The setting takes effect upon the next login. A long session timeout value (for example, over an hour) can have security implications, so excercise caution in setting the value too high.
- HTTP, HTTPS port
- Ports used by Apache web server. This is a display field. To change the value, please see the Zmanda Network Knowledge Base how to article.
- MySQL port
- ZMC MySQL services do not accept requests from TCP/IP port. All communication is done using local socket file.
ZMC services status
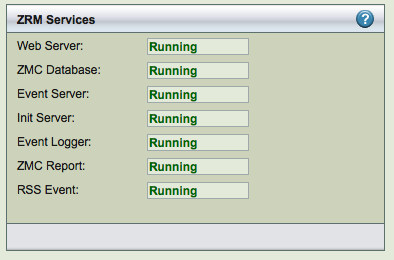
The Admin Services page shows the status of all ZMC processes. There are multiple components of Zmanda Management Console. All components have to be in running state for Zmanda Management Console to function correctly. The "running" state does not imply that they are consuming CPU/Memory resources. It implies they are waiting for requests.
ZRM License status
ZRM Enterprise product is a licensed product. The license file can be downloaded from Zmanda Network. The license file should be stored in the ZRM server. This page (shown below) shows the licensed quantities, subscription time and how they are used.
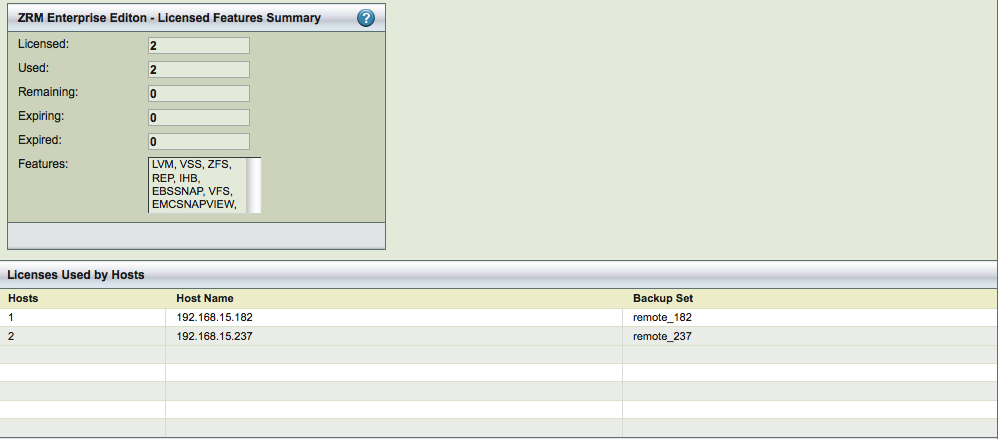
The Licensed Features Summary panel shows the features that are licensed. All features and MySQL servers Hosts are licensed for the subscription period.
Licensed
The number of MySQL servers (IP addresses) that can be backed up by this ZRM server that have valid subscription.
Used
The number of MySQL server licenses used by backup sets
Remaining
The number of MySQL server licenses ununsed.
Expiring
The number of MySQL server licenses expiring in next 30 days
Expired
The number of MySQL server licenses that have expired
Features
The list of licensed snapshot features
Licenses Used by Hosts table shows the list of MySQL server Hosts, their IP addresses and the backup sets that configured for the MySQL server.
Restore What
This is the first step in the restoration process.
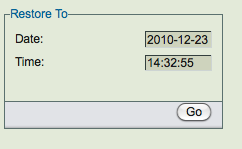
- Restore To
- If you came to this page using one of the report links (which is recommended), the date and time will be filled in based on the link that you clicked to get to this page. Otherwise enter a date and time to match the date and time you want the backup restored to.
- Go
- After you click Go, the ZMC validates your entry by looking for an existing backup and displays more options as appropriate. These options are described in the sections that follow.
Restore From
If users are restoring from a Full Backups and no incremental backups exist, then the backup set just prior to the time entered will be used to restore the data.
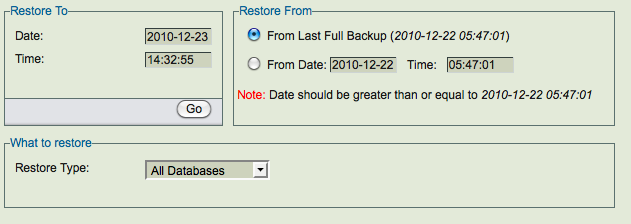
When incremental backups exist, ZMC for MySQL provides the ability to restore till the specified time. One of the more common reasons for a restore is to roll back the database to the point before a particular event (such as a mistake or malicious activity) damaged the database. In that case, you should use the Database Events viewer to launch the restore, and all of this information will be automatically prefilled on the Restore What page.
If the Restore from time is not specified, ZRM restores the most recent full backup and also looks at the subsequent incremental backup for transactions to restore to fulfill the user-specified Restore to time.
For example: A full backup was completed on Oct 8 at 16:17:29 and the next incremental backup occurred on Oct 8 at 18:00:00. If you specify a Restore to time of Oct 8, 16:17:29 and do not specify a "restore from" time, ZRM restores from the full backup dated Oct 8, 16:17:29 and all transactions that are present in the next incremental backup (Oct 8, 18:00:00) that occurred at Oct 8, 16:17:29.
What to Restore
- All Databases
- When the default choice, All Databases is accepted, the GUI does not change any further. Note that in this context the term All Databases means all the databases that have been backed up as part of the current backup set; such a restore could be all databases, selected databases, or selected table(s).
- Specific Database
- Choose this option to display the list of databases backed up within the set.
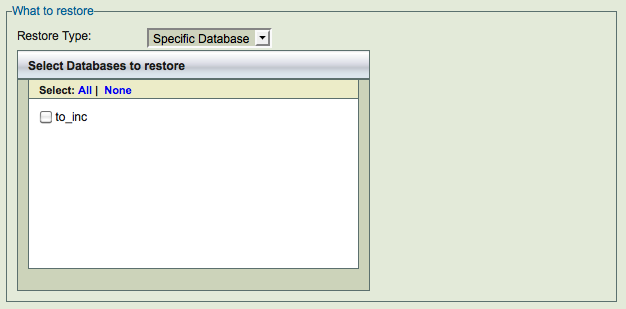
Specific Tables
This option of restoring specific tables from a database backup is available only for backups performed using logical or parallel logical or Xtrabackup tool.If you have performed logical or parallel logical backup, there are no restrictions.If you have performed backup using Xtrabackup tool, you can restore a table from a database backup to Percona MySQL server running XtraDB engine. For this functionality, innodb tables should be stored in separate data files i.e,innodb_file_per_table must be specified in my.cnf MySQL configuration file during the backup and requires innodb_expand_import to be enabled on the destination Percona server running XtraDB engine. See Percona documentation for the requirements.
Restoration involves the importing the table to the Percona MySQL server and this step has to be performed manually. You can perform the import only to Percona MySQL server.
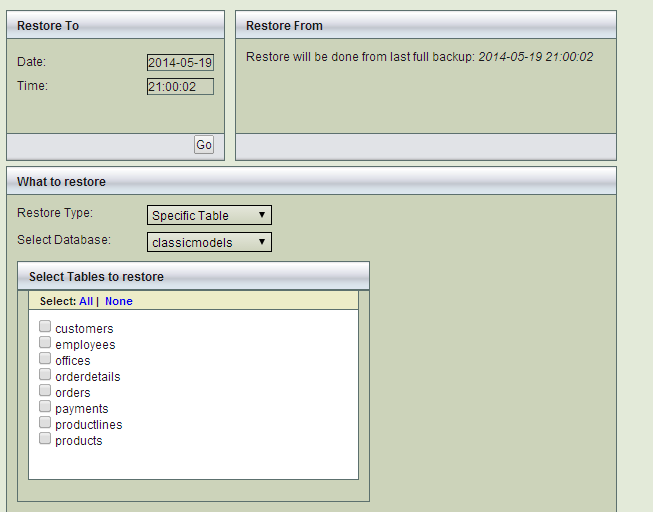
The above figure shows customers table from the classicmodels database has been selected for restoration. The Restore Type Specific Table will appear only for backups performed using Logical or Parallel logical or Xtrabackup tool.
You can select to restore a table from the backup images if you are backing certain backup methods. If you are using parallel logical backup using MyDumper command, you can restore a specific table. You can do specific table restoration from full backups done using Xtrabackup command. When you restore specific tables, stored procedures, views and triggers that are backed up will not be restored.
If you are performing table level restores of logical or parallel logical backups done using earlier releases of ZRM, you will have to run following command as mysql user on the ZRM server before restores can be performed.
$ /usr/bin/mysql-zrm-parse-sql --source-directory <backup image directory>
--update-table-list
- Clicking Next Step button Initiates an error checking routine, first checking that the Go button has been clicked first. If the Go button has not been clicked, you are prompted to do that. You must correct any errors displayed by clicking Go before you can proceed to the next step. If there are no problems, clicking Next Step takes you to the Restore Where page, with parameters in the Restore What page saved and transferred to Restore Restore page.
Restore Where
The Restore Where page lets you specify where the database is to be restored: either the original source, or to some other machine (Database or Table name cannot be changed).
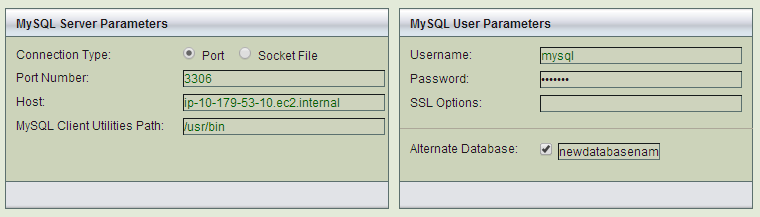
These are the same fields on the Backup What page MySQL Server Parameters panel describe here. As noted, you can fill them out to connect to the original database (in other words, with the same values used in the Backup What page), or fill them out to point to a different server. Click Next Step when you are done.
If you are restoring a database from logical or parallel logical backups, you can change the name of the database being restored. Please provide the name of the database in the Alternate Database field.
If you are restoring selected databases/tables (especially with InnoDB storage engine) and have not used Xtrabackup as the backup method, do NOT restore to MySQL server that already has other innoDB tables. MySQL server may not start after the restoration. You should restore to a temporary MySQL server or restore the complete backup set that was running on the original MySQL server. If you have used Xtrabackup as backup method, you can restore InnoDB tables to a Percona MySQL server that already has other InnoDB tables.
If you are restoring backup images created using MySQL Enterprise Backup tool to a MySQL server, you must have the same data file configuration as the original MySQL server i.e, innodb_data_file_path and innodb_data_home_dir values must be identical to the original MySQL server.
EBS snapshot restore parameters
In addition to other restore parameters, restoration from Amazon Elastic Block Storage snapshot full backups requires the target Amazon EC2 instance id to where the snapshots are restored to. ZMC also provides an option to change device mapping from the original backup. Device mapping maps how the EBS volumes and mount points on the original Amazon EC2 instance which was backed up. For example: the mapping at the time of backup could be:
  /innodb_data : /dev/sda
  /db : /dev/sdb
  /innodb_logs : /dev/sdd
It could be changed at the time of restoration on the restore target EC2 instance. ZRM remembers the original mapping as part of the backup image.
If you are changing the mount points at the time of restoration, you should provide next available device in lexicographic order. For example: If the system has "/dev/sda,/dev/sdb,/dev/sdc" devices, the customer must enter the next device name in lexicographic order - /dev/sdd. In newer kernels, the device names have "xv" prefix instead of "s" prefix. So, in newer kernels, if the system has devices attached as /dev/xvda, /dev/xvdb and /dev/xvdm, then you should enter "/dev/xvdc" since its available and is the next in lexicographic order.
The snapshots are restored and incremental backups are replayed on the target EC2 instance. If there are EBS volumes already mounted at the mount point, the restoration will fail. To prevent this, Check Unmount Existing to allow ZRM to unmount existing volumes before restoration of full backups.
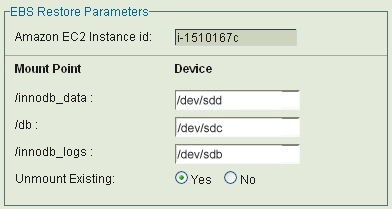
Above panel appears only when the backup being restored contains Amazon EBS snapshots.
Restore How
The Restore How lets you set some operational details for the restore. If you have set the global settings appropriately in the Site Settings page, you can just use the default values for the controls on this page.
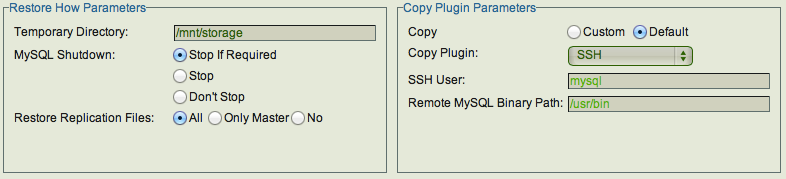
- Temporary Directory
- ZMC creates temporary files and directories during restore on ZRM server or MySQL server depending on the backup method used. Disk space usage and default values of this parameter are discussed here.
- MySQL Shutdown Options
- The 'MySQL Shutdown' radio buttons let you specify whether the MySQL server should shut down during the restore process.
The options are:
-
- Stop if required - MySQL server will be shutdown only for Full raw backup restoration.
- Stop - MySQL server will be shutdown before files are restored. MySQL server will not be shutdown in case of Full logical backup restoration and incremental log backup restoration.
- Don't stop - MySQL server will not be shutdown. This option is not recommended for full raw backup restoration.
- Restore replication files
- Set this parameter if you are restoring a backup taken from one replication slave to another MySQL server to create a new slave. You can set the parameter to restore all files (master.info, relay-bin.log files, SQL_LOAD*) or restore only master.info file or none of the replication files.
- The relay-bin.log are not restored when incremental backups are restored. When the replication is restarted, the slave will start replicating from the full backup timestamp from the master. You can replay the replication logs to the time of incremental backup by running the following commands from the master server:
mysqlbinlog <backup-directory>/slave-log | mysql -h <slave-machine>
Copy Plugin Parameters
If performing a restore to a remote MySQL server, specify the mechanism used to transfer files between the local ZMC server and the remote MySQL server. The recommended location for plugins is the /usr/share/mysql-zrm/pluginsdirectory.
- Copy Option
Lets you select whether to use a Copy Plugin during the restore process. Set the 'Copy' radio button to Yes to opt for the Copy plugin. If the 'No' option of Copy is selected then rest of the input boxes in the panel can be ignored.
- SSH
- This plugin uses the Secure Shell protocol to transfer files between the MySQL server and the ZRM server. Since SSH is being used, the data transfer is secure. Unless you have set up SSH keys for the MySQL restore user, you will be prompted for a password when restoring from the backup set.
- SSH User
- SSH user name
- Remote MySQL Binary path
- Specify the path on the remote MySQL server under either of the two options.
- Socket
- The socket based plugin is called socket-copy.pl. The socket copy plugin requires MySQL ZRM socket server package to be installed on all MySQL servers. The socket-server package installs xinetd/inetd socket server service and restarts xinetd/inetd.
- The socket copy plugin uses the TCP protocol to transfer data between the MySQL server the ZRM server. It uses port 25300 by default on the MySQL server. You can change the port using the field displayed after you select the socket copy plugin.
Socket Remote Port
- Enter the port you wish to use.
- Specify the path on the remote MySQL server where the MySQL binary commands are installed.
- Windows
- The Windows copy plugin is required for restoring any Windows-based MySQL server. It requires the ZRM for MySQL Windows client components described in the Installation Instructions. You must then enter the communications ports to use during restore (default is 10081) operations, and the retry count.
- The retry count specifies the number of times ZRM will attempt to restore a raw backup in case shutting down the MySQL server takes more time than expected. Hence ZRM will only attempt to retry for the restore of the very first file that is attempted to be restored. The default value is 2.
Clicking the Next Step button at the bottom takes you to the Run Restore page.
The Run Restore page lets you launch and monitor the restore process that has been selected in the previous dialogs.
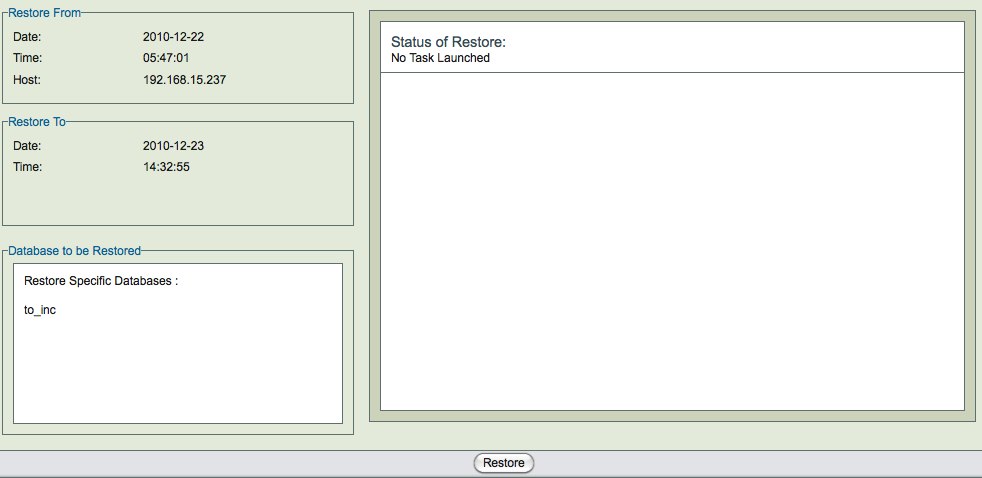
The three panels on left side (Restore From, Restore To, and Database to be Restored) of the page contain the data previously gathered. Note the the Restore To host is displayed only if it differs from the the Restore From host.
The restore process uses disk space under the temporary directory configured in the Backup Where page. The amount of disk space required depends on the number of backup images required for restoration and the backup method used.
Restores can take a long time if the database is large. The status of the restore process is shown in right hand panel. The restore process can be cancelled using the Cancel link that appears in the right hand pane. ZRM will cancel the restore process only when it is safe to do so (i.e, will not cause data corruption or loss of data).
Restore task can be cancelled:
- Before restore process starts
- When waiting for user input
- Between restoration of images i.e, i.e, between full backup restoration and incremental backup restoration and between incremental backup restorations.
Only the process running on the ZRM server are stopped during cancellation. All processes on the MySQL server may have to be stopped manually.
After restoration, it is important to check the database(s)/table(s) that were restored. SQL command CHECK TABLE can be used for consistency checking. Use of EXTENDED option is recommended. EXTENDED option does a full key lookup for all rows in the table and will take significant time for a large database.
mysql> CHECK TABLE <table1>, <table2> EXTENDED;
No other application can be using the database during table consistency check.
When you are restoring databases with InnoDB tables to a MySQL server that already has InnoDB tables, the common InnoDB files are overwritten (ib_data and ib_logfile*). ZRM displays a warning message :
Backup directory contains InnoDB data and InnodDB log files, During the
restore process these files will be overwritten on target MySQL server. You may
loose the existing data from the MySQL server. Are you sure you want to
continue the Restore?
It is important to make sure there are no InnoDB tables in the MySQL server being restored to. Please see restoration of InnoDB tables section below for an alternative.
Restoring to a MySQL replication slave
This procedure can be used to instantiate a MySQL slave.
You need to follow the procedure from the MySQL manual on how to set up replication. Instead of steps 3 and 5, you can use ZRM backups of the master server to restore the data to the slave server in step 5.
After restoring data to the replication slave either from backup images of MySQL master or another MySQL replication slave, you need to set up configure master server information on the slave.
Perform MySQL CHANGE MASTER TO command on the replication slave as shown below
mysql> CHANGE MASTER TO
    ->     MASTER_HOST='replication_master_host_name',
    ->     MASTER_USER='replication_user_name',
    ->     MASTER_PASSWORD='replication_password',
    ->     MASTER_LOG_FILE='value from next-binlog parameter from ZRM reports',
    ->     MASTER_LOG_POS=0;
MASTER_LOG_FILE
This value can be obtained from ZRM reports for the backup that was restored. Use ZRM Custom Reports page and look at Next BinLog parameter for the backup run.
MASTER_LOG_POS
The master-log-position will be zero because logs are rotated when backups are performed.
Restoring a table from a database backup
If you have performed backup using Xtrabackup, you can restore one or more InnoDB table(s) from a database backup. You should selected the tables for restoration in the Restore Where page. ZRM restore process exports the innoDB tables.
The exported innoDB tables will have to be manually imported into Percona MySQL server. These steps will have to be performed manually and are documented in the Percona manual (version 5.5). Similar feature is available for MySQL 5.6.
Using the Zmanda Troubleshooting Scripts
Licensed users can collect and send troubleshooting information directly to the Zmanda Support Team using convenient scripts located on ZRM servers and Windows clients.
Running the Support Script on the ZRM server
ZMC includes a support script that gathers various logs helpful for troubleshooting. It includes options for mailing the logs to the Zmanda Support Team (e-mail must be configured and running on the ZRM server).
To start the script, log in as root and run the following commands:
# cd /opt/zmanda/zrm/bin
# ./zm-support
This generates an archive of all the log files in the current directory. The automatically-generated file name will be displayed at the end of zm-support run:
...

/opt/zmc/logs/zmc_gui_debug.log
/opt/zmc/logs/zmc_gui_errors.log
/opt/zmc/logs/zmc_installer_16904.log
/opt/zmc/logs/zmc_server.log
/opt/zmc/mysql/data/mysqld.log
/opt/zmc/apache2/logs/access_log
/opt/zmc/apache2/logs/error_log
/opt/zmc/apache2/logs/httpd.pid
/opt/zmc/apache2/logs/NOTEMPTY

Please send this log file -> zm-logs-ZmandaNetworkAccountID-LogID.tar.g
You can email the file using your regular e-mail mechanism.
Alternatively, use zm-support --ship-to-zmanda to send the logs, assuming e-mail is configured on the Amanda server.
zm-support Options
The --help option generates a usage message. Options are detailed below.
- --config ConfigFile1 [, ConfigFile2...]
- Specifies configuration files to include in the archive. By default, all configuration files are archived.
- --skip-config ConfigFile1 [, ConfigFile2...]
- Same as above, except this specifies configurations to exclude.
- --no-zmc
- Excludes ZMC and related information from the archive.
- --no-amanda
- Excludes Amanda and related information from the archive.
- --no-mysql-dump
- Excludes the ZMC mysql database from the archive.
- --no-mysql-zrm
- Excludes the ZMC mysql-zrm log files from the archive.
- --no-var-log-messages
- Excludes the /var/log/messages file from the archive.
- -f or --ftp-to-zmanda
- Automatically transfer the archive to Zmanda Support using ftp.
- -ship
- Automatically mails the archive to Zmanda Support.
- --no-tar
- Rather than creating an archive, create a system information file (system-info-timestamp) in the current directory, and list the configurations and logs that should be examined or sent to Zmanda Support.
- -v
- List the files as they are gathered. The default to operate silently.
- --help
- Display a usage message
Running the Windows Client Support Script
The zwc-support utility collects system log files, log files related to ZWC and system related information. The utility then archives these log files into a single compressed file. This compressed file can be then sent to the Zmanda Support team for analysis.
Location
The Zmanda Client for Windows support utility zwc-support.bat gets installed when you install the Zmanda Client for Windows. The default location of the utility is C:\Program Files\Zmanda\Zmanda Client for Windows\bin.
Files Gathered
The following types of log files are gathered by zwc-support:
Zmanda Client for Windows Installation Logs
- C:\amanda_install.log
- C:\amanda_uninstall.log
- C:\Program Files\Zmanda\Zmanda Client for Windows\Debug\LogFile.txt
Zmanda Client for Windows Debug Logs
- C:\Program Files\Zmanda\Zmanda Client for Windows\Debug\LogFile(n).txt
- Zmanda Client for Windows configuration info
System Logs
- System-info
- Application and System Logs
Additional information
- Files and Folders count on all the drives.
- Environment variables list.
Output File
After the utility is run, an output file with the name zwc-logs-datetimestamp.cab is created in the Zmanda installation directory.