Table of contents
- 1. Introduction
- 2. Restore What Page Overview
- 3. Restore What Page - Main Functionalities
- 4. Restore What Page - Procedure
- 4.1. Restore Settings panel
- 4.1.1. Backup Date
- 4.1.2. Backup Time
- 4.1.3. Initial Host
- 4.1.4. Initial Directory
- 4.1.5. Explore Button
- 4.2. Select directories/files panel
- 4.2.1. Double Arrow Buttons
- 4.2.2. Next Step
- 4.2.3. Up Button
- 4.1. Restore Settings panel
- 5. Next Steps
RESTORE WHAT
Introduction
- 'Restore What' is the first step in the restore process in Zmanda Management Console.
- Note that the terms 'restore' and 'recovery' have the same meaning in 'ZMC'.
Restore What Page Overview
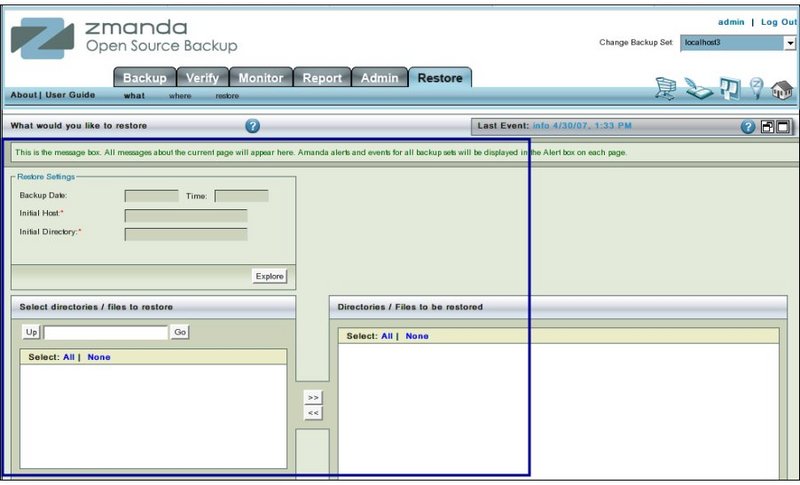
- Like all other functional pages of ZMC, the Restore What page has its main functionality in the center, while other common-to-most-pages functionalities are grouped at the top of the page.
- Explanation of common functionalities enclosed in a light blue rectangle at top in Fig. 1 can be found on Common Functionality page.
- In the image above,the main functionality area is enclosed in the lower Navy Blue rectangle.
Restore What Page - Main Functionalities
- The main functionality of the page is to allow users to select what to restore.
- This selection could be as simple as a single file or a single directory or all directories/files under a single directory.
- Selecting what to restore is a two step process.
- In the first step the Restore Setting panel guides users through the first step of a broad definition of what is to be restored.
- The Explore button takes you to the second panel where detailed information of what is to be restored can be selected.
Restore What Page - Procedure
Restore Settings panel
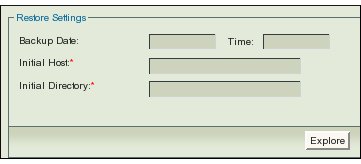
Backup Date
- It is not compulsory to enter any data in the Backup Date field.
- However, if a Backup date is entered then a Backup Time should also be entered.
- The time can be found by going to Report Summary page where the time of each backup run is displayed in the right hand panel in the second row named 'Timestamps'.
- Do not round up the time in minutes because it has exceeded thirty seconds. Seconds are to be ignored.
- Users are expected to enter the Backup date in the format MM/DD/YYYY.
- If users leave the Date and Time fields blank and enter the two remaining fields properly, users will get the image of the backed up data as of the current date and time .
- If users enter a date on which no Backup was run, users will get an error message that starts with "Error while attempting to read an index file....".
- It will also inform users that no index file exists for that date.
Backup Time
- It is not compulsory to enter any data in the Backup Time field.
- However, if a Time is entered, then a Date should also be entered.
- Users are expected to enter the Backup time in the format HH:MM.
- If any other format is used, the GUI will throw an error and point out the expected format.
- The time can be found by going to Report Summary page where the time of each backup run is displayed in the right hand panel in the second row named �Timestamps”.
- The time is not be rounded up on account of seconds. They are to be ignored.
- If users leave the Date and Time fields blank, users will get the image of the backed up data as of the current date and time .
- If users enter a date and time on which no Backup was run, users will get an error message that starts with "Error while attempting to read an index file....".
- It will also inform users that no index file exists for that date.
Initial Host
- Users have to enter the host name here.
- It must be exactly the same as users have entered on the Backup What page while creating the Backup Set.
- Users can copy/paste the data from that page to here.
- On subsequent attempts, most browsers will automatically display the host name once the first few characters that make it a unique name have been entered.
Initial Directory
- Users have to enter the same name that was entered on Backup What page while creating the Backup Set.
- Users can copy/paste the data from that page to here.
- ZMC regards the directory '/tmp' as being different from the directory '/tmp/'.
- It treats the ending slash in the directory name as a distinguishing mark.
- On subsequent attempts, most browsers will automatically display the host name once the first few characters that make it a unique name have been entered.
TIP
If a Directory is missing in RestoreWhat page bottom panel, check on BackupWhat page as to how you entered its name there.
Explore Button
- The Explore button acts as a link between the initial host and directory that are entered in the Restore Setting panel and the the detailed files that will be displayed below it in Select directories/files panel. This panel is in the lower left hand side of the page.
- If there are any errors in entering the data in the Restore setting panel, they will be caught when users presses the 'Explore' Button.
- If everything has been properly entered, Explore Button will populate the 'Select directories/files panel below it.
Select directories/files panel
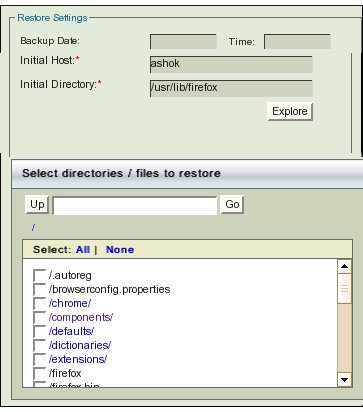
- In the list in the lower panel, Files are shown in black color, while Directory names are shown as hyper links.
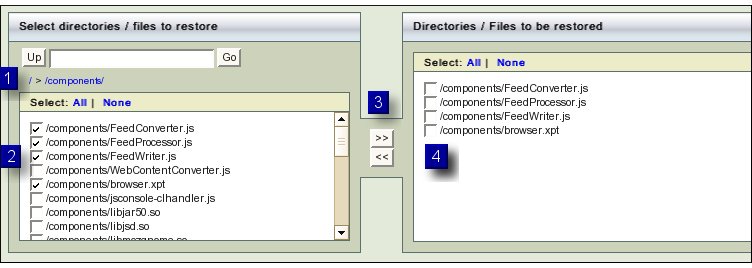
- Clicking the hyper link will open the lower level directory. It will also show the upper level directory in the pane(No 1 below).
- In the left panel all the lower level files/directories are displayed.
- In Fig. 4 some files check boxes have been ticked(No 2 above).
- To select all the files displayed, click the Select All hyper link in the panel.
Double Arrow Buttons
- Then the upper Double Arrow Button (No 3 above) has been clicked to transfer their names to right hand side panel.
- Note to remove a file from the list of files to be restored, check it and then click the lower Double Arrow Button.
- To remove all the files from the list, click the Select All hyper link in the right hand side panel and then, click the lower Double Arrow Button.
Next Step
- Here, ticking the Check boxes (No 4 above) and then Clicking the 'Next Step' Button at the bottom of the page will take users to the Restore Where page.
Up Button
- Clicking the 'Up' button in panel No 1 above will bring users back to the parent.
- Entering a directory path in the text box in panel No 1 above and clicking the 'Go' button will take users to the appropriate directory opened in the lower panel (No 2 above.)
Next Steps
- To continue the process of Restoring please click the Restore Where tab.